Send data from activity to fragment on android II

Send data from activity to fragment on android II
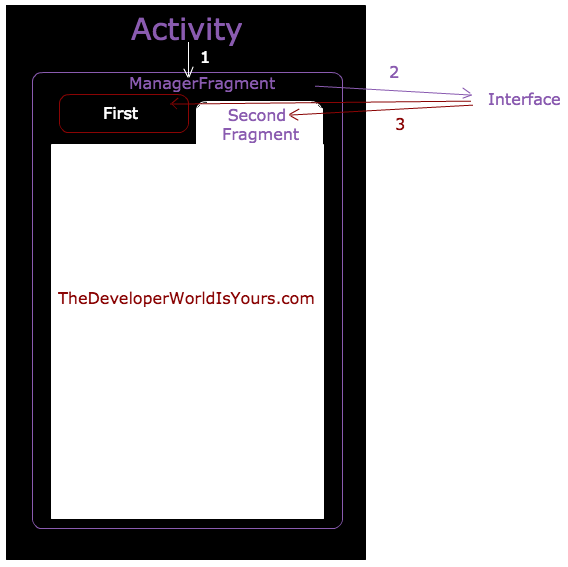
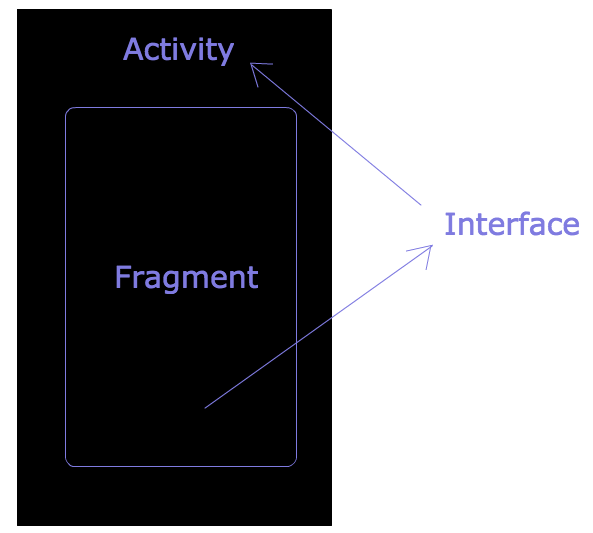
When it was instanceted of fragment, we can’t to pass data with parameter, The only way is to call fragment’s method from activity.

We need:
– Activity
– Fragment
We instance a fragment from activity. After that We will call a fragment’s method from the activity.

Complete code in github

You can check the activity.

package com.thedeveloperworldisyours.l;

import android.graphics.Color;
import android.support.v4.app.FragmentManager;
import android.support.v4.view.MenuItemCompat;
import android.support.v7.app.AppCompatActivity;
import android.os.Bundle;
import android.support.v7.widget.SearchView;
import android.util.Log;
import android.view.Menu;
import android.view.MenuItem;
import android.view.View;

public class MainActivity extends AppCompatActivity {

    private static final String TAG = "MainActivity";
    private MenuItem mSearchMenuItem;

    private SearchView mSearchView;
    private String mSearchString;
    private static final String SEARCH_KEY = "search";

    FirstFragment mFirstFragment;

    @Override
    protected void onCreate(Bundle savedInstanceState) {
        super.onCreate(savedInstanceState);
        setContentView(R.layout.activity_main);
        // if you saved something on outState you can recover them here
        if (savedInstanceState != null) {
            mSearchString = savedInstanceState.getString(SEARCH_KEY);
        }
        mFirstFragment = new FirstFragment().newInstance();
        replaceFragment();
    }

    // This is called before the activity is destroyed
    @Override
    protected void onSaveInstanceState(Bundle outState) {
        super.onSaveInstanceState(outState);
        mSearchString = mSearchView.getQuery().toString();
        outState.putString(SEARCH_KEY, mSearchString);
    }

    @Override
    public boolean onCreateOptionsMenu(Menu menu) {
        getMenuInflater().inflate(R.menu.menu_main, menu);

        mSearchMenuItem = menu.findItem(R.id.menu_main_action_search);

        mSearchView = (SearchView) MenuItemCompat.getActionView(mSearchMenuItem);

        customSearView();

        mSearchView.setOnQueryTextListener(new SearchView.OnQueryTextListener() {
            @Override
            public boolean onQueryTextSubmit(String query) {
                return true;
            }

            @Override
            public boolean onQueryTextChange(String newText) {
                mFirstFragment.refreshString(newText);
                return false;
            }
        });

        return super.onCreateOptionsMenu(menu);
    }

    public void customSearView() {
        SearchView.SearchAutoComplete searchAutoComplete = (SearchView.SearchAutoComplete) mSearchView.findViewById(android.support.v7.appcompat.R.id.search_src_text);
        searchAutoComplete.setHintTextColor(Color.WHITE);
        searchAutoComplete.setTextColor(Color.WHITE);

        View searchPlate = mSearchView.findViewById(android.support.v7.appcompat.R.id.search_plate);
        searchPlate.setBackgroundResource(R.drawable.background_search);

        mSearchView.setIconifiedByDefault(false);
    }


    public void replaceFragment() {

        try {

            FragmentManager fragmentManager = getSupportFragmentManager();
            fragmentManager.beginTransaction().replace(R.id.content_main, mFirstFragment, "tag").commit();

        } catch (Exception e) {
            Log.d(TAG, e.toString());
        }

    }


}

Complete code in github

Communicating between fragment and activity

Communicating between fragment and activity


The easiest way to communicate between your activity and fragments is using interfaces or parameters.

There are different ways to communicate:

*From activity to Fragment:

1. When it is instantiated, We can pass a parameter (Send data from activity to fragment in android)
2. When it was instantiated, We can call a fragment’s method from activity.(Send data from activity to fragment on android II)
3. When we use a TabBar with some fragments, We use a interface in our Adapter.(Communicating activity with fragments in TabBar)

*From fragment to activity:

1. When we need to communicate with activity from fragment, we use a interface. The idea is basically to define an interface a given fragment with onAttach(Activity activity) and onDetach(), and let the activity implement that interface.(Listener from fragment to activity)

Communicating activity with fragments in TabBar

Communicating activity with fragments in TabBar

We need
– Interface.
– Actvity.
– ManagerFragment.
– Adapter
– FirstFragment.
– SecondFragment.


Complete code in github

First Step

In our Activity we will call a Manager fragment

mManagerFragment.update(newText);

You can check the complete activity

public class MainActivity extends AppCompatActivity {

    private static final String TAG = "MainActivity";
    private MenuItem mSearchMenuItem;

    private SearchView mSearchView;

    ManagerFragment mManagerFragment;

    @Override
    protected void onCreate(Bundle savedInstanceState) {
        super.onCreate(savedInstanceState);
        setContentView(R.layout.activity_main);
       
        mManagerFragment = new ManagerFragment().newInstance();
        replaceFragment();
    }

    @Override
    public boolean onCreateOptionsMenu(Menu menu) {
        getMenuInflater().inflate(R.menu.menu_main, menu);

        mSearchMenuItem = menu.findItem(R.id.menu_main_action_search);

        mSearchView = (SearchView) MenuItemCompat.getActionView(mSearchMenuItem);

        mSearchView.setOnQueryTextListener(new SearchView.OnQueryTextListener() {
            @Override
            public boolean onQueryTextSubmit(String query) {
                return true;
            }

            @Override
            public boolean onQueryTextChange(String newText) {
                //sent to ManagerAdapter
                mManagerFragment.update(newText);
                return false;
            }
        });

        return super.onCreateOptionsMenu(menu);
    }


    public void replaceFragment() {

        try {

            FragmentManager fragmentManager = getSupportFragmentManager();
            fragmentManager.beginTransaction().replace(R.id.content_main, mManagerFragment, "tag").commit();

        } catch (Exception e) {
            Log.d(TAG, e.toString());
        }

    }
    
}

Now in Our ManagerFragment we received the string in this method

public void update(String string)

In Our Fragment we send the string from Manager To Adapter

public void update(String string){
        mAdapter.update(string);
    }

This is ManagerFragment

public class ManagerFragment extends Fragment {

    private ViewPager mViewPager;
    private TabsAdapter mAdapter;

    public ManagerFragment() {
        // Required empty public constructor
    }

    public static ManagerFragment newInstance() {
        ManagerFragment fragment = new ManagerFragment();
        return fragment;
    }

    @Override
    public void onCreate(Bundle savedInstanceState) {
        super.onCreate(savedInstanceState);
    }

    @Override
    public View onCreateView(LayoutInflater inflater, ViewGroup container,
                             Bundle savedInstanceState) {
        // Inflate the layout for this fragment
        View view = inflater.inflate(R.layout.fragment_manager, container, false);

        TabLayout tabLayout = (TabLayout) view.findViewById(R.id.fragment_manager_tab_bar_tab_layout);
        mViewPager = (ViewPager) view.findViewById(R.id.fragment_manager_tab_bar_pager);

        mAdapter = new TabsAdapter(getFragmentManager(), getActivity());

        mViewPager.setAdapter(mAdapter);
        tabLayout.setupWithViewPager(mViewPager);

        return view;
    }

    //received from Activity
    public void update(String string){
        //sent to Adapter
        mAdapter.update(string);
    }

}

Second Step

This is the most importa step
In Our adapter We receive from ManagerFragment

//received from ManagerFragment
    public void update(String string) {
        mGeneralString = string;
        //updated
        notifyDataSetChanged();
    }

And we sent to FirstFragment and SecondFragment

@Override
    public int getItemPosition(Object object) {
        if (object instanceof UpdateableFragmentListener) {
            //sent to FirstFragment and SecondFragment
            ((UpdateableFragmentListener) object).update(mGeneralString);
        }
        return super.getItemPosition(object);
    }

You can see the adapter

public class TabsAdapter extends FragmentStatePagerAdapter {

    public static final int TOTAL_TABS = 2;
    public String mGeneralString;
    public Context mContext;

    public TabsAdapter(FragmentManager fm, Context context) {
        super(fm);
        mContext = context;
    }

    @Override
    public Fragment getItem(int position) {
        switch (position) {
            case 0:
                return new FirstFragment().newInstance();

            case 1:
                return new SecondFragment().newInstance();
        }
        return null;
    }

    //received from ManagerFragment
    public void update(String string) {
        mGeneralString = string;
        //updated
        notifyDataSetChanged();
    }

    @Override
    public int getItemPosition(Object object) {
        if (object instanceof UpdateableFragmentListener) {
            //sent to FirstFragment and SecondFragment
            ((UpdateableFragmentListener) object).update(mGeneralString);
        }
        return super.getItemPosition(object);
    }

    @Override
    public int getCount() {
        return TOTAL_TABS;
    }

    @Override
    public CharSequence getPageTitle(int position) {
        switch (position) {
            case 0:
                return mContext.getString(R.string.fragment_first_title);
            case 1:
                return mContext.getString(R.string.fragment_second_title);
            default:
                return mContext.getString(R.string.fragment_first_title);
        }
    }
}

And our listener is a simple interface

 
public interface UpdateableFragmentListener {
    public void update(String string);
}

Third Step

In FirstFragment and SecondFragment we receive the string with our Listener,
We implement the listener

public class FirstFragment extends Fragment implements UpdateableFragmentListener{
//received from Adapter with our Listener
    @Override
    public void update(String string) {
        mTextView.setText(string);
    }

you can see the simple Fragment

public class FirstFragment extends Fragment implements UpdateableFragmentListener{

    TextView mTextView;

    public FirstFragment() {
        // Required empty public constructor
    }

    public static FirstFragment newInstance() {
        FirstFragment fragment = new FirstFragment();
        return fragment;
    }

    @Override
    public void onCreate(Bundle savedInstanceState) {
        super.onCreate(savedInstanceState);
    }

    @Override
    public View onCreateView(LayoutInflater inflater, ViewGroup container,
                             Bundle savedInstanceState) {
        // Inflate the layout for this fragment
        View view = inflater.inflate(R.layout.fragment_first, container, false);
        mTextView = (TextView) view.findViewById(R.id.fragment_first_text);
        return view;
    }

    //received from Adapter with our Listener
    @Override
    public void update(String string) {
        mTextView.setText(string);
    }
}

Complete code in github

Listener from fragment to activity

Listener from fragment to actvity

We need three things
– Interface
– Fragment
– Activity

Complete code in github

We create a simple Interface:

public interface InteractionListener {
    void onFragmentInteraction(String string);
}

Now in our fragment We need to use onAttach(Context context), called when a fragment is first attached to its context. In this method we init our listener

When the user click in button, we call our listener.

public class OurFragment extends Fragment implements View.OnClickListener{

    private EditText mEditText;
    private InteractionListener mListener;

    public OurFragment() {
        // Required empty public constructor
    }

    public static OurFragment newInstance() {
        OurFragment fragment = new OurFragment();
        return fragment;
    }

    @Override
    public void onCreate(Bundle savedInstanceState) {
        super.onCreate(savedInstanceState);
    }

    @Override
    public View onCreateView(LayoutInflater inflater, ViewGroup container,
                             Bundle savedInstanceState) {
        // Inflate the layout for this fragment
        View view = inflater.inflate(R.layout.fragment_our, container, false);
        mEditText = (EditText) view.findViewById(R.id.fragment_our_edit_text);
        Button button = (Button) view.findViewById(R.id.fragment_our_button);
        button.setOnClickListener(this);
        return view;
    }

    public void sentString() {
        mListener.onFragmentInteraction(mEditText.getText().toString());
    }

    @Override
    public void onAttach(Context context) {
        super.onAttach(context);
        if (context instanceof InteractionListener) {
            //init the listener
            mListener = (InteractionListener) context;
        } else {
            throw new RuntimeException(context.toString()
                    + " must implement InteractionListener");
        }
    }

    @Override
    public void onDetach() {
        super.onDetach();
        mListener = null;
    }

    @Override
    public void onClick(View v) {
        sentString();
    }
}

Now in activity We implement the listener

implements InteractionListener

And then to put our method

onFragmentInteraction(String string)
 
public class MainActivity extends AppCompatActivity implements InteractionListener{
    private static final String TAG = "MainActivity";
    private MenuItem mSearchMenuItem;

    private SearchView mSearchView;
    private String mSearchString;

    @Override
    protected void onCreate(Bundle savedInstanceState) {
        super.onCreate(savedInstanceState);
        setContentView(R.layout.activity_main);
       
        replaceFragment();

    }


    @Override
    public boolean onCreateOptionsMenu(Menu menu) {
        getMenuInflater().inflate(R.menu.main, menu);

        mSearchMenuItem = menu.findItem(R.id.menu_main_action_search);

        mSearchView = (SearchView) MenuItemCompat.getActionView(mSearchMenuItem);

        focusSearView();

        return super.onCreateOptionsMenu(menu);
    }

    public void focusSearView(){
        if (mSearchString != null && !mSearchString.isEmpty()) {
            mSearchMenuItem.expandActionView();
            mSearchView.setQuery(mSearchString, true);
            mSearchView.clearFocus();
        }
    }

    public void replaceFragment() {
        Fragment OurFragment = new OurFragment().newInstance();

        try {

            FragmentManager fragmentManager = getSupportFragmentManager();
            fragmentManager.beginTransaction().replace(R.id.content_main, OurFragment, "tag").commit();

        } catch (Exception e) {
            Log.d(TAG, e.toString());
        }

    }

    @Override
    public void onFragmentInteraction(String string) {
        //listened
        mSearchString = string;
        focusSearView();
    }
}

Here activity layout:

<?xml version="1.0" encoding="utf-8"?>
<RelativeLayout xmlns:android="http://schemas.android.com/apk/res/android"
    xmlns:tools="http://schemas.android.com/tools"
    android:id="@+id/content_main"
    android:layout_width="match_parent"
    android:layout_height="match_parent"
    android:paddingBottom="@dimen/activity_vertical_margin"
    android:paddingLeft="@dimen/activity_horizontal_margin"
    android:paddingRight="@dimen/activity_horizontal_margin"
    android:paddingTop="@dimen/activity_vertical_margin"
    tools:context="com.example.javier.customsearchview.MainActivity">

</RelativeLayout>

Now we create our SearchView. First we need to create new folder which name is menu.

After that we create new xml file, which name is “main”.

<?xml version="1.0" encoding="utf-8"?>
<menu xmlns:android="http://schemas.android.com/apk/res/android"
    xmlns:app="http://schemas.android.com/apk/res-auto">
    <item
        android:id="@+id/menu_main_action_search"
        android:icon="@android:drawable/ic_menu_search"
        android:title="@string/menu_main_search_title"
        app:actionViewClass="android.support.v7.widget.SearchView"
        app:showAsAction="always|collapseActionView" />
</menu>

Finally fragment layout:

<RelativeLayout xmlns:android="http://schemas.android.com/apk/res/android"
    xmlns:tools="http://schemas.android.com/tools"
    android:layout_width="match_parent"
    android:layout_height="match_parent"
    tools:context="com.example.javier.customsearchview.OurFragment">

    <EditText
        android:id="@+id/fragment_our_edit_text"
        android:layout_width="match_parent"
        android:layout_height="wrap_content"
        android:layout_centerVertical="true"
        android:gravity="center" />

    <Button
        android:id="@+id/fragment_our_button"
        android:layout_width="wrap_content"
        android:layout_height="wrap_content"
        android:layout_below="@+id/fragment_our_edit_text"
        android:layout_centerHorizontal="true" />

</RelativeLayout>

Complete code in github

To restore SearchView state

When you want to restore searchView state, we should use onSaveInstanceState(Bundle outState). Called to retrieve per-instance state from an activity before being killed so that the state can be restored in onCreate(Bundle) or onRestoreInstanceState(Bundle) (the Bundle populated by this method will be passed to both).

This method is called before an activity may be killed so that when it comes back some time in the future it can restore its state. For example, if activity B is launched in front of activity A, and at some point activity A is killed to reclaim resources, activity A will have a chance to save the current state of its user interface via this method so that when the user returns to activity A, the state of the user interface can be restored via onCreate(Bundle) or onRestoreInstanceState(Bundle).

Complete code in github

There is a example how to work this important method in our Activity.

import android.support.v4.view.MenuItemCompat;
import android.support.v7.app.AppCompatActivity;
import android.os.Bundle;
import android.support.v7.widget.SearchView;
import android.view.Menu;
import android.view.MenuItem;
 
public class MainActivity extends AppCompatActivity {
 
    private SearchView mSearchView;
    private String mSearchString;
    private static final String SEARCH_KEY = "search";
 
    @Override
    protected void onCreate(Bundle savedInstanceState) {
        super.onCreate(savedInstanceState);
        setContentView(R.layout.activity_main);
        // if you saved something on outState you can recover them here
        if (savedInstanceState != null) {
            mSearchString = savedInstanceState.getString(SEARCH_KEY);
        }
    }
 
    // This is called before the activity is destroyed
    @Override
    protected void onSaveInstanceState(Bundle outState) {
        super.onSaveInstanceState(outState);
        mSearchString = mSearchView.getQuery().toString();
        outState.putString(SEARCH_KEY, mSearchString);
    }
 
    @Override
    public boolean onCreateOptionsMenu(Menu menu) {
        getMenuInflater().inflate(R.menu.main, menu);
 
        MenuItem searchMenuItem = menu.findItem(R.id.menu_main_action_search);
 
        mSearchView = (SearchView) MenuItemCompat.getActionView(searchMenuItem);
 
        //focus the SearchView
        if (mSearchString != null && !mSearchString.isEmpty()) {
            searchMenuItem.expandActionView();
            mSearchView.setQuery(mSearchString, true);
            mSearchView.clearFocus();
        }
 
        return super.onCreateOptionsMenu(menu);
    }
}

Now we create our SearchView. First we need to create new folder which name is menu.

After that we create new xml file, which name is “main”.

After that we create new xml file, which name is “main”.

<?xml version="1.0" encoding="utf-8"?>
<menu xmlns:android="http://schemas.android.com/apk/res/android"
    xmlns:app="http://schemas.android.com/apk/res-auto">
    <item
        android:id="@+id/menu_main_action_search"
        android:icon="@android:drawable/ic_menu_search"
        android:title="@string/menu_main_search_title"
        app:actionViewClass="android.support.v7.widget.SearchView"
        app:showAsAction="always|collapseActionView" />
</menu>

Finally our string file.

<resources>
    <string name="app_name">"CustomSearchView "</string>
    <string name="activity_main_text">TheDeveloperWorldIsYours.com</string>
    <string name="menu_main_search_title">Search</string>
</resources>

Complete code in github