how to highlight the selected Item of Recycler View?

how to highlight the selected Item of Recycler View?

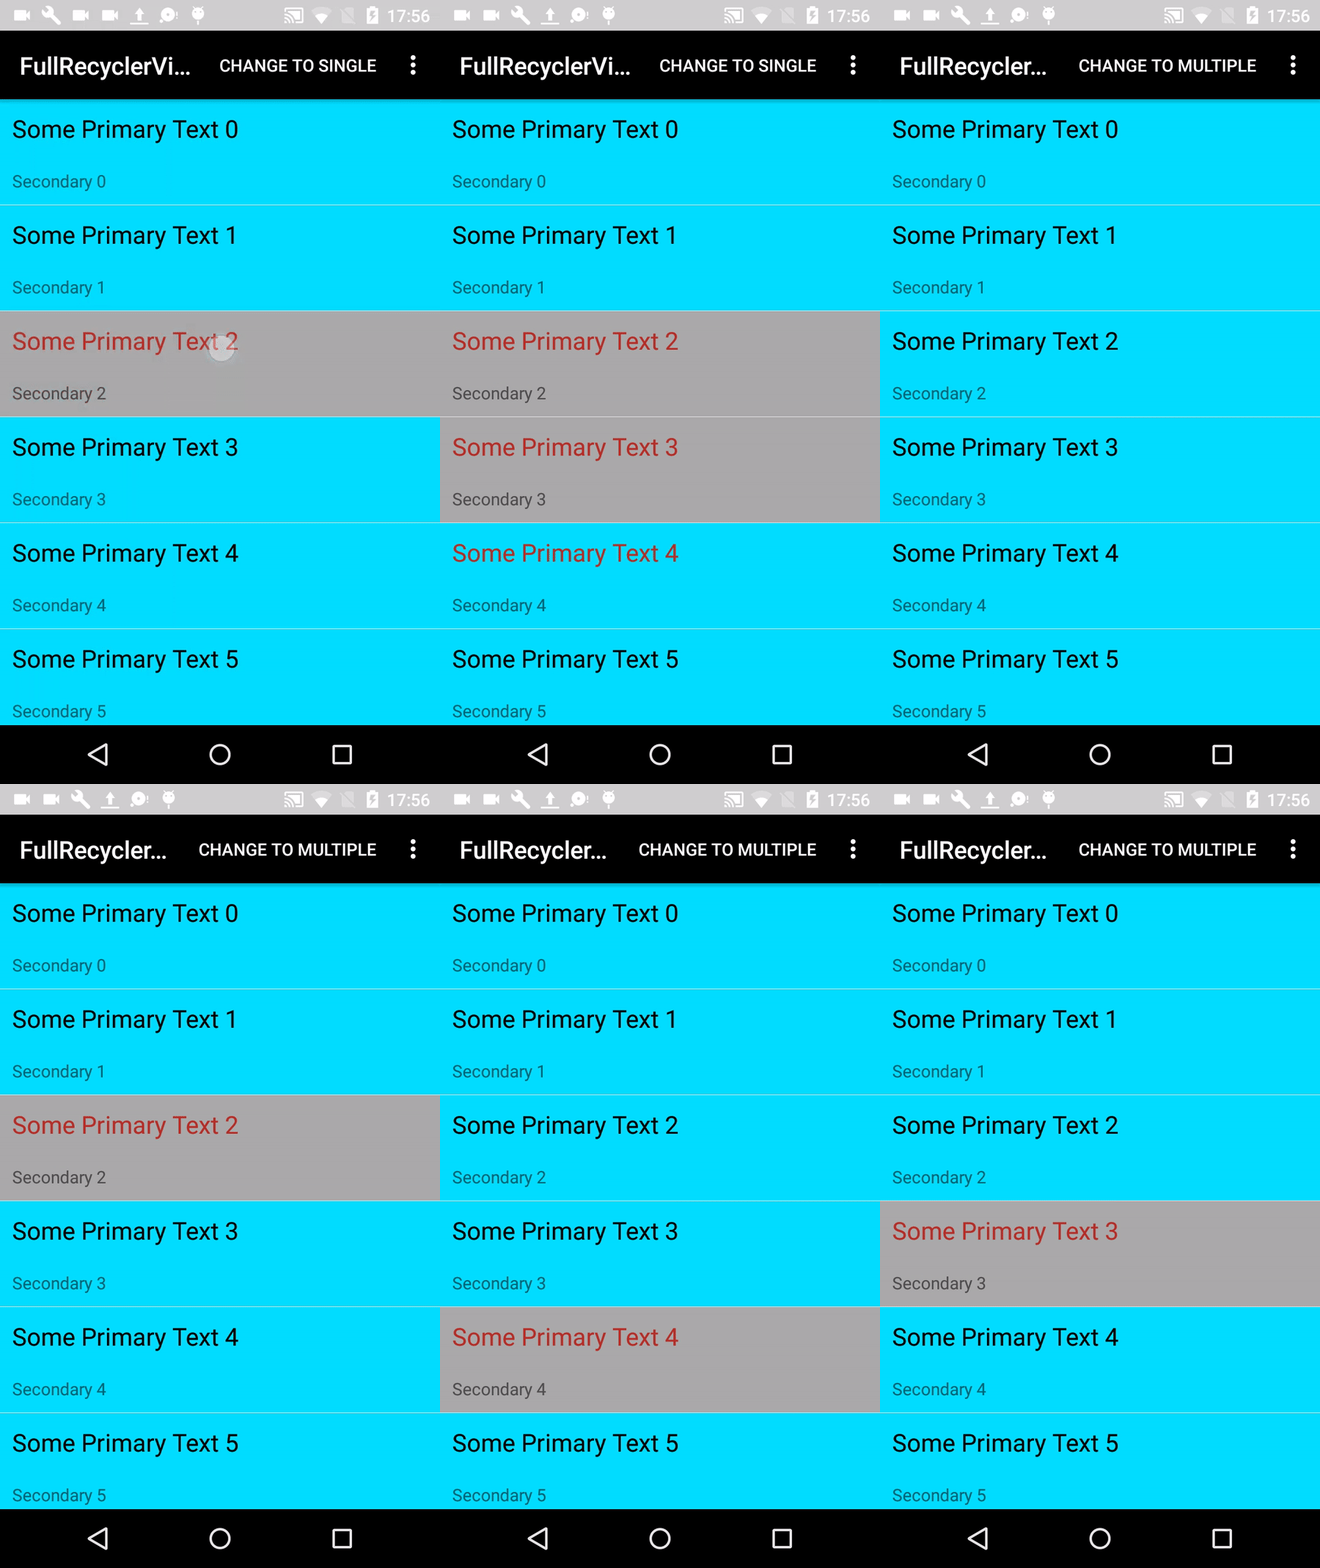
We can find several ways to highlight the selected Item of Recycler View.
In this case We can use SparseBooleanArray, SparseBooleanArrays map integers to booleans. Unlike a normal array of booleans there can be gaps in the indices. It is intended to be more memory efficient than using a HashMap to map Integers to Booleans, both because it avoids auto-boxing keys and values and its data structure doesn’t rely on an extra entry object for each mapping.
Complete Code in GitHub
Now in our Adapter We can see how to use SparseBooleanArray.
First step We create a selected background

Create a new Drawable resource file in your drawable directory with the following content:

selector_row.xml

<?xml version="1.0" encoding="utf-8"?>
<selector xmlns:android="http://schemas.android.com/apk/res/android">
    <!-- Color when the row is selected -->
    <item android:drawable="@android:color/darker_gray" android:state_pressed="false" android:state_selected="true" />
    <!-- Standard background color -->
    <item android:drawable="@android:color/white" android:state_selected="false" />
</selector>

Now simply use this StateListDrawable as the background in the row-layout of your RecyclerView

<RelativeLayout xmlns:android="http://schemas.android.com/apk/res/android"
    android:layout_width="match_parent"
    android:layout_height="wrap_content"
    android:background="@drawable/selector_row">

    <!-- row content -->
</RelativeLayout>

Now as soon as the onClick() method in your adapter is called you simply need to do the following:

// myBackground is the RelativeLayout root of your row
myBackground.setSelected(true);
The rows’ background will have the color (in this case darker_gray) as long as you call myBackground.setSelected(false). Of course you should create a SparseBooleanArray for example in order to know which row is selected and which isn’t since the rows will be reused when scrolling.

Edit: Remember selected items
The idea behind the SparseBooleanArray is to remember the items which are selected. Following a sample on how to use it:


public class UpdateDataAdapter extends RecyclerView
        .Adapter<UpdateDataAdapter
        .DataObjectHolder> {

    private ArrayList<UpdateData> mDataset;
    private static Context mContext;
    private static int mPosition;
    private static SparseBooleanArray sSelectedItems;
    private static UpdateDataClickListener sClickListener;

    static class DataObjectHolder extends RecyclerView.ViewHolder
            implements View
            .OnClickListener {
        TextView mLabel;
        TextView mDateTime;
        LinearLayout mBackground;


        DataObjectHolder(View itemView) {
            super(itemView);
            mLabel = (TextView) itemView.findViewById(R.id.vertical_list_item_title);
            mDateTime = (TextView) itemView.findViewById(R.id.vertical_list_item_subtitle);
            mBackground = (LinearLayout) itemView.findViewById(R.id.vertical_list_item_background);
            itemView.setOnClickListener(this);

        }

        @Override
        public void onClick(View v) {
            if (sSelectedItems.get(getAdapterPosition(), false)) {
                sSelectedItems.delete(getAdapterPosition());
                mBackground.setSelected(false);
                mLabel.setTextColor(ContextCompat.getColor(mContext, android.R.color.black));
            } else {    
            
                mLabel.setTextColor(ContextCompat.getColor(mContext, R.color.colorAccent));
                sSelectedItems.put(getAdapterPosition(), true);
                mBackground.setSelected(true);
            }
            sClickListener.onItemClick(getAdapterPosition());
        }
    }

    void setOnItemClickListener(UpdateDataClickListener clickListener) {
        sClickListener = clickListener;
    }

    UpdateDataAdapter(ArrayList<UpdateData> myDataset, Context context, int modo) {
        mDataset = myDataset;
        mContext = context;
        sSelectedItems = new SparseBooleanArray();
     }

    @Override
    public UpdateDataAdapter.DataObjectHolder onCreateViewHolder(ViewGroup parent,
                                                                 int viewType) {
        View view = LayoutInflater.from(parent.getContext())
                .inflate(R.layout.vertical_list_item, parent, false);

        UpdateDataAdapter.DataObjectHolder dataObjectHolder = new UpdateDataAdapter.DataObjectHolder(view);
        return dataObjectHolder;
    }

    @Override
    public void onBindViewHolder(UpdateDataAdapter.DataObjectHolder holder, int position) {
        holder.mLabel.setText(mDataset.get(position).getmTitle());
        if (sSelectedItems.get(position)) {
            holder.mLabel.setTextColor(ContextCompat.getColor(mContext, R.color.colorAccent));
        } else {
            holder.mLabel.setTextColor(ContextCompat.getColor(mContext, android.R.color.black));
        }
        holder.mDateTime.setText(mDataset.get(position).getmSubTitle());
        holder.mBackground.setSelected(sSelectedItems.get(position, false));
    }

    @Override
    public int getItemCount() {
        return mDataset.size();
    }

    public void selected(int position) {
       
    }

    public void changeMode(int modo) {
      
    }

    interface UpdateDataClickListener {
        void onItemClick(int position);
    }

}

This is one way how to highlight the selected Item of Recycler View.

Complete Code in GitHub

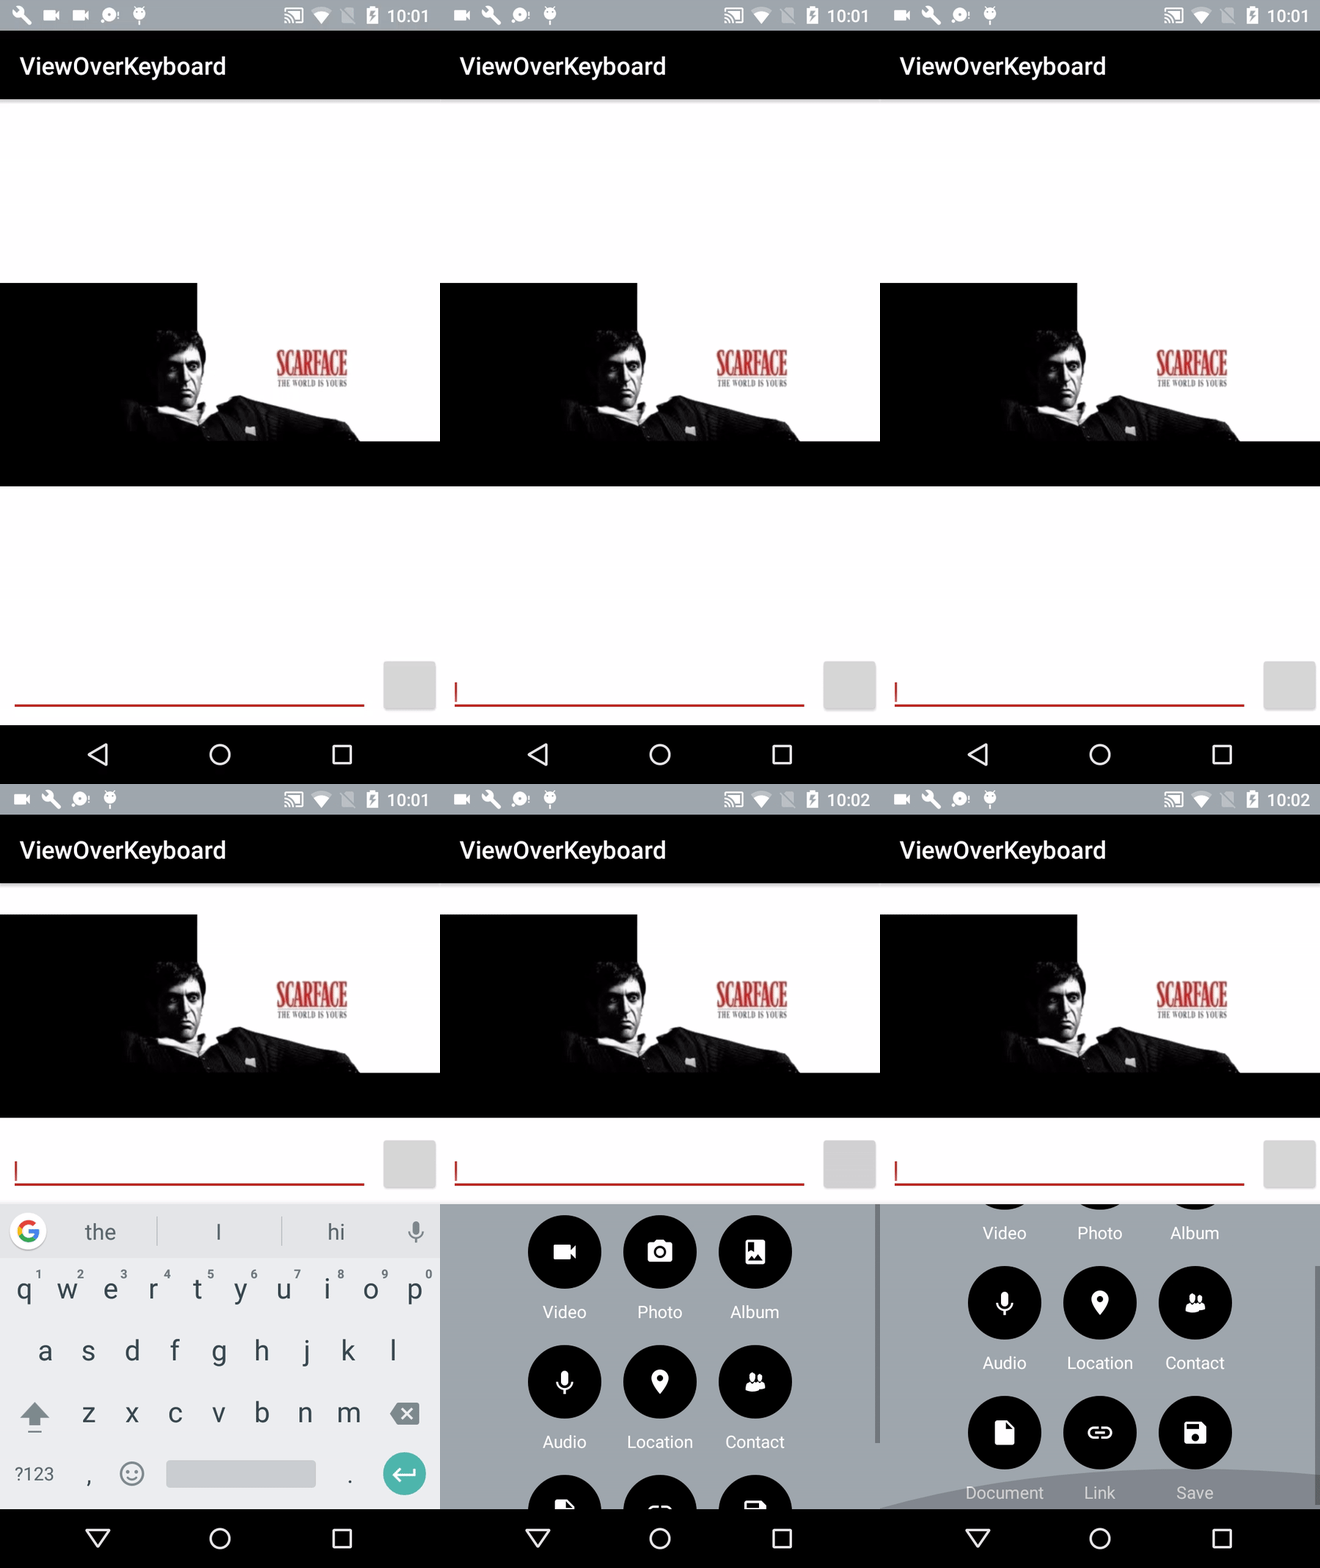
View over keyboard

View over keyboard

Sometimes We need more space when the keyboard it’s open, the solution can be to put a view over keyboard.

Complete Code in GitHub

We try this way, we have to create a popup in our activity


public void showPopUpKeyboard() {
        mIsPopupVisible = true;
        // Initialize a new instance of LayoutInflater service
        LayoutInflater inflater = (LayoutInflater) getSystemService(LAYOUT_INFLATER_SERVICE);

        // Inflate the custom layout/view
        View customView = inflater.inflate(R.layout.popup_in_keyboard, null);


        mScrollView = (ScrollView) customView.findViewById(R.id.keyboard_layout_view);
        // Initialize a new instance of popup window
        mPopupWindow = new PopupWindow(
                customView,
                RelativeLayout.LayoutParams.MATCH_PARENT,
                RelativeLayout.LayoutParams.MATCH_PARENT
        );


        setSizeForSoftKeyboard();

        // Get a reference for the custom view close button
        Button closeButton = (Button) customView.findViewById(R.id.ib_close);

        // Set a click listener for the popup window close button
        closeButton.setOnClickListener((View view) -> {
                // Dismiss the popup window
                mIsPopupVisible = false;
                mPopupWindow.dismiss();
        });
        mPopupWindow.showAtLocation(mParentLayout, Gravity.CENTER, 0, 0);

    }

And to know our height of keyboard with getViewTreeObserver, you can put this code in our onCreate in Activity

mParentLayout.getViewTreeObserver().addOnGlobalLayoutListener(() -> {
                Rect r = new Rect();

                mParentLayout.getWindowVisibleDisplayFrame(r);

                int heightDiff = mParentLayout.getRootView().getHeight() - (r.bottom - r.top);
                if (heightDiff > 100) {
                    //enter your code here
                    if (mIsPopupVisible) {
                        keepKeyboard();
                        mIsPopupVisible = false;
                        mPopupWindow.dismiss();
                    }
                } else {
                    //enter code for hid
                }
        });

This is my screen in my popup screen, but you can changes whatever you want.

<?xml version="1.0" encoding="utf-8"?>
<RelativeLayout xmlns:android="http://schemas.android.com/apk/res/android"
    android:id="@+id/keyboard_rootView"
    android:layout_width="match_parent"
    android:layout_height="match_parent">

    <Button
        android:id="@+id/ib_close"
        android:layout_width="match_parent"
        android:layout_height="match_parent"
        android:layout_above="@+id/keyboard_layout_view"
        android:background="@android:color/transparent" />

    <ScrollView
        android:id="@+id/keyboard_layout_view"
        android:layout_width="match_parent"
        android:layout_height="wrap_content"
        android:layout_alignParentBottom="true">

        <RelativeLayout
            android:layout_width="match_parent"
            android:layout_height="match_parent"
            android:background="@android:color/white">

            <RelativeLayout

                android:id="@+id/keyboard_video"
                android:layout_width="wrap_content"
                android:layout_height="wrap_content"
                android:layout_centerHorizontal="true"
                android:layout_toLeftOf="@+id/keyboard_image_photo_image">

                <ImageButton
                    android:id="@+id/keyboard_video_button"
                    android:layout_width="wrap_content"
                    android:layout_height="wrap_content"
                    android:layout_margin="@dimen/activity_messenger_margin_elements"
                    android:background="@drawable/attach_circle"
                    android:src="@drawable/ic_message_videocam" />

                <TextView
                    android:layout_width="wrap_content"
                    android:layout_height="wrap_content"
                    android:layout_below="@+id/keyboard_video_button"
                    android:layout_centerHorizontal="true"
                    android:paddingBottom="@dimen/activity_messenger_margin_elements"
                    android:text="@string/activity_messenger_video" />

            </RelativeLayout>

            <ImageButton
                android:id="@+id/keyboard_image_photo_image"
                android:layout_width="wrap_content"
                android:layout_height="wrap_content"
                android:layout_centerHorizontal="true"
                android:layout_margin="@dimen/activity_messenger_margin_elements"
                android:background="@drawable/attach_circle"
                android:src="@drawable/ic_message_camera" />

            <TextView
                android:id="@+id/keyboard_image_photo_text"
                android:layout_width="wrap_content"
                android:layout_height="wrap_content"
                android:layout_below="@+id/keyboard_image_photo_image"
                android:layout_centerHorizontal="true"
                android:paddingBottom="@dimen/activity_messenger_margin_elements"
                android:text="@string/activity_messenger_photo" />


            <RelativeLayout
                android:layout_width="wrap_content"
                android:layout_height="wrap_content"
                android:layout_toRightOf="@+id/keyboard_image_photo_image">

                <ImageButton
                    android:id="@+id/keyboard_album_image"
                    android:layout_width="wrap_content"
                    android:layout_height="wrap_content"
                    android:layout_margin="@dimen/activity_messenger_margin_elements"
                    android:background="@drawable/attach_circle"
                    android:src="@drawable/ic_message_album" />

                <TextView
                    android:layout_width="wrap_content"
                    android:layout_height="wrap_content"
                    android:layout_below="@+id/keyboard_album_image"
                    android:layout_centerHorizontal="true"
                    android:paddingBottom="@dimen/activity_messenger_margin_elements"
                    android:text="@string/activity_messenger_album" />

            </RelativeLayout>

            <RelativeLayout
                android:id="@+id/keyboard_audio_relative_layout"
                android:layout_width="wrap_content"
                android:layout_height="wrap_content"
                android:layout_below="@+id/keyboard_image_photo_text"
                android:layout_toLeftOf="@+id/keyboard_location_button">

                <ImageButton
                    android:id="@+id/keyboard_audio_button"
                    android:layout_width="wrap_content"
                    android:layout_height="wrap_content"
                    android:layout_alignParentLeft="true"
                    android:layout_alignParentStart="true"
                    android:layout_alignParentTop="true"
                    android:layout_margin="@dimen/activity_messenger_margin_elements"
                    android:background="@drawable/attach_circle"
                    android:src="@drawable/ic_message_voice" />

                <TextView
                    android:layout_width="wrap_content"
                    android:layout_height="wrap_content"
                    android:layout_below="@+id/keyboard_audio_button"
                    android:layout_centerHorizontal="true"
                    android:paddingBottom="@dimen/activity_messenger_margin_elements"
                    android:text="@string/activity_messenger_audio" />
            </RelativeLayout>

            <ImageButton
                android:id="@+id/keyboard_location_button"
                android:layout_width="wrap_content"
                android:layout_height="wrap_content"
                android:layout_below="@+id/keyboard_image_photo_text"
                android:layout_centerHorizontal="true"
                android:layout_margin="@dimen/activity_messenger_margin_elements"
                android:background="@drawable/attach_circle"
                android:src="@drawable/ic_message_location" />

            <TextView
                android:id="@+id/keyboard_location_text"
                android:layout_width="wrap_content"
                android:layout_height="wrap_content"
                android:layout_below="@+id/keyboard_location_button"
                android:layout_centerHorizontal="true"
                android:paddingBottom="@dimen/activity_messenger_margin_elements"
                android:text="@string/activity_messenger_location" />

            <RelativeLayout
                android:id="@+id/keyboard_contact_relative_layout"
                android:layout_width="wrap_content"
                android:layout_height="wrap_content"
                android:layout_below="@+id/keyboard_image_photo_text"
                android:layout_toRightOf="@+id/keyboard_location_button">

                <ImageButton
                    android:id="@+id/keyboard_contact_button"
                    android:layout_width="wrap_content"
                    android:layout_height="wrap_content"
                    android:layout_margin="@dimen/activity_messenger_margin_elements"
                    android:background="@drawable/attach_circle"
                    android:src="@drawable/ic_contacts_white" />

                <TextView
                    android:id="@+id/keyboard_contact_text"
                    android:layout_width="wrap_content"
                    android:layout_height="wrap_content"
                    android:layout_below="@+id/keyboard_contact_button"
                    android:layout_centerHorizontal="true"
                    android:paddingBottom="@dimen/activity_messenger_margin_elements"
                    android:text="@string/activity_messenger_contact" />
            </RelativeLayout>

            <RelativeLayout
                android:id="@+id/keyboard_document_relative_layout"
                android:layout_width="wrap_content"
                android:layout_height="wrap_content"
                android:layout_below="@+id/keyboard_location_text"
                android:layout_toLeftOf="@+id/keyboard_link_button">

                <ImageButton
                    android:id="@+id/keyboard_document_relative_button"
                    android:layout_width="wrap_content"
                    android:layout_height="wrap_content"
                    android:layout_margin="@dimen/activity_messenger_margin_elements"
                    android:background="@drawable/attach_circle"
                    android:src="@drawable/ic_message_file" />

                <TextView
                    android:layout_width="wrap_content"
                    android:layout_height="wrap_content"
                    android:layout_below="@+id/keyboard_document_relative_button"
                    android:layout_centerHorizontal="true"
                    android:paddingBottom="@dimen/activity_messenger_margin_elements"
                    android:text="@string/activity_messenger_document" />
            </RelativeLayout>

            <ImageButton
                android:id="@+id/keyboard_link_button"
                android:layout_width="wrap_content"
                android:layout_height="wrap_content"
                android:layout_below="@+id/keyboard_location_text"
                android:layout_centerHorizontal="true"
                android:layout_margin="@dimen/activity_messenger_margin_elements"
                android:background="@drawable/attach_circle"
                android:src="@drawable/ic_message_link" />

            <TextView
                android:layout_width="wrap_content"
                android:layout_height="wrap_content"
                android:layout_below="@+id/keyboard_link_button"
                android:layout_centerHorizontal="true"
                android:paddingBottom="@dimen/activity_messenger_margin_elements"
                android:text="@string/activity_messenger_link" />

            <RelativeLayout
                android:id="@+id/keyboard_save_relative_layout"
                android:layout_width="wrap_content"
                android:layout_height="wrap_content"
                android:layout_below="@+id/keyboard_location_text"
                android:layout_toRightOf="@+id/keyboard_link_button">

                <ImageButton
                    android:id="@+id/keyboard_save_button"
                    android:layout_width="wrap_content"
                    android:layout_height="wrap_content"
                    android:layout_margin="@dimen/activity_messenger_margin_elements"
                    android:background="@drawable/attach_circle"
                    android:src="@drawable/ic_message_save" />

                <TextView
                    android:layout_width="wrap_content"
                    android:layout_height="wrap_content"
                    android:layout_below="@+id/keyboard_save_button"
                    android:layout_centerHorizontal="true"
                    android:paddingBottom="@dimen/activity_messenger_margin_elements"
                    android:text="@string/activity_messenger_save" />
            </RelativeLayout>

        </RelativeLayout>
    </ScrollView>

</RelativeLayout>

Complete Code in GitHub

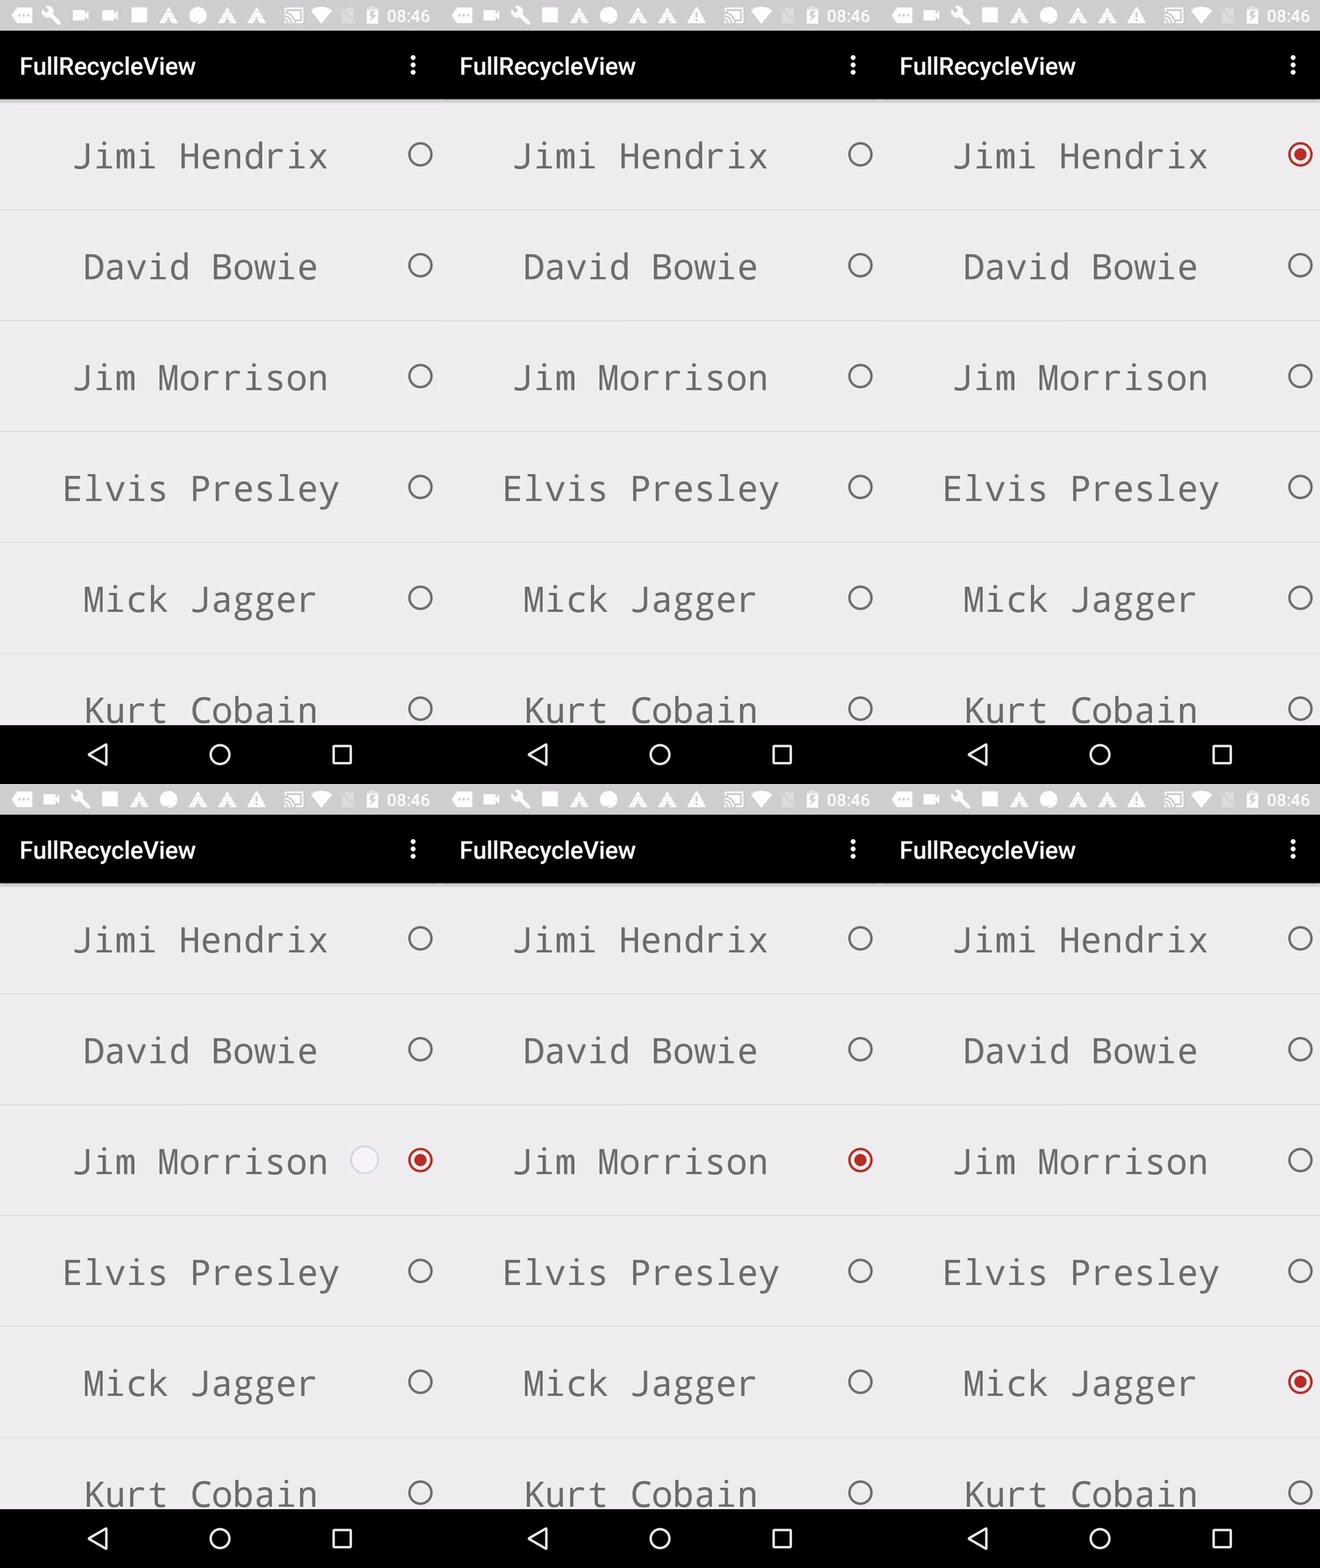
Single choice recyclerView

Single choice recyclerView

When we want to Multiple choice in RecyclerView, we will need these things:

– String []
– Adapter with itemClickListener
– Activity or fragment
– activity_main (recyclerView)
– list_item (TextView, CheckBox)

We use notifydatasetchanged(), it’s very important than We understand this method.
You can check the full code in GitHub.

Our views activity_main.xml (recyclerView):

<RelativeLayout xmlns:android="http://schemas.android.com/apk/res/android"
    xmlns:tools="http://schemas.android.com/tools"
    android:layout_width="match_parent"
    android:layout_height="match_parent"
    tools:context="com.thedeveloperworldisyours.fullrecycleview.single.SingleFragment">

    <android.support.v7.widget.RecyclerView
        android:id="@+id/single_fragment_recycler_view"
        android:layout_width="match_parent"
        android:layout_height="wrap_content"/>

</RelativeLayout>

and list_item.xml (TextView, CheckBox)

<RelativeLayout xmlns:android="http://schemas.android.com/apk/res/android"
    android:layout_width="match_parent"
    android:layout_height="wrap_content">

    <TextView
        android:id="@+id/single_list_item_text"
        android:layout_width="match_parent"
        android:layout_height="90dp"
        android:text="@string/app_name"
        android:typeface="monospace"
        android:layout_toLeftOf="@+id/single_list_item_check_button"
        android:gravity="center"
        android:textSize="@dimen/multiple_list_item_size_rock_stars"/>

    <RadioButton
        android:id="@+id/single_list_item_check_button"
        android:layout_width="wrap_content"
        android:layout_height="90dp"
        android:layout_alignParentRight="true"
        android:checked="false"
        android:clickable="false"
        android:focusable="false" />

</RelativeLayout>

Adapter with ClickListener


public class SingleRecyclerViewAdapter extends RecyclerView.Adapter<SingleRecyclerViewAdapter.DataObjectHolder> {

    private String[] mData;
    private static SingleClickListener sClickListener;
    private static int sSelected = -1;

    public SingleRecyclerViewAdapter(String[] mData) {
        this.mData = mData;
    }

    static class DataObjectHolder extends RecyclerView.ViewHolder implements View.OnClickListener {

        TextView mTextView;
        RadioButton mRadioButton;

        public DataObjectHolder(View itemView) {
            super(itemView);
            this.mTextView = (TextView) itemView.findViewById(R.id.single_list_item_text);
            this.mRadioButton = (RadioButton) itemView.findViewById(R.id.single_list_item_check_button);
            itemView.setOnClickListener(this);
        }

        @Override
        public void onClick(View view) {
            sSelected = getAdapterPosition();
            sClickListener.onItemClickListener(getAdapterPosition(), view);
        }
    }

    public void selectedItem() {
        notifyDataSetChanged();
    }

    void setOnItemClickListener(SingleClickListener clickListener) {
        sClickListener = clickListener;
    }

    @Override
    public DataObjectHolder onCreateViewHolder(ViewGroup parent, int viewType) {
        View view = LayoutInflater.from(parent.getContext())
                .inflate(R.layout.single_list_item, parent, false);

        DataObjectHolder dataObjectHolder = new DataObjectHolder(view);
        return dataObjectHolder;
    }

    @Override
    public void onBindViewHolder(DataObjectHolder holder, int position) {
        holder.mTextView.setText(mData[position]);

        if (sSelected == position) {
            holder.mRadioButton.setChecked(true);
        } else {
            holder.mRadioButton.setChecked(false);
        }

    }

    @Override
    public int getItemCount() {
        return mData.length;
    }

    interface SingleClickListener {
        void onItemClickListener(int position, View view);
    }

}

Activity or fragment

public class SingleFragment extends Fragment implements SingleRecyclerViewAdapter.SingleClickListener {

    SingleRecyclerViewAdapter mAdapter;

    public SingleFragment() {
        // Required empty public constructor
    }

    public static SingleFragment newInstance() {
        return new SingleFragment();
    }

    @Override
    public void onCreate(Bundle savedInstanceState) {
        super.onCreate(savedInstanceState);
    }

    @Override
    public View onCreateView(LayoutInflater inflater, ViewGroup container,
                             Bundle savedInstanceState) {
        // Inflate the layout for this fragment
        View view = inflater.inflate(R.layout.single_fragment, container, false);
        RecyclerView recyclerView = (RecyclerView) view.findViewById(R.id.single_fragment_recycler_view);

        String[] list = new String[]{"Jimi Hendrix", "David Bowie", "Jim Morrison", "Elvis Presley",
                "Mick Jagger", "Kurt Cobain", "Bob Dylan", "John Lennon", "Freddie Mercury", "Elton John", "Eric Clapton"};

        mAdapter = new SingleRecyclerViewAdapter(list);
        recyclerView.setAdapter(mAdapter);
        recyclerView.setHasFixedSize(true);
        RecyclerView.LayoutManager layoutManager = new LinearLayoutManager(getActivity());
        RecyclerView.ItemDecoration itemDecoration =
                new DividerVerticalItemDecoration(getActivity());
        recyclerView.addItemDecoration(itemDecoration);
        recyclerView.setLayoutManager(layoutManager);
        mAdapter.setOnItemClickListener(this);
        return view;
    }

    @Override
    public void onItemClickListener(int position, View view) {
        mAdapter.selectedItem();
    }
}

You can check the full code in GitHub.

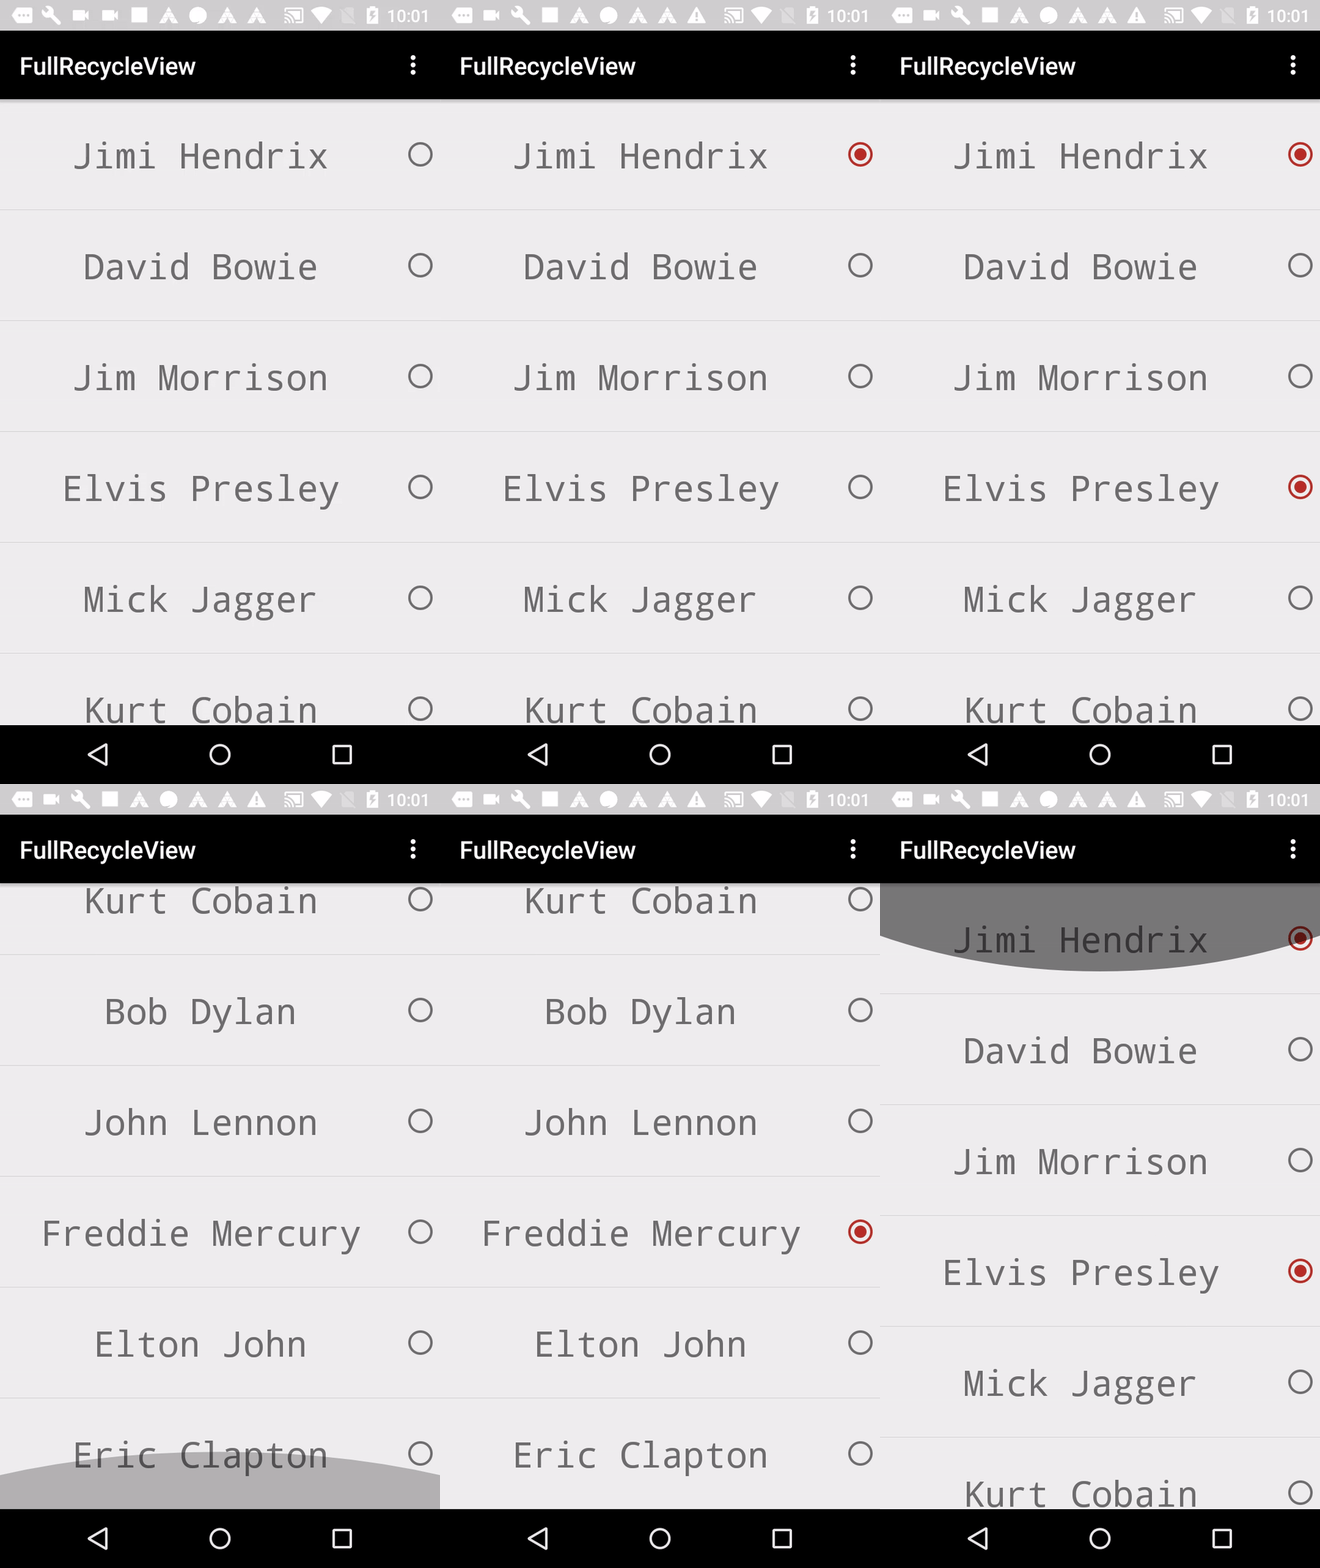
Multiple choice recyclerView

Multiple choice recyclerView

The completed code GitHub

When we want to Multiple choice in RecyclerView, we will need these things:

– Data (String name, boolean selected)
– Adapter with itemClickListener
– Activity or fragment
– activity_main (recyclerView)
– list_item (TextView, CheckBox)

We use notifydatasetchanged(), it’s very important than We understand this method.

Out Data will have String and boolean, this boolean will save if user select or not the item.

public class MultipleData {

    private String mTitle;
    private boolean mBoolean;

    public MultipleData(String title, boolean mBoolean) {
        this.mTitle = title;
        this.mBoolean = mBoolean;
    }

    public String getTitle() {
        return mTitle;
    }

    public void setTitle(String mTitle) {
        this.mTitle = mTitle;
    }

    public boolean isBoolean() {
        return mBoolean;
    }

    public void setBoolean(boolean mBoolean) {
        this.mBoolean = mBoolean;
    }
}

Our views activity_main.xml (recyclerView)

<FrameLayout xmlns:android="http://schemas.android.com/apk/res/android"
    xmlns:tools="http://schemas.android.com/tools"
    android:layout_width="match_parent"
    android:layout_height="match_parent"
    tools:context="com.thedeveloperworldisyours.fullrecycleview.multiple.MultipleFragment">

    <android.support.v7.widget.RecyclerView
        android:id="@+id/multiple_fragment_recycler_view"
        android:layout_width="match_parent"
        android:layout_height="match_parent" />

</FrameLayout>

and list_item.xml (TextView, CheckBox)

<RelativeLayout xmlns:android="http://schemas.android.com/apk/res/android"
    android:layout_width="match_parent"
    android:layout_height="wrap_content">

    <TextView
        android:id="@+id/multiple_list_item_text"
        android:layout_width="match_parent"
        android:layout_height="90dp"
        android:text="@string/app_name"
        android:typeface="monospace"
        android:layout_toLeftOf="@+id/multiple_list_item_check_button"
        android:gravity="center"
        android:textSize="@dimen/multiple_list_item_size_rock_stars"/>

    <RadioButton
        android:id="@+id/multiple_list_item_check_button"
        android:layout_width="wrap_content"
        android:layout_height="90dp"
        android:layout_alignParentRight="true"
        android:checked="false"
        android:clickable="false"
        android:focusable="false" />

</RelativeLayout>

Adapter with ClickListener

public class MultipleRecyclerViewAdapter extends RecyclerView
        .Adapter<MultipleRecyclerViewAdapter
        .DataObjectHolder> {

    private List<MultipleData> mList;
    private static MultipleClickListener sClickListener;

    MultipleRecyclerViewAdapter(List<MultipleData> mList) {
        this.mList = mList;
    }

    static class DataObjectHolder extends RecyclerView.ViewHolder
            implements View
            .OnClickListener {

        TextView mTextView;
        RadioButton mRadioButton;

         DataObjectHolder(View itemView) {
            super(itemView);
            mTextView = (TextView) itemView.findViewById(R.id.multiple_list_item_text);
            mRadioButton = (RadioButton) itemView.findViewById(R.id.multiple_list_item_check_button);
            itemView.setOnClickListener(this);
        }

        @Override
        public void onClick(View v) {
            sClickListener.onItemClick(getAdapterPosition(), v);
        }
    }

    void changedData(int position) {
            if (mList.get(position).isBoolean()) {
                mList.get(position).setBoolean(false);
            } else {
                mList.get(position).setBoolean(true);
            }
        notifyDataSetChanged();
    }

    void setOnItemClickListener(MultipleClickListener myClickListener) {
        this.sClickListener = myClickListener;
    }

    @Override
    public DataObjectHolder onCreateViewHolder(ViewGroup parent, int viewType) {
        View view = LayoutInflater.from(parent.getContext())
                .inflate(R.layout.multiple_list_item, parent, false);

        DataObjectHolder dataObjectHolder = new DataObjectHolder(view);
        return dataObjectHolder;
    }

    @Override
    public void onBindViewHolder(DataObjectHolder holder, int position) {
        holder.mTextView.setText(mList.get(position).getTitle());
        holder.mRadioButton.setChecked(mList.get(position).isBoolean());
    }

    @Override
    public int getItemCount() {
        return mList.size();
    }

    interface MultipleClickListener {
        void onItemClick(int position, View v);
    }


}

Activity or fragment

package com.thedeveloperworldisyours.fullrecycleview.multiple;

import android.os.Bundle;
import android.support.v4.app.Fragment;
import android.support.v7.widget.LinearLayoutManager;
import android.support.v7.widget.RecyclerView;
import android.view.LayoutInflater;
import android.view.View;
import android.view.ViewGroup;

import com.thedeveloperworldisyours.fullrecycleview.R;
import com.thedeveloperworldisyours.fullrecycleview.swipe.DividerItemDecoration;

import java.util.ArrayList;
import java.util.List;

public class MultipleFragment extends Fragment implements MultipleRecyclerViewAdapter.MultipleClickListener{

    MultipleRecyclerViewAdapter mAdapter;

    public MultipleFragment() {
        // Required empty public constructor
    }

    public static MultipleFragment newInstance() {
        return new MultipleFragment();
    }

    @Override
    public void onCreate(Bundle savedInstanceState) {
        super.onCreate(savedInstanceState);
    }

    @Override
    public View onCreateView(LayoutInflater inflater, ViewGroup container,
                             Bundle savedInstanceState) {
        // Inflate the layout for this fragment
        View view = inflater.inflate(R.layout.multiple_fragment, container, false);

        RecyclerView recyclerView = (RecyclerView) view.findViewById(R.id.multiple_fragment_recycler_view);

        MultipleData hendrix = new MultipleData("Jimi Hendrix", false);
        MultipleData bowie = new MultipleData("David Bowie", false);
        MultipleData morrison = new MultipleData("Jim Morrison", false);

        MultipleData presley = new MultipleData("Elvis Presley", false);
        MultipleData jagger = new MultipleData("Mick Jagger", false);
        MultipleData cobain = new MultipleData("Kurt Cobain", false);

        MultipleData dylan = new MultipleData("Bob Dylan", false);
        MultipleData lennon = new MultipleData("John Lennon", false);
        MultipleData mercury = new MultipleData("Freddie Mercury", false);

        MultipleData elton = new MultipleData("Elton John", false);
        MultipleData clapton = new MultipleData("Eric Clapton", false);

        List<MultipleData> list = new ArrayList<>();
        list.add(0, hendrix);
        list.add(1, bowie);
        list.add(2, morrison);

        list.add(3, presley);
        list.add(4, jagger);
        list.add(5, cobain);

        list.add(6, dylan);
        list.add(7, lennon);
        list.add(8, mercury);

        list.add(9, elton);
        list.add(10, clapton);

        mAdapter = new MultipleRecyclerViewAdapter(list);
        recyclerView.setAdapter(mAdapter);
        recyclerView.setHasFixedSize(true);
        RecyclerView.LayoutManager layoutManager = new LinearLayoutManager(getActivity());
        RecyclerView.ItemDecoration itemDecoration =
                new DividerItemDecoration(getActivity(), LinearLayoutManager.VERTICAL);
        recyclerView.addItemDecoration(itemDecoration);
        recyclerView.setLayoutManager(layoutManager);
        mAdapter.setOnItemClickListener(this);

        return view;
    }

    @Override
    public void onItemClick(int position, View v) {
        mAdapter.changedData(position);
    }
}

The completed code GitHub

To restore SearchView state

When you want to restore searchView state, we should use onSaveInstanceState(Bundle outState). Called to retrieve per-instance state from an activity before being killed so that the state can be restored in onCreate(Bundle) or onRestoreInstanceState(Bundle) (the Bundle populated by this method will be passed to both).

This method is called before an activity may be killed so that when it comes back some time in the future it can restore its state. For example, if activity B is launched in front of activity A, and at some point activity A is killed to reclaim resources, activity A will have a chance to save the current state of its user interface via this method so that when the user returns to activity A, the state of the user interface can be restored via onCreate(Bundle) or onRestoreInstanceState(Bundle).

Complete code in github

There is a example how to work this important method in our Activity.

import android.support.v4.view.MenuItemCompat;
import android.support.v7.app.AppCompatActivity;
import android.os.Bundle;
import android.support.v7.widget.SearchView;
import android.view.Menu;
import android.view.MenuItem;
 
public class MainActivity extends AppCompatActivity {
 
    private SearchView mSearchView;
    private String mSearchString;
    private static final String SEARCH_KEY = "search";
 
    @Override
    protected void onCreate(Bundle savedInstanceState) {
        super.onCreate(savedInstanceState);
        setContentView(R.layout.activity_main);
        // if you saved something on outState you can recover them here
        if (savedInstanceState != null) {
            mSearchString = savedInstanceState.getString(SEARCH_KEY);
        }
    }
 
    // This is called before the activity is destroyed
    @Override
    protected void onSaveInstanceState(Bundle outState) {
        super.onSaveInstanceState(outState);
        mSearchString = mSearchView.getQuery().toString();
        outState.putString(SEARCH_KEY, mSearchString);
    }
 
    @Override
    public boolean onCreateOptionsMenu(Menu menu) {
        getMenuInflater().inflate(R.menu.main, menu);
 
        MenuItem searchMenuItem = menu.findItem(R.id.menu_main_action_search);
 
        mSearchView = (SearchView) MenuItemCompat.getActionView(searchMenuItem);
 
        //focus the SearchView
        if (mSearchString != null && !mSearchString.isEmpty()) {
            searchMenuItem.expandActionView();
            mSearchView.setQuery(mSearchString, true);
            mSearchView.clearFocus();
        }
 
        return super.onCreateOptionsMenu(menu);
    }
}

Now we create our SearchView. First we need to create new folder which name is menu.

After that we create new xml file, which name is “main”.

After that we create new xml file, which name is “main”.

<?xml version="1.0" encoding="utf-8"?>
<menu xmlns:android="http://schemas.android.com/apk/res/android"
    xmlns:app="http://schemas.android.com/apk/res-auto">
    <item
        android:id="@+id/menu_main_action_search"
        android:icon="@android:drawable/ic_menu_search"
        android:title="@string/menu_main_search_title"
        app:actionViewClass="android.support.v7.widget.SearchView"
        app:showAsAction="always|collapseActionView" />
</menu>

Finally our string file.

<resources>
    <string name="app_name">"CustomSearchView "</string>
    <string name="activity_main_text">TheDeveloperWorldIsYours.com</string>
    <string name="menu_main_search_title">Search</string>
</resources>

Complete code in github