Jenkins for PHP from scratch – II

In the previous post, we explained how to set up jenkins for php applications. It was the basic setup, installing Jenkins and creating a test job.

Now we want to go on step further and take advantage of all the previously installed plugins. They require some php extensions and phpunit extensions in order to start working.

Summarizing, I had to run the following command (you might have already installed some of the packages, that’s okey):

sudo apt-get install php5-xsl  #Required by phpdox
sudo pear config-set auto_discover 1
sudo pear install -a pear.phpunit.de/phploc
sudo pear install -a PHP_CodeSniffer
sudo pear install pear.phpunit.de/phpcpd
sudo pear channel-discover pear.pdepend.org
sudo pear install pdepend/PHP_Depend
sudo pear channel-discover pear.phpmd.org
sudo pear install --alldeps phpmd/PHP_PMD
sudo pear install -a channel://nikic.github.com/pear/PHPParser-0.9.3
sudo pear install -a channel://pear.netpirates.net/phpDox-0.5.0
sudo pear channel-discover pear.phpqatools.org
sudo pear install --alldeps phpqatools/PHP_CodeBrowser

Now you should have installed all the tools required by the jenkins plugins.

Then, we just need to create a script to execute all this tools, save the outputs, and configure the jenkins plugins to parse all this data. Yo can do it all manually in a bash script, but I’d suggest you to install ant and create an easy customizable build.

In order to get ant just type:

sudo apt-get install ant1.7

Note: You might need to install java JRE in order to get ant working.

Now, you have to create your own build.xml file on the root directory of your proyect. This is how mine looks like:

<?xml version="1.0" encoding="UTF-8"?>

<project name="The Developer World Is Yours" default="build" basedir="workspace/">
 <target name="build"
   depends="prepare,lint,phploc,pdepend,phpmd-ci,phpcs-ci,phpcpd,phpdox,phpunit,phpcb"/>

 <target name="clean" description="Cleanup build artifacts">
  <delete dir="${basedir}/build/api"/>
  <delete dir="${basedir}/build/code-browser"/>
  <delete dir="${basedir}/build/coverage"/>
  <delete dir="${basedir}/build/logs"/>
  <delete dir="${basedir}/build/pdepend"/>
 </target>

 <target name="prepare" depends="clean" description="Prepare for build">
  <mkdir dir="${basedir}/build/api"/>
  <mkdir dir="${basedir}/build/code-browser"/>
  <mkdir dir="${basedir}/build/coverage"/>
  <mkdir dir="${basedir}/build/logs"/>
  <mkdir dir="${basedir}/build/pdepend"/>
  <mkdir dir="${basedir}/build/phpdox"/>
 </target>

 <target name="lint" description="Perform syntax check of sourcecode files">
  <apply executable="php" failonerror="true">
   <arg value="-l" />

   <fileset dir="${basedir}/">
    <include name="**/*.php" />
    <modified />
   </fileset>

   <fileset dir="${basedir}/tests">
    <include name="**/*.php" />
    <modified />
   </fileset>
  </apply>
 </target>

 <target name="phploc" description="Measure project size using PHPLOC">
  <exec executable="phploc">
   <arg value="--log-csv" />
   <arg value="${basedir}/build/logs/phploc.csv" />
   <arg path="${basedir}/" />
  </exec>
 </target>

 <target name="pdepend" description="Calculate software metrics using PHP_Depend">
  <exec executable="pdepend">
   <arg value="--jdepend-xml=${basedir}/build/logs/jdepend.xml" />
   <arg value="--jdepend-chart=${basedir}/build/pdepend/dependencies.svg" />
   <arg value="--overview-pyramid=${basedir}/build/pdepend/overview-pyramid.svg" />
   <arg path="${basedir}/" />
  </exec>
 </target>

 <target name="phpmd-ci" description="Perform project mess detection using PHPMD creating a log file for the continuous integration server">
  <exec executable="phpmd">
   <arg path="${basedir}/" />
   <arg value="xml" />
   <arg value="${basedir}/../phpmd.xml" />
   <arg value="--reportfile" />
   <arg value="${basedir}/build/logs/pmd.xml" />
  </exec>
 </target>

 <target name="phpcs-ci" description="Find coding standard violations using PHP_CodeSniffer creating a log file for the continuous integration server">
  <exec executable="phpcs" output="/dev/null">
   <arg value="--report=checkstyle" />
   <arg value="--report-file=${basedir}/build/logs/checkstyle.xml" />
   <arg value="--standard=PSR2" />
   <arg path="${basedir}/analyzer/" />
  </exec>
 </target>

 <target name="phpcpd" description="Find duplicate code using PHPCPD">
  <exec executable="phpcpd">
   <arg value="--log-pmd" />
   <arg value="${basedir}/build/logs/pmd-cpd.xml" />
   <arg path="${basedir}/" />
  </exec>
 </target>

 <target name="phpdox" description="Generate API documentation using phpDox">
     <exec executable="phpdox">
         <arg value="-f" />
         <arg value="../phpdox.xml.dist" />
     </exec>
 </target>

 <target name="phpunit" description="Run unit tests with PHPUnit">
     <exec executable="phpunit" failonerror="true">
         <arg value="--log-junit" />
         <arg path="${basedir}/build/logs/junit.xml" />
         <arg value="--coverage-clover" />
         <arg path="${basedir}/build/logs/clover.xml" />
         <arg value="--configuration" />
         <arg path="${basedir}/tests/phpunit.xml" />
         <arg value="${basedir}" />
     </exec>
 </target>

 <target name="phpcb" description="Aggregate tool output with PHP_CodeBrowser">
  <exec executable="phpcb">
   <arg value="--log" />
   <arg path="${basedir}/build/logs" />
   <arg value="--source" />
   <arg path="${basedir}/" />
   <arg value="--output" />
   <arg path="${basedir}/build/code-browser" />
   <arg value="${basedir}" />
  </exec>
 </target>
</project>

You must to keep in mind the output paths that you have set, as you will need to put the same data on jenkins.

In order to ensure that everything is fine, just type ant on the commandline and it will automatically execute all the other targets (dependencies). You shouldn’t see any errors.

This is the process that it should follow:

  • Delete all the build folders (clean up any existing data).
  • Create all the folders where the build results will be stored.
  • Ensure that there aren’t any syntax errors in the code.
  • Generate a full report of the project, including metrics like:
    • Number of lines of code, comments and no-comments
    • Number of directories, files, namespaces, interfaces, classes and so on.
    • Number of testing classes, methods and functions
    • Number of abstract and concrete classes
    • Number of static, non-static, public and private methods
    • Number of global and class constants
    • Average length of the classes and methods
    • Cyclomatic complexity regarding lines of code and number of methods
  • Generate a full report of project dependencies, which includes metrics such as:
    • Complexity
    • Coupling
    • Hierarchy
    • Inheritance
    • and so on.
  • Analyze the source code looking for the following problems:
    • Possible bugs
    • Suboptimal code
    • Overcomplicated expressions
    • Unused parameters, methods, properties
  • Find coding standard violations, note that you can provide a predefined set of rules (such as PSR2) or just create your own custom rules/standard.
  • Perform an analysis of duplicated code (copy paste detector).
  • Generate documentation based on the phpdoc comments found on the source code.
  • Run all PHPUnit tests.
  • Generates a browsable representation of PHP code where sections with violations found by the previous tools are highlighted.
Once you have the ant build working, it’s time to create a new job on Jenkins.
In order to speed up this, you can use  Sebastian Bergmann’s template, whose page has been the inspiration of this guide, by the way. Or you can download my template, which is basically the same but with some customizations.

Either way, all you need is create a new folder under jenkins’ jobs directory, which in Ubuntu is located at /var/lib:

cd /var/lib/jenkins/jobs/
sudo mkdir thedeveloperworldisyours
cd thedeveloperworldisyours
#put here the template (config.xml) file.
cd ..
#change the owner and group of the files, you can get the proper name and group by making an ls -l under jenkins directory (jenkins:nogroup by default)
sudo chown -R jenkins:nogroup thedeveloperworldisyours/

Now, restart Jenkins, go to the web interface, select “New Job” and select the option “copy existing job”:
jenkins-new-job-thedeveloperworldisyours

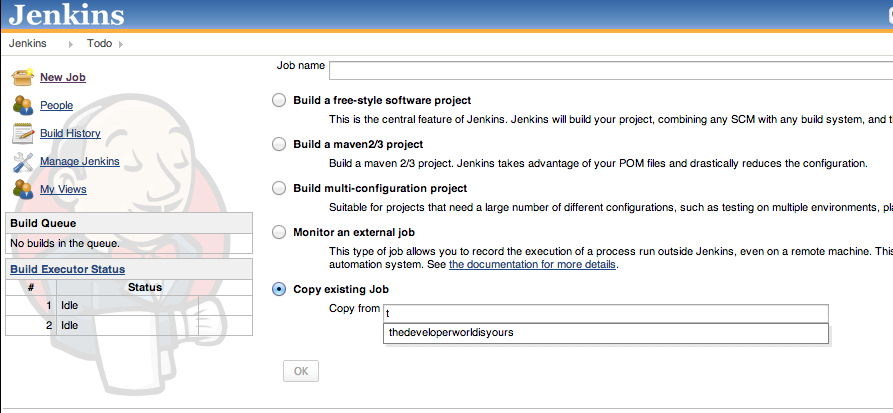
Have a look at the configuration and make the required changes (if you chosen my template you only need to change the source of your git files and the notification email).

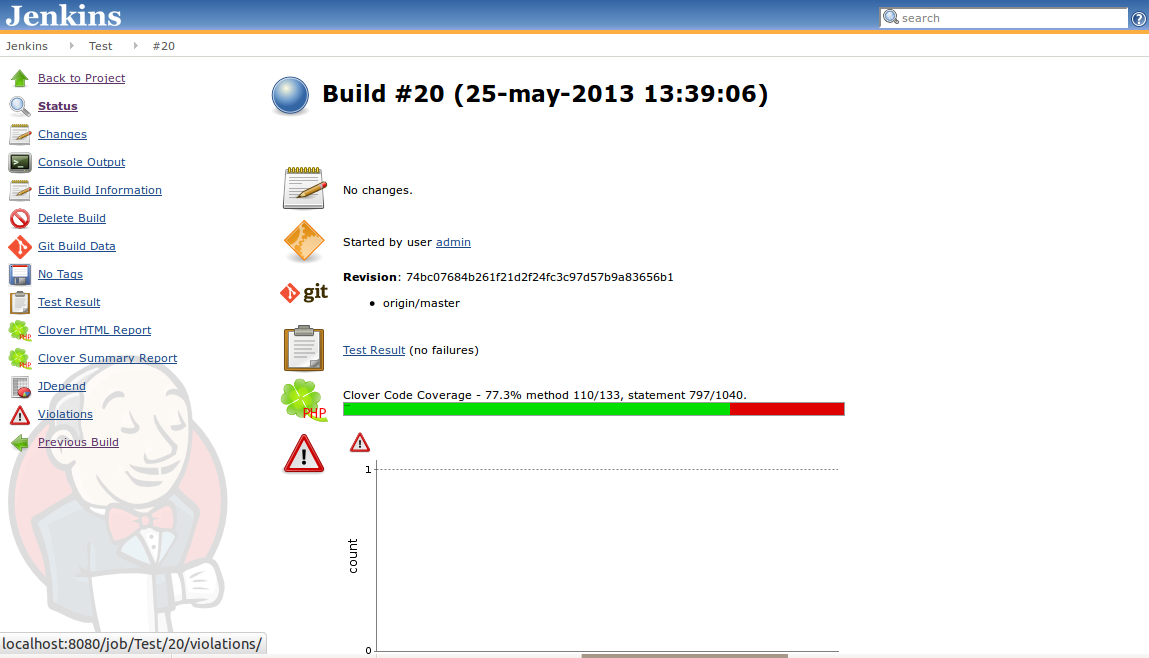
Finally, run the job and hopefully you will get the venerated blue ball at the end:
jenkins-blue-ball

And that’s about it. If you have any doubts, questions or problems, feel free to ask.

In my next post I’ll show you how to integrate jenkins with git, authenticating using ssh keys, adding precommit and postcommit hooks, and much more!

Jenkins for PHP from scratch – I

jenkins logoThis is meant to be a full guide of how to set up jenkins for php, starting from the very beginning until the end. As it might become a very long guide, I’ll try to simplify it as much as possible, and I’ll split it in two or three posts.

All the guide was made under Ubuntu 12.10 though it should work fairly well in most of the latest Ubuntu versions, and apart from the apt-get commands the rest should be the almost the same for any unix operating system.

For those who doesn’t know what Jenkins is, here you are a very concise description:

Jenkins is an open source continuous integration tool written in Java.

It’s a very powerful tool and definitely a must have for any development environment that attempts to achieve continuous integration. If you are still not convinced have a look at wikipedia link, and read the fully explanation.

Ok, said that, let’s start, assuming the worst case scenario, where you have your own php application running, but you don’t even have a single automated/unit test.

The first thing you should probably do is install phpunit and start writting some tests. In my case I installed php-test-helpers as well. The installation should be pretty straightforward:

sudo pear config-set auto_discover 1
sudo pear install -a pear.phpunit.de/PHPUnit
sudo pear channel-discover pear.phpunit.de
sudo pecl install phpunit/test_helpers

I’ll skip the part when you learn how to write your own tests :).

Assuming you already have a bunch of tests that cover most of your application code, and you feel like you are ready to install jenkins, let’s do it:

wget -q -O - http://pkg.jenkins-ci.org/debian/jenkins-ci.org.key | sudo apt-key add -
sudo sh -c 'echo deb http://pkg.jenkins-ci.org/debian binary/ > /etc/apt/sources.list.d/jenkins.list'
sudo apt-get update
sudo apt-get install jenkins

Jenkins should be already installed and its service should  have started automatically. It has a web interface at 8080 port by default, so now you should be able to browse it by typing the following url in your browser: http://localhost:8080

Now you should install several plugins that will probably be useful later. You might eventually get rid of some of them, but I advice you to give them a try, as they can provide you with very interesting information about your application. Typically, it’s recommended to install the following plugins:

– Jenkins GIT plugin: As I use git and my application is stored in bitbucket.
– Checkstyle: Useful if you want to apply some codding standard checks over the code.
– Jenkins Clover PHP: For processing PHPUnit code coverage reports.
–  DRY: For checking for duplicated code in the application
– HTML Publisher: For publishing HTML reports, such as the ones generated by PHPUnit.
– JDepend: For analizing the code coupling and dependencies.
– Plot: For being able to draw/display results as graphs
– PMD: For performing further analysis of the code such as locating unused variables, unnecessary objects and many more.
– Violations: For gathering all the isues found by all the plugins listed above.
– xUnit: To collect PHPUnit test results.

Note that here we are just installing the plugins, but in many cases we will need to install some additional software to actually be able to generate the reports. The plugins will take care of reading and displaying in a friendly way the mentioned reports. But don’t worry, we’ll cross that bridge when we get to it, for the moment installing the plugins is enough.

Once you have installed all the plugins that you want, let’s create our first job and test that everything is working as expected.

Open Jenkins and click on New Job.
Type any job name, select “Build a free-style software project” and hit OK.
In the next window, select your Source Code Management (git in my case) and configure its settings.
Assuming you are using GIT, you have to enter the repository URL, and you’ll probably get an authentication error, unless you are using a public repository.
Note that jenkins runs as an isolated service and it even creates its own pseudo-username. The easiest way to authenticate on the git repository from jenkins is either creating a new public key for jenkins username or just using your own keys. This is how I managed to get it working:
sudo cp .ssh/* /var/lib/jenkins/.ssh/
sudo chown jenkins:nogroup /var/lib/jenkins/.ssh/
This should fix the problem.
Now you just need to select your branch and if you want to browse the code from jenkins, just select the repository browser and enter the url.

Then, under the build section, click on Add build step, select “Execute shell” and type in the following:

phpunit --log-junit 'reports/unitreport.xml' --coverage-html 'reports/coverage' --coverage-clover 'reports/coverage/coverage.xml' path_of_your_tests

Finally, under the post-build section, add the following actions:
– Publish JUnit test result report: Enter the previous used file path: tests/reports/unitreport.xml
– Publish Cover PHP Coverage report: Enter the coverage file path: tests/reports/coverage/coverage.xml
Enable the option Publish HTML Report and enter the path tests/reports/coverage/
– Publish xUnit test result report

Once you are finished doing that, save the job, and start a new build.
If everything works as expected, you should see a blue ball at the end, and and something like this:
blue ball buildIf you have any problems have a look at the Console Output and it should help you to detect the problem. Let me know if you have any other problem and are not able to fix it.

That’s all for now, next time we’ll show how to use all the installed plugins and how to automatically start new builds once new code is pushed to the repository.

Handling Arrays In PHP

arrays in phpToday, I’ll try to show you how to take advantage of the powerful built-in functions to handle arrays in PHP.

If you are a software developer, you will be used to handle data arrays in any language, so you’ll probably appreciate any given buil-in function that does all the dirty job for you.

This is not intended to be another tutorial of how to use arrays in PHP. I’d like to show you how combine the usage of the built-in functions, and how to create your own callable functions to create your custom filters, sorts or whatever you need.

If you have a look at php.net, PHP provide a lot of built-in functions, that allow you to transform, merge and/or split the data, accoding to your needs. Let’s start having a look at some of them individually, in order to see how to combine them later.


array_unique: Remove the duplicated elements from the array.

$a = array(0, 1, 1, 2);
array_unique($a); // array(0,1,2);

array_diff: Compare two arrays and return the difference respect from the first one.
$a = array(0, 1, 2);
$b = array(0, 2);
array_diff($a, $b); // array(1)

array_filter: Allow to apply a custom filter to the array. By default filters all elements that cast to boolean false.
$a = array(0 => true, 1 => false, 2 => 454, 3 => '');
array_filter($a); //array(0 => true, 2 => 454) Note that the key values are preserved

array_flip: Exchange the keys with the values.
$a = array("key" => "value");
array_flip($a); // array("value" => "key")

array_merge: Join all the arrays into a big one.
$a = array(1, 2, 3);
$b = array(3, 4, 5, 6);
array_merge($a, $b); //array(1, 2, 3, 3, 4, 5, 6) Note that duplicated elements are kept.

array_count_values: Show the number of ocurrences found for each value.
$a = array(1, 2, 1, 3, 2, 1);
array_count_values($a); //array(1 => 3, 2 => 2, 3 => 1);

array_map: Apply the given function to all the elements of the array. Check array_walk as well.
$a = array(" the", " developer ", " world ", " is ", " yours");
array_map("trim", $a); //array("the", "developer", "word", "is", "yours"); Note that the original array remains unchanged.

There are too many functions and I can’t show all of them here, because that would be another whole post. However you can always check the official page for more information and examples.

Now let’s see a couple of usages that can be useful many times.

For instance, imagine you are given an array of data, and first you want to do is clear it, and remove the empty values.

$data = array(" THE ", "developer ", "World", "", "IS", " yours ");
array_map('strtolower', array_filter(array_map('trim', $data)));
array (
  "the",
  "developer",
  "world",
  "is",
  "yours",
)

Firstly, trim all the elements, then filter the empty values, and finally transform all the data to lower case.
Another way of doing the same thing with an anonymous function:

array_filter(array_map(function($value) { return strtolower(trim($value));}, $data));

You might also try array_walk:

//Note that the following line will actually modify the original array
//We might use an anonymous function as well like in the previous example, now we use create_function
array_walk($data, create_function('&$val', '$val = strtolower(trim($val));'));
//Now we just need to clear out the empty values
array_filter($data);

Imagine we are working within a class, we want to apply a class method funcion to each array element, and we need to pass some extra variable as well.

class TheDeveloperWorldIsYours {
    public function parseData(&$data) {
        $prefix = 'Parsed: ';
        return array_walk($data, array($this, 'parseElement'), $prefix);
    }
    /**
     * parseElement
     * Prepend prefix to the given element if the key is even
     *
     * @param mixed $elem
     * @param mixed $key
     * @param mixed $prefix
     * @access protected
     * @return void
     */
    private function parseElement(&$elem, $key, $prefix) {
        $elem = $key % 2 == 0 ? $prefix . $elem : $elem;
    }
}

$data = array(1, 2, 3, 4, 5);
$a = new TheDeveloperWorldIsYours();
$a->parseData($data);
//Output:
array (
  0 => 'Parsed: 1',
  1 => 2,
  2 => 'Parsed: 3',
  3 => 4,
  4 => 'Parsed: 5',
)

Note that array_walk will call the given function with both the value and the key, in this order, and all the additional parameters will be placed afterwards.

Now, Imagine you have an array of data and you want to get only the duplicated elements.

$data = array('handling', 'arrays', 'in', 'php', 'handling', 'php', 'hi', 'php');
array_diff_key($data, array_unique($data));
array (
  "handling",
  "php",
  "php",
)

Note that we are comparing the array keys, because as we said previously, array_unique preserve them. So if we compare the original array with the unique, the repeated values (nor its keys) will not be present in the unique array, and we will get all the repeated elements as a result.
Imagine we just wanted to get once the repeated values. We might just apply an array_unique to the previous code, but we might do the following as well:

array_keys(array_filter(array_count_values($data), function($val) { return $val !=1;}));
array (
  'handling',
  'php',
)

And that’s about it. Now, each time you have to do some array filtering, sorting, transforming or whatever, firstly have a look at the php.net and think how you could do it without creating a loop :).

PHPUnit tips

Hopefully, all this phpunit tips can help you to test your own applications. If you have any questions, or suggestions, feel free to contact me!Some people have asked me to write something about testing, so I’ve decided to make this post and share some phpunit tips that I’ve learn.

This is not meant to be another tutorial of how to start writing your own tests with phpunit. Well, actually it is, but the purpose of my post is to explain you how to deal with real scenarios. If you try to search for phpunit examples, most places will show you how to create very simple test cases, but I haven’t seen many places explaining how to do more complex things. That’s exactly the purpose of this article. Moreover, If you think something’s missing, I encourage you to ask me about it, and I’ll try to append it to the post, or if it’s a big enough subject, I’ll create a whole new article about it.

Let’s begin from a very simple case, and we’ll get into something a bit more complicated step by step.
I assume that you already know what’s PHPUnit, and some basic concepts of how to use it, like for instance the dataproviders or mocks. If you think that you need some help to get started, have a look at PHPUnit’s official page and feel free to ask me, if needed.

Happy case in PHPUnit: Imagine you have an isolated class and you wanna test some of its methods.


/**
 * This code has been taken just as an example, from: http://snipplr.com/view.php?codeview&id=9024
 */
 class TheDeveloperWorldIsYours {
public static function generateUrlFromText($strText) {
 $strText = preg_replace('/[^A-Za-z0-9-]/', ' ', $strText);
 $strText = preg_replace('/ +/', ' ', $strText);
 $strText = trim($strText);
 $strText = str_replace(' ', '-', $strText);
 $strText = preg_replace('/-+/', '-', $strText);
 $strText = strtolower($strText);
 return $strText;
}
}

How would you test that? This might be an attempt:

/**
 * TheDeveloperWorldIsYours_Test
 *
 * @uses PHPUnit_Framework_TestCase
 */
class TheDeveloperWorldIsYours_Test extends PHPUnit_Framework_TestCase {

    public function setUp() {
    }

    protected static $inputs = array(
        array('   string    with  many   spaces   ', 'string-with-many-spaces'),
        array('stríng wïth wêird Àccents', 'str-ng-w-th-w-ird-ccents'),
        array('$peci4l: ch%r·ct3r$.', 'peci4l-ch-r-ct3r'),
        array('nice-string', 'nice-string'),
        array('testing+with+phpunit-is-cool', 'testing-with-phpunit-is-cool')
    );

    public static function providerFormat()
    {
        return self::$inputs;
    }

    /**
     * testFormat
     * Ensure that the string is being properly cleaned
     *
     * @dataProvider providerFormat
     * @param mixed $input
     * @param mixed $result
     * @access public
     * @return void
     */
    public function testFormat($input, $result) {
        $this->assertEquals($result, TheDeveloperWorldIsYours::generateUrlFromText($input));
    }
}

I assume that you have already set up some boostrap that takes care of including the required files (in this case, we just need to include the file where the class TheDeveloperWorldIsYours before executing the test).
If you run the test file with PHPUnit, you’ll notice that all the tests are passing, and you might want to add some corner cases to feel more comfortable, such as very long strings, empty strings, numbers and so. However, that’s out of the scope of this post (I could create a whole article about it). Nobody would know better than you the casuistic of your application, and you are the one responsible to add all the missing tests in each case.

So, in this example, we have the best scenario: The method is public, and even static, so we don’t need to instantiate the class in order to test the method. Also, the class doesn’t inherits from any other class, so we don’t have to worry about including all the required files.

Now, let’s assume we had the following scenario:

 class TheDeveloperWorldIsYours extends Some_Parent_Class {
protected function generateUrlFromText($strText) {
 $strText = preg_replace('/[^A-Za-z0-9-]/', ' ', $strText);
 $strText = preg_replace('/ +/', ' ', $strText);
 $strText = trim($strText);
 $strText = str_replace(' ', '-', $strText);
 $strText = preg_replace('/-+/', '-', $strText);
 $strText = strtolower($strText);
 if($strText === '') {
    die('Unable to generate a valid url from the given input');
 }
 return $strText;
}
}

Continue reading

CSV File Validation In PHP (Part III)

This is the third and last part o the explanation of how to implement a csv file validation in php, using the Strategy Pattern.

If you remember the first post, we started implementing simple validations for each column, and in the second post, we wrote the main class that will take care of processing the whole CSV file.

Now, it’s time to implement the missing piece, to merge both parts. Basically, we need a class that should act as interface between our analyzer and the validators. We should apply a different validation’s implementation depending on the csv field.

In order to do that, I turn the field’s name into the class name that should take care of the validation of the field. In example, if the field is called “short_description”, then its validator class should be ShortDescription (UpperCamelCase). In order to separate the validators by phases, I prepend the phase with an underscore, so for instance, the previous example would eventually be Lexical_ShortDescription and Semantic_ShortDescription.

Then, all I have to do is instantiate the class, and call its method “validate” with the given input, and return the result.

This how it looks like:

class ValidatorContext {

private $strategy;
private $warnings;

/*
* Create the instance of the validator by building the class name with the UpperCamelCase format
* Generate a warning if the validator wasn't found, and create a generic validator instance
*
* @param $type string type of analysis
* @param $strategy string validator strategy class name
* @param $optData array optional data passed to the semantic validators
* @return void
*/
function __construct($type, $strategy, $profile, $optData = null) {
$this->warnings = array();
$validator = ucfirst($type) . '_' . str_replace(' ', '', ucwords(str_replace('_', ' ', $validator)));
if(class_exists($validator)) {
$this->strategy = new $validator($profile, $optData);
}else {
$this->strategy = new Generic_Validator();
$this->warnings[] = sprintf('Strategy %s (%s) is not implemented for the %s analizer ' . "\n", $strategy, $validator, $type);
}
}

/**
* Remove elements from memory
* @return void
*/
function __destruct() {
unset($this->strategy);
}

/**
* getTokens
* Return the tokens retrieved from the validator
* @return array
*/
public function getTokens() {
return $this->strategy->getTokens();
}

/**
* getErrors
* Return the errrors found during the validation
* @return array
*/
public function getErrors() {
return $this->strategy->getErrors();
}

/**
* getWarnings
* Return the warnings found during the validation
* @return array
*/
public function getWarnings() {
return $this->warnings;
}

/**
* getErrorMsg
     * Return the errror description to help the user to solve the problem
* @param $input string|array
* @return string
*/
public function getErrorMsg($input) {
return $this->strategy->getErrorMsg($input);
}

/**
* validate
* @access public
* @param $input mixed input data of the csv
* @return bool whether this data is valid or not for current validator
*/
public function validate(&$input) {
//Uncomment the line below to debug
//echo get_class($this->_strategy) . ": " . $input . "\n";
return $this->strategy->validate($input);
}

}

And basically, that’s about it. You might thrown an exception if there is no validation found for a certain field, but in my case its enough to just bypass the validation, so the Generic_Validator class, will always return true.

I hope this can help you to implement your own csv validation in php. If you want to download the source code of the whole application, I’ll put the link with some working examples of usage included during this week.

Updated on 14/04/2013

I’ve created a git repository with the source code of the CSV validator. I’ve included an example of usage with some demo files as well. All you have to do is clone the repository and execute “example.php” from php-cli.

You get the source code of the validator from here.