Model View Presenter on Android

What is MVP

  • View is a layer that displays data and reacts to user actions. On Android, this could be an Activity, a Fragment, an android.view.View or a Dialog.
  • Model is a data access layer such as database API or remote server API.
  • Presenter is a layer that provides View with data from Model. Presenter also handles background tasks.

On Android MVP is a way to separate background tasks from activities/views/fragments to make them independent of most lifecycle-related events. This way an application becomes simpler, overall application reliability increases up to 10 times, application code becomes shorter, code maintainability becomes better and developer’s life becomes happier.

Why MVP on Android

Reason 1: Keep It Stupid Simple

If you haven’t read this article yet, do it: The Kiss Principle

  • Most of the modern Android applications just use View-Model architecture.
  • Programmers are involved into fight with View complexities instead of solving business tasks.

Using only Model-View in your application you usually end up with “everything is connected with everything”.

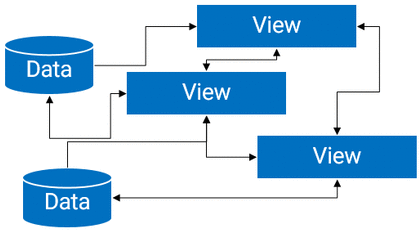
If this diagram does not look complex, then think about each View can disappear and appear at random time. Do not forget about saving/restoring of Views. Attach a couple of background tasks to that temporary Views, and the cake is ready!

An alternative to the “everything is connected with everything” is a god object.

A god object is overcomplicated; its parts cannot be reused, tested or easily debugged and refactored.

With MVP

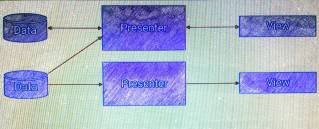
  • Complex tasks are split into simpler tasks and are easier to solve.
  • Smaller objects, less bugs, easier to debug.
  • Testable.

View layer with MVP becomes so simple, so it does not even need to have callbacks when requesting for data. View logic becomes very linear.

Reason 2: Background tasks

Whenever you write an Activity, a Fragment or a custom View, you can put all methods that are connected with background tasks to a different external or static class. This way your background tasks will not be connected with an Activity, will not leak memory and will not depend on Activity’s recreation. We call such object “Presenter”.

There are few different approaches to handle background tasks but non of them are as reliable as MVP is.

Why this works

Here is a little diagram that shows what happens with different application parts during a configuration change or during an out-of-memory event. Every Android developer should know this data, however this data is surprisingly hard to find.

                                          |    Case 1     |   Case 2     |    Case 3
                                          |A configuration| An activity  |  A process
                                          |   change      |   restart    |   restart
 ---------------------------------------- | ------------- | ------------ | ------------
 Dialog                                   |     reset     |    reset     |    reset
 Activity, View, Fragment                 | save/restore  | save/restore | save/restore
 Fragment with setRetainInstance(true)    |   no change   | save/restore | save/restore
 Static variables and threads             |   no change   |   no change  |    reset

Case 1: A configuration change normally happens when a user flips the screen, changes language settings, attaches an external monitor, etc. More on this event you can read here:configChanges.

Case 2: An Activity restart happens when a user has set “Don’t keep activities” checkbox in Developer’s settings and another activity becomes topmost.

Case 3: A process restart happens if there is not enough memory and the application is in the background.

Conclusion

Now you can see, a Fragment with setRetainInstance(true) does not help here – we need to save/restore such fragment’s state anyway. So we can simply throw away retained fragments to limit the number of problems.

                                          |A configuration|
                                          |   change,     |
                                          | An activity   |  A process
                                          |   restart     |   restart
 ---------------------------------------- | ------------- | -------------
 Activity, View, Fragment, DialogFragment | save/restore  | save/restore
 Static variables and threads             |   no change   |    reset

Now it looks much better. We only need to write two pieces of code to completely restore an application in any possible case:

  • save/restore for Activity, View, Fragment, DialogFragment;
  • restart background requests in case of a process restart.

The first part can done by usual means of Android API. The second part is a job for Presenter. Presenter just remembers which requests it should execute, and if a process restarts during execution, Presenter will execute them again.

You can see complete code here.

Also you can see how to make Model View Presenter on Android here.

Update Fragment ViewPager

How to Update Fragment ViewPager

My approach to update fragments within the viewpager is to use the setTag() method for any instantiated view in the instantiateItem() method. So when you want to change the data or invalidate the view that you need, you can call the findViewWithTag() method on the ViewPager to retrieve the previously instantiated view and modify/use it as you want without having to delete/create a new view each time you want to update some value.

Imagine for example that you have 100 pages with 100 TextViews and you only want to update one value periodically. With the approaches explained before, this means you are removing and instantiating 100 TextViews on each update. It does not make sense…

You can see complete code here

In my adapter

import android.support.v4.app.Fragment;
import android.support.v4.app.FragmentManager;
import android.support.v4.app.FragmentPagerAdapter;
import android.view.ViewGroup;

import com.thedeveloperworldisyours.refreshcurrentfragment.fragments.FirstFragment;
import com.thedeveloperworldisyours.refreshcurrentfragment.fragments.SecondFragment;
import com.thedeveloperworldisyours.refreshcurrentfragment.fragments.ThirdFragment;

import java.util.HashMap;
import java.util.Map;

/**
 * Created by javierg on 09/01/2017.
 */

public class MyPagerAdapter extends FragmentPagerAdapter {
    private static int NUM_ITEMS = 3;
    private Map<Integer, String> mFragmentTags;
    private FragmentManager mFragmentManager;

    public MyPagerAdapter(FragmentManager fragmentManager) {
        super(fragmentManager);
        mFragmentManager = fragmentManager;
        mFragmentTags = new HashMap<Integer, String>();
    }

    // Returns total number of pages
    @Override
    public int getCount() {
        return NUM_ITEMS;
    }

    // Returns the fragment to display for that page
    @Override
    public Fragment getItem(int position) {
        switch (position) {
            case 0:
                return FirstFragment.newInstance();
            case 1:
                return SecondFragment.newInstance();
            case 2:
                return ThirdFragment.newInstance();
            default:
                return null;
        }
    }

    // Returns the page title for the top indicator
    @Override
    public CharSequence getPageTitle(int position) {
        return "Page " + position;
    }

    @Override
    public Object instantiateItem(ViewGroup container, int position) {
        Object object = super.instantiateItem(container, position);
        if (object instanceof Fragment) {
            Fragment fragment = (Fragment) object;
            String tag = fragment.getTag();
            mFragmentTags.put(position, tag);
        }
        return object;
    }

    public Fragment getFragment(int position) {
        Fragment fragment = null;
        String tag = mFragmentTags.get(position);
        if (tag != null) {
            fragment = mFragmentManager.findFragmentByTag(tag);
        }
        return fragment;
    }
}

And now in my activity:

import android.support.v4.app.Fragment;
import android.support.v4.view.ViewPager;
import android.support.v7.app.AppCompatActivity;
import android.os.Bundle;

import com.thedeveloperworldisyours.refreshcurrentfragment.adapter.MyPagerAdapter;

public class MainActivity extends AppCompatActivity implements ViewPager.OnPageChangeListener{

    MyPagerAdapter mAdapterViewPager;

    @Override
    protected void onCreate(Bundle savedInstanceState) {
        super.onCreate(savedInstanceState);
        setContentView(R.layout.activity_main);
        ViewPager viewPager = (ViewPager) findViewById(R.id.activity_main_view_pager);
        mAdapterViewPager = new MyPagerAdapter(getSupportFragmentManager());
        viewPager.setAdapter(mAdapterViewPager);
        viewPager.addOnPageChangeListener(this);
    }

    @Override
    public void onPageScrolled(int position, float positionOffset, int positionOffsetPixels) {

    }

    @Override
    public void onPageSelected(int position) {

        Fragment fragment = mAdapterViewPager.getFragment(position);
        if (fragment != null) {
            fragment.onResume();
        }
    }

    @Override
    public void onPageScrollStateChanged(int state) {

    }
}

Finally in your fragment, something like that:

import android.animation.Animator;
import android.content.Context;
import android.os.Bundle;
import android.support.v4.app.Fragment;
import android.util.Log;
import android.view.LayoutInflater;
import android.view.View;
import android.view.ViewAnimationUtils;
import android.view.ViewGroup;
import android.widget.RelativeLayout;

import com.thedeveloperworldisyours.refreshcurrentfragment.R;

public class FirstFragment extends Fragment {
    RelativeLayout mView;
    Context mContext;

    public FirstFragment() {
        // Required empty public constructor
    }

    /**
     * Use this factory method to create a new instance of
     * this fragment using the provided parameters.
     *
     * @return A new instance of fragment FirstFragment.
     */
    // TODO: Rename and change types and number of parameters
    public static FirstFragment newInstance() {
        return new FirstFragment();
    }

    @Override
    public void onCreate(Bundle savedInstanceState) {
        super.onCreate(savedInstanceState);
    }

    @Override
    public View onCreateView(LayoutInflater inflater, ViewGroup container,
                             Bundle savedInstanceState) {
        // Inflate the layout for this fragment
        View view = inflater.inflate(R.layout.fragment_first, container, false);
        mView = (RelativeLayout) view.findViewById(R.id.fragment_first_view);
        return view;
    }

    @Override
    public void onResume() {
        super.onResume();
        onAnimationStart();
    }

    @Override
    public void onAttach(Context context) {
        super.onAttach(context);
        mContext = context;
    }

    public void onAnimationStart() {
        Log.d("FirstFragment","onAnimationStart()");

        // get the center for the clipping circle
        int cx = (mView.getRight());
        int cy = (mView.getBottom());

        // get the final radius for the clipping circle
        int finalRadius = Math.max(mView.getWidth(), mView.getHeight());

        // create the animator for this view (the start radius is zero)
        Animator anim =
                ViewAnimationUtils.createCircularReveal(mView, cx, cy, 0, finalRadius);
        anim.setDuration(1000);

        // make the view visible and start the animation
        mView.setVisibility(View.VISIBLE);
        anim.start();
    }

}

You can see complete code here

How-To Install Magento 2 on OpenShift – II

Magento 2

Magento 2

Last week we posted a guide to Install Magento 2 on OpenShift. It was just an experiment, and we didn’t intend to do anything else after we showed the proof of concept. However, since the guide has become very popular, we’ve decided to dig out a bit more into this and see if there was a less hacky way of install Magento 2 in OpenShift, and there  we are glad to say that we’ve managed to get it up and running with MySQL 5.7, by using another community cartridge.

It’s been very challenging due the hard disk limitation of 1GB, and we’ve had to delete everything that wasn’t absolutely necessary, as well as give up on performance in MySQL settings to squeeze a few more extra space, but eventually it worth the effort!

The steps to spot a new instance are almost the same as in our previous post, but this time we’ve simplified them even more within a simple bash script.

All you have to do is copy and paste this in a .sh file, set your API KEY & SECRET and run it from your favourite terminal (sh filename.sh). Remember that you need to have rhc installed and your Magento API Keys (check our previous post if you need any help with that):

#!/bin/bash

#CHANGE THIS SETTINGS
myapp='myapp' #App name
API_KEY='YOUR API KEY'
API_SECRET='YOUR API SECRET'
# Database settings, change them if you want
USERNAME='magento'
PASSWORD='123456'

regex='Git remote: \K(.*) (?=Cloned)'
echo Creating app...
newapp=$(rhc create-app $myapp http://cartreflect-claytondev.rhcloud.com/github/boekkooi/openshift-cartridge-nginx)
echo $newapp
GIT_REMOTE=`echo $newapp | grep -Po "$regex"`
echo $GIT_REMOTE

echo Setting env variables
rhc set-env API_KEY=$API_KEY API_SECRET=$API_SECRET OPENSHIFT_MYSQL_DB_USERNAME=$USERNAME OPENSHIFT_MYSQL_DB_PASSWORD=$PASSWORD -a $myapp

echo Installing cartridges
rhc cartridge add -a $myapp http://cartreflect-claytondev.rhcloud.com/github/icflorescu/openshift-cartridge-mysql
rhc cartridge add -a $myapp http://cartreflect-claytondev.rhcloud.com/github/boekkooi/openshift-cartridge-php

echo Cloning repository
git clone https://github.com/javilumbrales/magento2-openshift.git
cd magento2-openshift
git pull
git checkout magento-2

echo Deploying!
git remote add $myapp $GIT_REMOTE
git push $myapp magento-2:master -f

That’s it, your Magento 2 instance should be up and running on http://$myapp-$namespace.rhcloud.com.

The admin url and credentials are the same (/admin123 with admin / OpenShiftAdmin123)

Please, note that after deploying the app, the gear is almost out of space, so you would only be able to add minor data/changes to it. Hopefully, it should be enough for you to test it and see how it performs, and if you like it you could always upgrade your account to get some more space.

Enjoy!

Show me the code

How-To Install Magento 2 on OpenShift

MAgento 2If you are wondering how to try and install Magento 2 on a free hosting provider, keep reading. This is how we managed to deploy Magento 2 to Openshift without spending a penny!

This guide assumes you know OpenShift and have some basic experience with it, otherwise head to www.openshift.com, create an account and do some reading and basic tests.

Note that at the end of this post you’ll have the link to a repository that is almost ready to spin up a Magento 2 instance, but if you want to be aware of the caveats we’ll recommend you to keep on reading.

To begin with, we have the following “out of the box” issues:

  • Magento 2 requires PHP 5.5+ and OpenShift currently has official cartridges of up to PHP 5.4
  • Magento 2 requires shit lot of space, and OpenShift free gears are limited to 1GB
  • Magento 2 requires MySQL 5.6+ and OpenShift currently supports up to MySQL 5.5 official cartridges

To solve the PHP version issue, we firstly tried a community cartridge that installs Nginx and PHP 5.5/5.6. The cartridge itself worked flawlessly, but unfortunately then we run out space while running composer install after deploying the Magento 2 repository. We searched for something else and tried to run Magento 2 in PHP 5.4 (it was a bad idea btw). Eventually, we had to come back to that cartridge, as it seemed to most straightforward way to go. There doesn’t seem to be much options out there to install PHP 5.4+ in OpenShift without manually downloading the source code and compiling it and that would be beyond the scope of our purpose.

Moving on to the next issue, the out of space problems: While deploying Magento 2 to OpenShift, you almost run out of space, and yet you have to run `composer install` to fetch all the dependencies, and there are quite a few. While running `composer install –no-dev`, it would fail at half way, showing an error: Disk quota usage exceeded. We tried clearing composer cached files to free up some space but still wasn’t enough.

After a lot of back and forth, we managed to install all the dependencies without running out of space, but at the price of deleting the rollback deployments ($OPENSHIFT_DEPLOYMENTS_DIR). Note that this is not recommended at all, as you are actually loosing many of the benefits of using OpenShift, but if you ever need to make some extra space, you can run the following command in the OpenShift instance (We actually added that command to the `post_deploy` action_hooks script (file .openshift/action_hooks/post_deploy of your app’s repository):

rm -fr $OPENSHIFT_DEPLOYMENTS_DIR/*/repo/

Now, we had enough space available to install the dependencies, but it is required to have an API KEY and an API SECRET to be able to fetch them from the Magento Repository. You can get your own key pair for free by following this guide (basically create an account in Magento, and click on Generate Keys inside the Developers section after logging in). In order to keep the keys outside the source code, we opted to set them as environment variables (API_KEY and API_SECRET) while starting the new app. You’ll see how to do this further down.

Last, but not least, the issue with the MySQL version. After some research we ended up with the conclusion that it will not be easy at all to install MySQL on OpenShift, not to mention that we were already struggling with the disk space available. That’s why we decided that, for the shake of the experiment, we would try to make Magento 2 run over MySQL 5.5. After all, it wouldn’t be that different, would it? It turns out it is actually quite different. We were expecting to get away with this by just amending the check for the MySQL version in the Magento code, but that wasn’t enough. While running the installer, it would crash while creating the tables due some incompatible definitions. It took a bit of hacking that we are not proud of, which basically allowed us to install it by doing the following changes:

  • Removing the checks for the MySQL version
  • Amending a few table definitions that were not compatible with MySQL5.5:
    • The first error was: “There can be only one TIMESTAMP column with CURRENT_TIMESTAMP in DEFAULT or ON UPDATE clause”. In order to fix it we basically got rid of the CURRENT_TIMESTAMP that was being added to the updated_at columns.
    • The second error was: “The used table type doesn’t support FULLTEXT indexes”. To fix it we got rid of the FULLTEXT indexes on the InnoDB tables.

After the above changes, we managed to install Magento 2 successfully. However, as a result of this, the database and the app’s behaviour might (and will) not be stable, mostly in regards of search functionality, but also there will be a few datetime columns that will not be updated accordingly after data updates. Hopefully, all of this will not be needed soon as OpenShift provides an official MySQL 5.6 cartridge.

The “good news” are that our repository automatically provides the database schema that we managed to generate (which is compatible with mysql 5.5), so the source code of Magento 2 is not modified at all, as the changes were only required for the installation stage.

After this, we had a few permissions issues, and we had to add the config.php and env.php files (generated by the installation) to the repository with a default config and the database credentials taken from the environment variables. As Magento 2 doesn’t use local.xml anymore, it was fairly easy to replace the hardcoded database credentials on the env.php file by getenv(‘OPENSHIFT_MYSQL_DB_USERNAME’), etc. and it just worked. This is very convenient as well because you don’t have to make any changes on this files for it to work out of the box in your app, as it will get the database credentials from OpenShift provided environment variables.

Ok, enough talking. We’ve put all this together in a repository for you, so now you can almost almost plug & play it by following the below steps.

How to spot a new OpenShift app with Magento 2

In order to start a new app, all you need to have is:

Then, open a termial and run the below commands:

# Create a new OpenShift app with NGINX as web server
# Replace "123" by your actual api key & secrets and $myapp with your preferred app name.
# Write down the "Git Remote" ssh url that will be shown once the command finishes.
rhc create-app $myapp http://cartreflect-claytondev.rhcloud.com/github/boekkooi/openshift-cartridge-nginx API_KEY=123 API_SECRET=123
# Install PHP 5.6 cartridge into the app
rhc cartridge add -a $myapp http://cartreflect-claytondev.rhcloud.com/github/boekkooi/openshift-cartridge-php
# Install mysql-5.5 cartridge into the app
rhc cartridge add -a $myapp mysql-5.5
# Clone our repository and push it to your app, we will take care of everything for you :)
git clone https://github.com/javilumbrales/magento2-openshift
cd magento2-openshift
# Remember to replace $myapp by your app's name and YOUR_GIT_REMOTE by your actual repository url, the one that you got when you created the app (ie. should be something like ssh://*******@magento2-mage2.rhcloud.com/~/git/yourappname.git/)
git remote add $myapp YOUR_GIT_REMOTE
git push $myapp master -f

This whole process will take a while, but you don’t have to do anything other than copy and paste the commands and wait. Hopefully, you’ll see the following success message at the end:

remote: Deployment completed with status: success

Done! You should now be able to browse your Magento 2 store on http://$myapp-$mynamespace.rhcloud.com/.

Probably the statics will be missing, and in order to fix that SSH into your app (`rhc ssh $myapp`) and run the below command to deploy the statics:

php $OPENSHIFT_REPO_DIR/public/bin/magento setup:static-content:deploy

Note that you might need to run it a few times, as, for some reason that we couldn’t figure out, sometimes it just crashes. Retrying a few times seems to do the trick though.

Eventually, you should see at the end of the execution the following message:

New version of deployed files: XXXXXXXX

And that’s it! Now your Magento 2 app should be completely up and running! The admin is available on http://$myapp-$mynamespace.rhcloud.com/admin123 with the credentials: admin / OpenShiftAdmin123.

Good luck!

Conclusions

It was a quite painful process, and it took several hacks to get Magento 2 running on OpenShift, but mostly due the outdated official cartridges for both PHP and MySQL. Hopefully, they’ll be updated soon and we should be able to make this process much easier and quicker.

After all, the app seems to perform very well in terms of speed, and we haven’t spend any time optimising any settings. So it certainly looks that OpenShift might potentially be a very interesting option to host a Magento 2 store. As per today, this is only on an experimental stage, to say the least, but it was a very challenging and interesting task to find our ways around the many limitations that we faced, and we finally did it! (well, kind of :)).

Troubleshooting

If you get this error while deploying the app:

remote: [Composer\Downloader\TransportException]
remote: The ‘https://repo.magento.com/archives/magento/composer/magento-composer-1.0.2.0.zip’ URL required authentication.
remote: You must be using the interactive console to authenticate

Make sure that your API_KEY and API_SECRET env variables are set with the proper values. You can re-set them with the following command:

rhc set-env API_KEY=ENTER_YOUR_API_KEY_HERE API_SECRET=ENTER_YOUR_API_SECRET_HERE -a $myapp

Demo

Finally, if you just want to have a look at the resulst, you can find here our Magento 2 app running on OpenShift: http://demo-mage2.rhcloud.com/

You can also login to the admin on http://demo-mage2.rhcloud.com/index.php/admin_1ep725/ (User: demo Pass: demo123)

Show me the code!

Asymmetric Encryption (RSA)

RSA is one of the first practical public-key cryptosystems and is widely used for secure data transmission. In such acryptosystem, the encryption key is public and differs from the decryption key which is kept secret. In RSA, this asymmetry is based on the practical difficulty of factoring the product of two large prime numbers, the factoring problem. RSA is made of the initial letters of the surnames of Ron Rivest, Adi Shamir, and Leonard Adleman, who first publicly described the algorithm in 1977. Clifford Cocks, an English mathematician, had developed an equivalent system in 1973, but it was notdeclassified until 1997.

A user of RSA creates and then publishes a public key based on two large prime numbers, along with an auxiliary value. The prime numbers must be kept secret. Anyone can use the public key to encrypt a message, but with currently published methods, if the public key is large enough, only someone with knowledge of the prime numbers can feasibly decode the message. Breaking RSA encryption is known as the RSA problem; whether it is as hard as the factoring problem remains an open question.

public class AsymmetricAlgorithmRSA {

    public static final String sTAG = "AsymmetricAlgorithmRSA";

    /**
     * Generated key pair for 1024-bit RSA encryption and decryption
     * @return
     */
    public static KeyPair generateKey() {
        KeyPair keyPair = null;
        try {
            KeyPairGenerator kpg = KeyPairGenerator.getInstance("RSA");
            kpg.initialize(1024);
            keyPair = kpg.genKeyPair();

        } catch (Exception e) {
            Log.e(sTAG, String.valueOf(R.string.asymmetric_algorithm_rsa_key));
        }
        return keyPair;
    }

    /**
     * Encoded the original data with RSA private key
     * @param privateKey
     * @param encryptionText
     * @return
     */
    public static byte[] encryption(Key privateKey, String encryptionText) {
        byte[] encodedBytes = null;
        try {
            Cipher c = Cipher.getInstance("RSA");
            c.init(Cipher.ENCRYPT_MODE, privateKey);
            encodedBytes = c.doFinal(encryptionText.getBytes());
        } catch (Exception e) {
            Log.e(sTAG, String.valueOf(R.string.asymmetric_algorithm_rsa_enryption_error));
        }
        return encodedBytes;
    }

    /**
     * Decoded the encoded data with RSA public key
     * @param publicKey
     * @param encodedBytes
     * @return
     */
    public static byte[] decryption(Key publicKey, byte[] encodedBytes) {
        byte[] decodedBytes = null;
        try {
            Cipher c = Cipher.getInstance("RSA");
            c.init(Cipher.DECRYPT_MODE, publicKey);
            decodedBytes = c.doFinal(encodedBytes);
        } catch (Exception e) {
            Log.e(sTAG, String.valueOf(R.string.asymmetric_algorithm_rsa_deryption_error));
        }
        return decodedBytes;
    }
}

Example in github

And now in our activity:

import android.os.Bundle;
import android.support.v7.app.AppCompatActivity;
import android.support.v7.widget.Toolbar;
import android.util.Base64;
import android.view.View;
import android.widget.Button;
import android.widget.EditText;
import android.widget.TextView;

import com.thedeveloperworldisyous.encryptionfile.utils.AsymmetricAlgorithmRSA;
import com.thedeveloperworldisyous.encryptionfile.utils.Utils;

import java.security.Key;
import java.security.KeyPair;

public class RSAActivity extends AppCompatActivity {

    public TextView mInPutTextView, mEncodedTextView, mDecoded;
    public EditText mEditText;

    @Override
    protected void onCreate(Bundle savedInstanceState) {
        super.onCreate(savedInstanceState);
        setContentView(R.layout.activity_rsa);
        Toolbar toolbar = (Toolbar) findViewById(R.id.toolbar);
        setSupportActionBar(toolbar);

        mEditText = (EditText) findViewById(R.id.activity_rsa_edit_text);
        mInPutTextView = (TextView)findViewById(R.id.activity_rsa_text_view);
        mEncodedTextView  = (TextView)findViewById(R.id.activity_rsa_encode_text_view);
        mDecoded = (TextView)findViewById(R.id.activity_rsa_decode_text_view);

        setSupportActionBar(toolbar);

    }

    public void encodeAndDecodeRSA(View view) {

        Utils.hideKeyboard(this);
        String stringText = mEditText.getText().toString();
        mEditText.setText("");
        mInPutTextView.setText(stringText);

        KeyPair keyPair = AsymmetricAlgorithmRSA.generateKey();
        Key publicKey = keyPair.getPublic();
        Key privateKey = keyPair.getPrivate();

        byte[] encodedBytes = AsymmetricAlgorithmRSA.encryption(privateKey, stringText);
        mEncodedTextView.setText(Base64.encodeToString(encodedBytes, Base64.DEFAULT));

        byte[] decodedBytes = AsymmetricAlgorithmRSA.decryption(publicKey, encodedBytes);
        mDecoded.setText(new String(decodedBytes));
    }
}

Example in github