How to Implement Horizontal ListView on Android

Horizontal ListView on Android

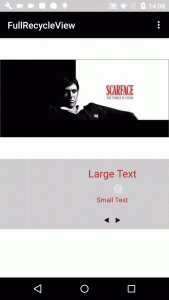
Actually android doesn’t have a listView in horizontal view. Find below an example of what you will get if you follow this tutorial:
We need these things:
*Activity and layout.
*Adapter and list_item.
*Data object.
*DividerItemDecoration (it divides our item).

As per Android Documentaion recyclerview is the new way to organize the items in listview and to be displayed horizontally.

Advantages:

*Since by using Recyclerview Adapter, ViewHolder pattern is automatically implemented
*Animation is easy to perform
*Many more features

The code is in GitHub

In your dependencies you add this line

compile "com.android.support:recyclerview-v7:24.0.0"

dimens.xml

<resources>
    <!-- Default screen margins, per the Android Design guidelines. -->
    <dimen name="activity_main_horizontal_margin">16dp</dimen>
    <dimen name="activity_main_vertical_margin">16dp</dimen>
      
    <;dimen name="activity_main_height">150dp</dimen>
</resources>

list_item.xml

&lt;?xml version="1.0" encoding="utf-8"?&gt;
&lt;LinearLayout xmlns:android="http://schemas.android.com/apk/res/android"
    android:orientation="vertical" android:layout_width="match_parent"
    android:layout_height="match_parent"&gt;
    &lt;TextView
        android:id="@+id/item_list_view_text_view"
        android:layout_width="wrap_content"
        android:layout_height="wrap_content"
        android:padding="@dimen/activity_main_vertical_margin"
        android:text="Large Text"
        android:textAppearance="?android:attr/textAppearanceLarge" /&gt;
  
    &lt;TextView
        android:id="@+id/item_list_view_text_view_two"
        android:layout_width="match_parent"
        android:layout_height="wrap_content"
        android:gravity="center"
        android:padding="@dimen/activity_main_vertical_margin"
        android:text="Small Text"
        android:textAppearance="?android:attr/textAppearanceSmall" /&gt;
&lt;/LinearLayout&gt;

activity_main.xml

&lt;?xml version="1.0" encoding="utf-8"?&gt;
&lt;RelativeLayout xmlns:android="http://schemas.android.com/apk/res/android"
    xmlns:tools="http://schemas.android.com/tools"
    android:layout_width="match_parent"
    android:layout_height="match_parent"
    tools:context="com.example.javier.recyclerviewhorizontallistviewtwo.MainActivity"&gt;
  
    &lt;android.support.v7.widget.RecyclerView
        android:id="@+id/activity_main_recyclerview"
        android:layout_width="match_parent"
        android:layout_height="@dimen/activity_main_height"
        android:background="@android:color/darker_gray" /&gt;
  
&lt;/RelativeLayout&gt;

Our data
Data.java

public class HorizontalData {
    private String mTitle;
    private String mSubTitle;

    HorizontalData(String title, String subTitle){
        mTitle = title;
        mSubTitle = subTitle;
    }

    public String getmTitle() {
        return mTitle;
    }

    public void setmTitle(String mTitle) {
        this.mTitle = mTitle;
    }

    public String getmSubTitle() {
        return mSubTitle;
    }

    public void setmSubTitle(String mSubTitle) {
        this.mSubTitle = mSubTitle;
    }
}

DividerItemDecoration.java

package com.example.javier.swipe;

import android.content.Context;
import android.content.res.TypedArray;
import android.graphics.Canvas;
import android.graphics.Rect;
import android.graphics.drawable.Drawable;
import android.support.v7.widget.LinearLayoutManager;
import android.support.v7.widget.RecyclerView;
import android.view.View;

/**
 * Created by javierg on 16/02/16.
 */
public class DividerItemDecoration extends RecyclerView.ItemDecoration {

    private static final int[] ATTRS = new int[]{
            android.R.attr.listDivider
    };

    public static final int HORIZONTAL_LIST = LinearLayoutManager.HORIZONTAL;
    public static final int VERTICAL_LIST = LinearLayoutManager.VERTICAL;
    private Drawable mDivider;
    private int mOrientation;

    public DividerItemDecoration(Context context, int orientation) {
        final TypedArray a = context.obtainStyledAttributes(ATTRS);
        mDivider = a.getDrawable(0);
        a.recycle();
        setOrientation(orientation);
    }

    public void setOrientation(int orientation) {
        if (orientation != HORIZONTAL_LIST &amp;&amp; orientation != VERTICAL_LIST) {
            throw new IllegalArgumentException("invalid orientation");
        }
        mOrientation = orientation;
    }

    @Override
    public void onDrawOver(Canvas c, RecyclerView parent, RecyclerView.State state) {
        if (mOrientation == VERTICAL_LIST) {
            drawVertical(c, parent);
        } else {
            drawHorizontal(c, parent);
        }
    }

    public void drawVertical(Canvas c, RecyclerView parent) {
        final int left = parent.getPaddingLeft();
        final int right = parent.getWidth() - parent.getPaddingRight();
        final int childCount = parent.getChildCount();
        for (int i = 0; i &lt; childCount; i++) {
            final View child = parent.getChildAt(i);
            final RecyclerView.LayoutParams params = (RecyclerView.LayoutParams) child
                    .getLayoutParams();
            final int top = child.getBottom() + params.bottomMargin;
            final int bottom = top + mDivider.getIntrinsicHeight();
            mDivider.setBounds(left, top, right, bottom);
            mDivider.draw(c);
        }
    }

    public void drawHorizontal(Canvas c, RecyclerView parent) {
        final int top = parent.getPaddingTop();
        final int bottom = parent.getHeight() - parent.getPaddingBottom();
        final int childCount = parent.getChildCount();
        for (int i = 0; i &lt; childCount; i++) {
            final View child = parent.getChildAt(i);
            final RecyclerView.LayoutParams params = (RecyclerView.LayoutParams) child
                    .getLayoutParams();
            final int left = child.getRight() + params.rightMargin;
            final int right = left + mDivider.getIntrinsicHeight();
            mDivider.setBounds(left, top, right, bottom);
            mDivider.draw(c);
        }
    }

    @Override
    public void getItemOffsets(Rect outRect, View view, RecyclerView parent, RecyclerView.State state) {
        if (mOrientation == VERTICAL_LIST) {
            outRect.set(0, 0, 0, mDivider.getIntrinsicHeight());
        } else {
            outRect.set(0, 0, mDivider.getIntrinsicWidth(), 0);
        }
    }
}

CustomRecyclerViewAdapter.java

public class HorizontalRecyclerViewAdapter extends RecyclerView
        .Adapter&lt;HorizontalRecyclerViewAdapter
        .DataObjectHolder&gt; {
    private static String LOG_TAG = "MyRecyclerViewAdapter";
    private ArrayList&lt;HorizontalData&gt; mDataset;
    private static MyClickListener myClickListener;

    public static class DataObjectHolder extends RecyclerView.ViewHolder
            implements View
            .OnClickListener {
        TextView mLabel;
        TextView mDateTime;

        public DataObjectHolder(View itemView) {
            super(itemView);
            mLabel = (TextView) itemView.findViewById(R.id.horizontal_list_item_text_view);
            mDateTime = (TextView) itemView.findViewById(R.id.horizontal_list_item_text_view_two);
            itemView.setOnClickListener(this);
        }

        @Override
        public void onClick(View v) {
            myClickListener.onItemClick(getAdapterPosition(), v);
        }
    }

    public void setOnItemClickListener(MyClickListener myClickListener) {
        this.myClickListener = myClickListener;
    }

    public HorizontalRecyclerViewAdapter(ArrayList&lt;HorizontalData&gt; myDataset) {
        mDataset = myDataset;
    }

    @Override
    public DataObjectHolder onCreateViewHolder(ViewGroup parent,
                                               int viewType) {
        View view = LayoutInflater.from(parent.getContext())
                .inflate(R.layout.horizontal_list_item, parent, false);

        DataObjectHolder dataObjectHolder = new DataObjectHolder(view);
        return dataObjectHolder;
    }

    @Override
    public void onBindViewHolder(DataObjectHolder holder, int position) {
        holder.mLabel.setText(mDataset.get(position).getmTitle());
        holder.mDateTime.setText(mDataset.get(position).getmSubTitle());
    }

    public void addItem(HorizontalData dataObj, int index) {
        mDataset.add(dataObj);
        notifyItemInserted(index);
    }

    public void deleteItem(int index) {
        mDataset.remove(index);
        notifyItemRemoved(index);
    }

    @Override
    public int getItemCount() {
        return mDataset.size();
    }

    public interface MyClickListener {
        public void onItemClick(int position, View v);
    }
}

Our Activity or Fragment

public class HorizontalFragment extends Fragment implements HorizontalRecyclerViewAdapter.MyClickListener{
    private RecyclerView mRecyclerView;
    private HorizontalRecyclerViewAdapter mAdapter;
    private RecyclerView.LayoutManager mLayoutManager;
    private static String LOG_TAG = "RecyclerViewActivity";

    public HorizontalFragment() {
        // Required empty public constructor
    }

    public static HorizontalFragment newInstance() {
        HorizontalFragment fragment = new HorizontalFragment();
        return fragment;
    }

    @Override
    public void onCreate(Bundle savedInstanceState) {
        super.onCreate(savedInstanceState);
    }

    @Override
    public View onCreateView(LayoutInflater inflater, ViewGroup container,
                             Bundle savedInstanceState) {
        // Inflate the layout for this fragment
        View view = inflater.inflate(R.layout.horizontal_fragment, container, false);
        mRecyclerView = (RecyclerView) view.findViewById(R.id.fragment_horizontal_recycler_view);
        mRecyclerView.setHasFixedSize(true);


        mLayoutManager = new LinearLayoutManager(getActivity(),LinearLayoutManager.HORIZONTAL, false);//new LinearLayoutManager(this);
        mRecyclerView.setLayoutManager(mLayoutManager);


        mAdapter = new HorizontalRecyclerViewAdapter(getDataSet());
        mRecyclerView.setAdapter(mAdapter);
        RecyclerView.ItemDecoration itemDecoration =
                new DividerItemDecoration(getActivity(), LinearLayoutManager.HORIZONTAL);
        mRecyclerView.addItemDecoration(itemDecoration);
        mAdapter.setOnItemClickListener(this);


        // Code to Add an item with default animation
        //((MyRecyclerViewAdapter) mAdapter).addItem(obj, index);

        // Code to remove an item with default animation
        //((MyRecyclerViewAdapter) mAdapter).deleteItem(index);


        return view;
    }

    private ArrayList&lt;HorizontalData&gt; getDataSet() {
        ArrayList results = new ArrayList&lt;&gt;();
        for (int index = 0; index &lt; 20; index++) {
            HorizontalData obj = new HorizontalData("Some Primary Text " + index,
                    "Secondary " + index);
            results.add(index, obj);
        }
        return results;
    }


    @Override
    public void onItemClick(int position, View v) {
        Log.i(LOG_TAG, " Clicked on Item " + position);
    }
}

Now We have our horizontal ListView.

The code is in GitHub

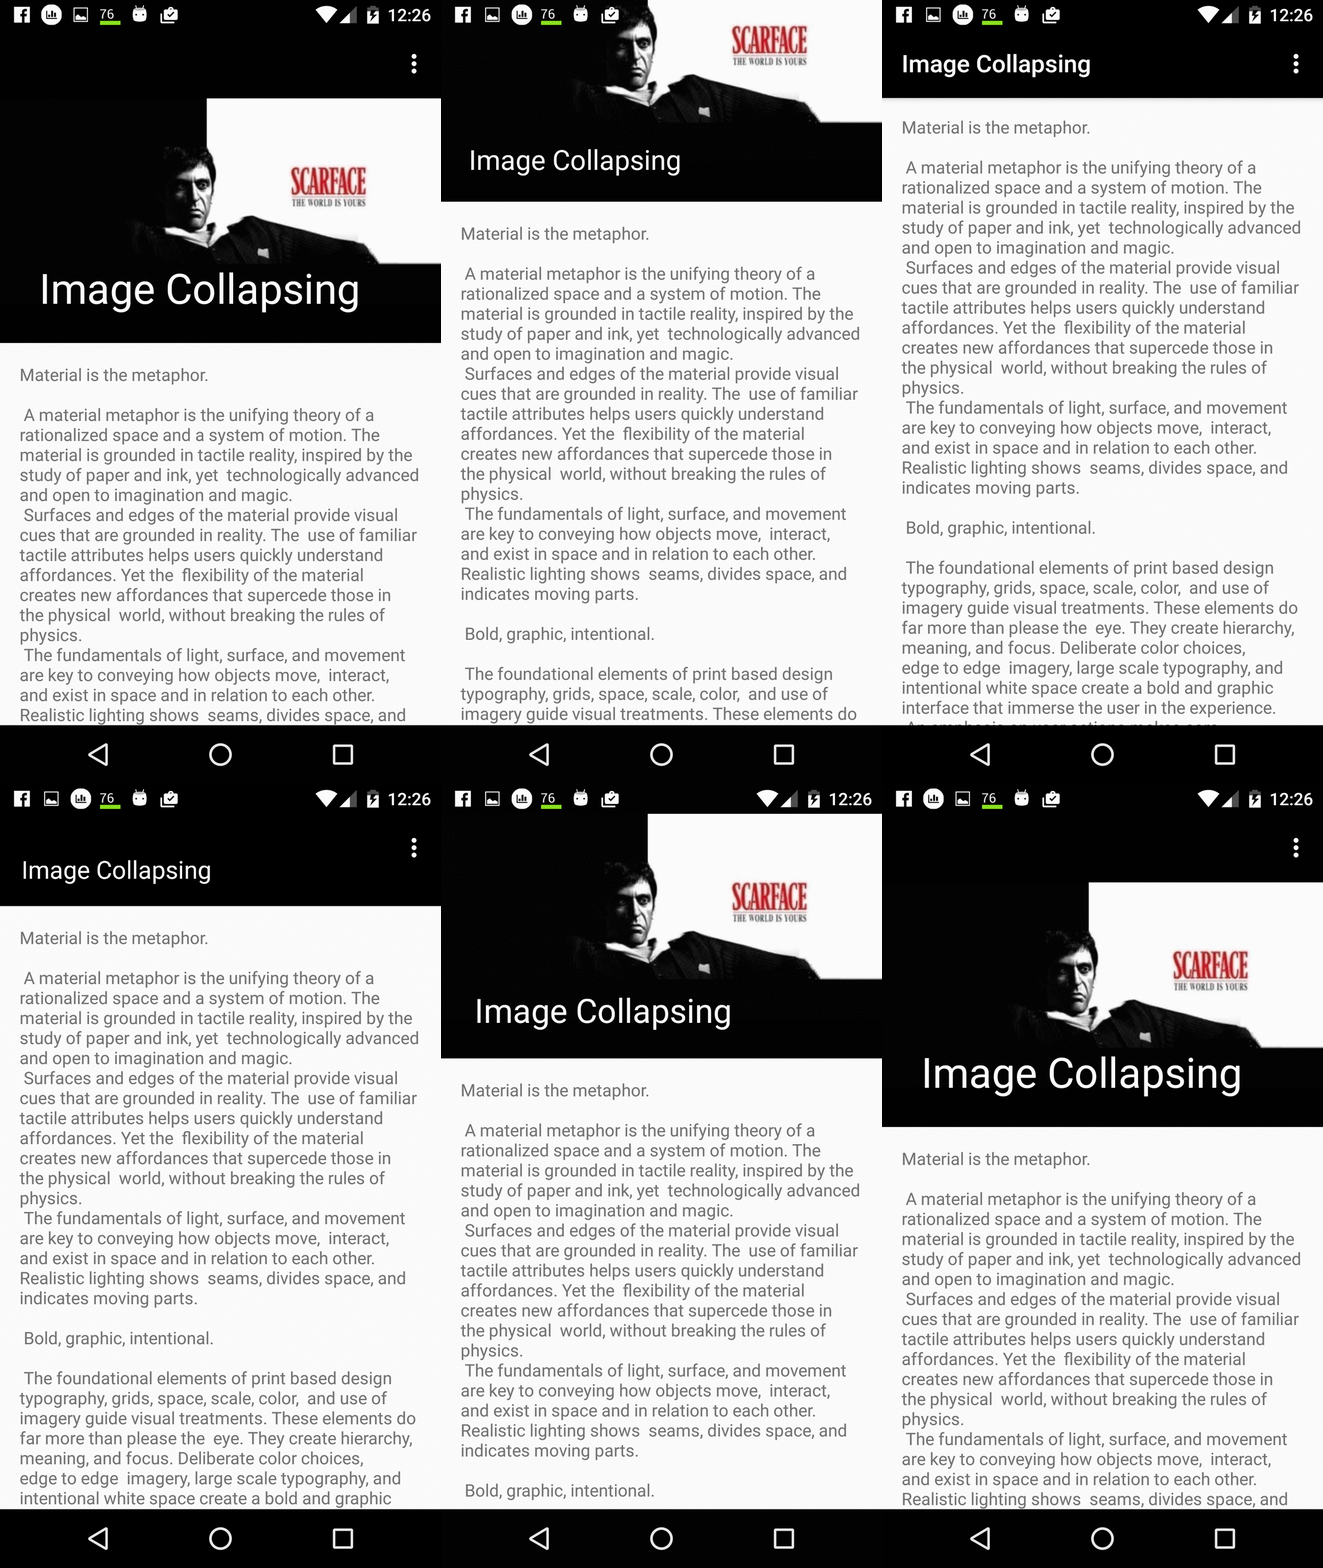
How to put image in CollapsingToolbarLayout

How to put image in CollapsingToolbarLayout

Inside of our CollopasingTollbarLayout you can put our Image and Toolbar.

you can check in GitHub

<?xml version="1.0" encoding="utf-8"?>
<android.support.design.widget.CoordinatorLayout xmlns:android="http://schemas.android.com/apk/res/android"
    xmlns:app="http://schemas.android.com/apk/res-auto"
    xmlns:tools="http://schemas.android.com/tools"
    android:layout_width="match_parent"
    android:layout_height="match_parent"
    android:fitsSystemWindows="true"
    tools:context="com.thedeveloperworldisyours.imagecollapsingtoolbarlayout.ScrollingActivity">

    <android.support.design.widget.AppBarLayout
        android:id="@+id/app_bar"
        android:layout_width="match_parent"
        android:layout_height="@dimen/app_bar_height"
        android:fitsSystemWindows="true"
        android:theme="@style/AppTheme.AppBarOverlay">

        <android.support.design.widget.CollapsingToolbarLayout
            android:id="@+id/toolbar_layout"
            android:layout_width="match_parent"
            android:layout_height="match_parent"
            android:fitsSystemWindows="true"
            app:contentScrim="?attr/colorPrimary"
            app:layout_scrollFlags="scroll|exitUntilCollapsed">

            <!--image-->
            <ImageView
                android:layout_width="match_parent"
                android:layout_height="match_parent"
                android:src="@drawable/scardface_scrolling"/>

            <!--toolbar-->
            <android.support.v7.widget.Toolbar
                android:id="@+id/toolbar"
                android:layout_width="match_parent"
                android:layout_height="?attr/actionBarSize"
                app:layout_collapseMode="pin"
                app:popupTheme="@style/AppTheme.PopupOverlay" />

        </android.support.design.widget.CollapsingToolbarLayout>
    </android.support.design.widget.AppBarLayout>

    <include layout="@layout/content_scrolling" />

</android.support.design.widget.CoordinatorLayout>

In our content

<?xml version="1.0" encoding="utf-8"?>
<android.support.v4.widget.NestedScrollView xmlns:android="http://schemas.android.com/apk/res/android"
    xmlns:app="http://schemas.android.com/apk/res-auto"
    xmlns:tools="http://schemas.android.com/tools"
    android:layout_width="match_parent"
    android:layout_height="match_parent"
    app:layout_behavior="@string/appbar_scrolling_view_behavior"
    tools:context="com.thedeveloperworldisyours.imagecollapsingtoolbarlayout.ScrollingActivity"
    tools:showIn="@layout/activity_scrolling">

    <TextView
        android:layout_width="wrap_content"
        android:layout_height="wrap_content"
        android:layout_margin="@dimen/text_margin"
        android:text="@string/large_text" />

</android.support.v4.widget.NestedScrollView>

In our activity

public class ScrollingActivity extends AppCompatActivity {

    @Override
    protected void onCreate(Bundle savedInstanceState) {
        super.onCreate(savedInstanceState);
        setContentView(R.layout.activity_scrolling);
        Toolbar toolbar = (Toolbar) findViewById(R.id.toolbar);
        setSupportActionBar(toolbar);

    }

    @Override
    public boolean onCreateOptionsMenu(Menu menu) {
        // Inflate the menu; this adds items to the action bar if it is present.
        getMenuInflater().inflate(R.menu.menu_scrolling, menu);
        return true;
    }

    @Override
    public boolean onOptionsItemSelected(MenuItem item) {
        // Handle action bar item clicks here. The action bar will
        // automatically handle clicks on the Home/Up button, so long
        // as you specify a parent activity in AndroidManifest.xml.
        int id = item.getItemId();

        //noinspection SimplifiableIfStatement
        if (id == R.id.action_settings) {
            return true;
        }
        return super.onOptionsItemSelected(item);
    }
}

Gmail overriding pending transition

Gmail overriding pending transition

You can check full code in GitHub

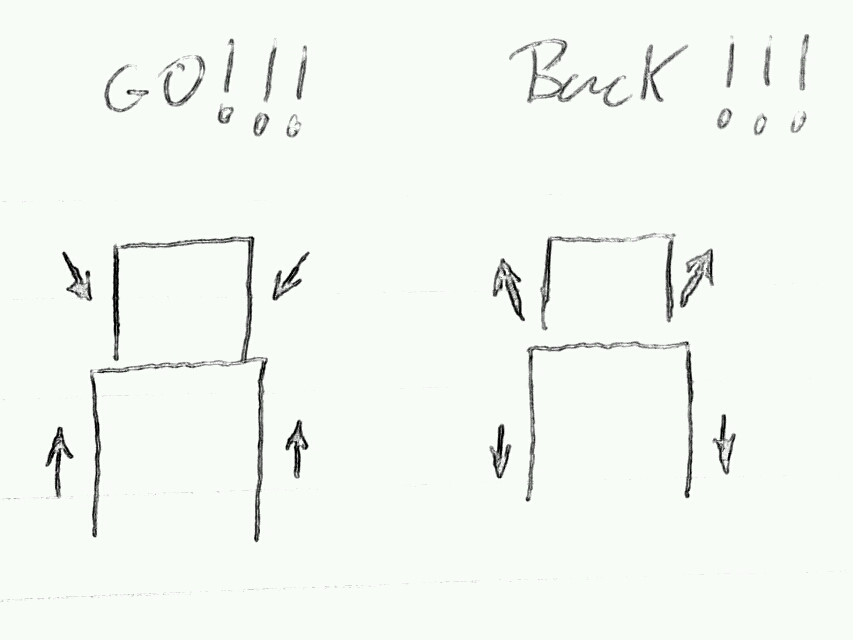
It is very easy to make transition between activities. In this post we can see how to make Gmail.

First step, in res we create directory, which name is anim, after that.

We have to create 4 files:

go_in.xml

<?xml version="1.0" encoding="utf-8"?>
<set xmlns:android="http://schemas.android.com/apk/res/android">
 
    <translate
        android:duration="700"
        android:fromYDelta="100%"
        android:toYDelta="0%"/>
 
</set>

go_out.xml

<?xml version="1.0" encoding="utf-8"?>
<set xmlns:android="http://schemas.android.com/apk/res/android">
 
    <scale android:duration="700"
        android:fromXScale="100%"
        android:fromYScale="100%"
        android:pivotX="50%"
        android:pivotY="50%"
        android:toXScale="70%"
        android:toYScale="70%"/>
 
</set>

back_in.xml

<?xml version="1.0" encoding="utf-8"?>
<set xmlns:android="http://schemas.android.com/apk/res/android">
 
    <scale android:duration="700"
        android:fromXScale="70%"
        android:fromYScale="70%"
        android:pivotX="50%"
        android:pivotY="50%"
        android:toXScale="100%"
        android:toYScale="100%"/>
 
</set>

back_out.xml

<?xml version="1.0" encoding="utf-8"?>
<set xmlns:android="http://schemas.android.com/apk/res/android">
 
    <translate
        android:duration="700"
        android:fromYDelta="0%"
        android:toYDelta="100%"/>
 
</set>

After that We need two activities.
FirstActivity

package com.thedeveloperworldisyours.gmailanimation;
 
import android.content.Intent;
import android.support.v7.app.AppCompatActivity;
import android.os.Bundle;
import android.view.View;
 
public class MainActivity extends AppCompatActivity {
 
    @Override
    protected void onCreate(Bundle savedInstanceState) {
        super.onCreate(savedInstanceState);
        setContentView(R.layout.activity_main);
    }
 
    public void goTo(View view) {
        Intent intent = new Intent(this, SecondActivity.class);
        startActivity(intent);
 
 
    }
 
}

this is layout activity_first.xml:

<?xml version="1.0" encoding="utf-8"?>
<RelativeLayout xmlns:android="http://schemas.android.com/apk/res/android"
    xmlns:tools="http://schemas.android.com/tools"
    android:layout_width="match_parent"
    android:layout_height="match_parent"
    android:paddingBottom="@dimen/activity_vertical_margin"
    android:paddingLeft="@dimen/activity_horizontal_margin"
    android:paddingRight="@dimen/activity_horizontal_margin"
    android:paddingTop="@dimen/activity_vertical_margin"
    tools:context="com.thedeveloperworldisyours.gmailanimation.MainActivity">
 
    <Button
        android:layout_width="wrap_content"
        android:layout_height="wrap_content"
        android:layout_centerInParent="true"
        android:onClick="goTo"
        android:text="@string/activity_main_go" />
</RelativeLayout>

In SecondActivity, We have to put two overridePedingTransition()

package com.thedeveloperworldisyours.gmailanimation;
 
import android.support.v7.app.AppCompatActivity;
import android.os.Bundle;
import android.view.View;
 
public class SecondActivity extends AppCompatActivity {
 
    @Override
    protected void onCreate(Bundle savedInstanceState) {
        super.onCreate(savedInstanceState);
        setContentView(R.layout.activity_second);
        overridePendingTransition(R.anim.go_in, R.anim.go_out);
    }
 
    public void back(View view) {
        finishMyActivity();
    }
 
    @Override
    public void onBackPressed() {
        finishMyActivity();
    }
 
    public void finishMyActivity() {
        finish();
        overridePendingTransition(R.anim.back_in, R.anim.back_out);
    }
}

This is layout activity_second.xml

<?xml version="1.0" encoding="utf-8"?>
<RelativeLayout xmlns:android="http://schemas.android.com/apk/res/android"
    xmlns:tools="http://schemas.android.com/tools"
    android:layout_width="match_parent"
    android:layout_height="match_parent"
    android:paddingBottom="@dimen/activity_vertical_margin"
    android:paddingLeft="@dimen/activity_horizontal_margin"
    android:paddingRight="@dimen/activity_horizontal_margin"
    android:paddingTop="@dimen/activity_vertical_margin"
    tools:context="com.thedeveloperworldisyours.gmailanimation.SecondActivity">
 
    <Button
        android:layout_width="wrap_content"
        android:layout_height="wrap_content"
        android:layout_centerInParent="true"
        android:onClick="back"
        android:text="@string/activity_second_back" />
 
</RelativeLayout>

That’s all, Now We have Gmail animation between activities.

You can check full code in GitHub

Proximity screen off

Proximity screen off

We can learn how to screen off with proximity

import android.content.Context;
import android.os.PowerManager;
import android.support.v7.app.AppCompatActivity;
import android.os.Bundle;
import android.util.Log;
import android.view.View;
import android.widget.Toast;

public class MainActivity extends AppCompatActivity {

    private PowerManager mPowerManager;
    private PowerManager.WakeLock mWakeLock;

    private static final String TAG = "MainActivity";

    @Override
    protected void onCreate(Bundle savedInstanceState) {
        super.onCreate(savedInstanceState);
        setContentView(R.layout.activity_main);

        mPowerManager = (PowerManager) getSystemService(Context.POWER_SERVICE);
    }

    public void activateSensor(View v) {
        Toast.makeText(MainActivity.this, "Proximity On", Toast.LENGTH_LONG).show();
        if (mWakeLock == null) {
            mWakeLock = mPowerManager.newWakeLock(PowerManager.PROXIMITY_SCREEN_OFF_WAKE_LOCK, "incall");
        }
        if (!mWakeLock.isHeld()) {
            Log.d(TAG, "New call active : acquiring incall (CPU only) wake lock");
            mWakeLock.acquire();
        } else {
            Log.d(TAG, "New call active while incall (CPU only) wake lock already active");
        }
    }

    public void deactivateSensor(View v) {
        Toast.makeText(MainActivity.this, "Proximity Off", Toast.LENGTH_LONG).show();
        if (mWakeLock != null && mWakeLock.isHeld()) {
            mWakeLock.release();
            Log.d(TAG, "Last call ended: releasing incall (CPU only) wake lock");
        } else {
            Log.d(TAG, "Last call ended: no incall (CPU only) wake lock were held");
        }
    }

}

And now in your layout:

<?xml version="1.0" encoding="utf-8"?>
<RelativeLayout xmlns:android="http://schemas.android.com/apk/res/android"
    xmlns:tools="http://schemas.android.com/tools"
    android:layout_width="match_parent"
    android:layout_height="match_parent"
    android:paddingBottom="@dimen/activity_vertical_margin"
    android:paddingLeft="@dimen/activity_horizontal_margin"
    android:paddingRight="@dimen/activity_horizontal_margin"
    android:paddingTop="@dimen/activity_vertical_margin"
    tools:context="com.example.javier.proximitysensor.MainActivity">

    <Button
        android:layout_width="match_parent"
        android:layout_height="wrap_content"
        android:layout_above="@+id/activity_main_turn_on_screen"
        android:onClick="activateSensor"
        android:text="@string/activity_main_activate_sensor" />

    <Button
        android:id="@+id/activity_main_turn_on_screen"
        android:layout_width="match_parent"
        android:layout_height="wrap_content"
        android:layout_alignParentBottom="true"
        android:onClick="deactivateSensor"
        android:text="@string/activity_main_deactivate_sensor" />
</RelativeLayout>

Speeding up Magento (evil extensions)

Speeding up magentoSpeeding up Magento is the headache of many shop owners, which usually contact us frustrated after seeing how their page loads are way above the market average, causing a really high bounce rate.
Last week, we were tasked to investigate some spikes in a website that were even temporarily bringing the server down in some cases. Thankfully, our customer had Newrelic, which was very helpful pointing us to the right direction.

Tinkering around within Newrelic, we noticed quite a few issues:

  • It was a multi-website shop, with four different domains. One of them had the “shell” folder had directory listing enabled, and some malware/malicious attempt/bot had been crawling it and calling multiple times a php script that performs heavy operations, and was taking nearly 30 minutes to finish.
  • There quite a few 404 entries in newrelic with a load time suspiciously high.
  • There were also some other pages with an abnormally high load time, and they were all coming from the same user agent, also the 404 ones, which seemed to be some sort of SQL injection attempts by the looks of the URLs:
/checkout/-1%22%20OR%203%2b936-936-1%3d0%2b0%2b0%2b1%20--%20/add/uenc/aHR0cDovL3Nob3AuZ2Zpbml0eS5uZXQvb3RoZXItc3R1ZmYuaHRtbA,,/product/13953/form_key/5kBBRqrthVBCRE1e

/category-name/subcategory/shop%25'%20AND%202%2b1-1-1%3d0%2b0%2b0%2b1%20AND%20'FAEs'%21%3d'FAEs%25/custom-filter/custom-filter-2.html

Which url-decoded looks like:

/checkout/-1&amp;quot; OR 3+936-936-1=0+0+0+1 -- /add/uenc/aHR0cDovL3Nob3AuZ2Zpbml0eS5uZXQvb3RoZXItc3R1ZmYuaHRtbA,,/product/13953/form_key/5kBBRqrthVBCRE1e
/category-name/subcategory/shop%' AND 2+1-1-1=0+0+0+1 AND 'FAEs'!='FAEs%/custom-filter/custom-filter-2.html

Then, we started looking at the stack traces, and spotted a third party extension which was the slowest part of execution flow:

Slowest components Count Duration %
QuBit_UniversalVariable_Model_Uv::_getLineItems 1 11,100 ms 31%

A quick look at the code confirmed our suspicions, we had stumbled upon with another evil magento extension.

The third party extension had an observer on the basket that for each item, was loading the product, and for each product, it was loading each of its assigned categories, with the purpose of generating a JSON file for tracking purposes. It was running “fine” with low traffic, and with a low amount of items in the basket, but the load time was growing exponentially was new products were added to the basket, with together with a malicious behaviour adding over 400 products, was capable of bringing the server down. Interestingly, the tracking code was only required for the checkout cart page, but it was actually running on every single page, which is why the 404 and other non-cached pages were affected.

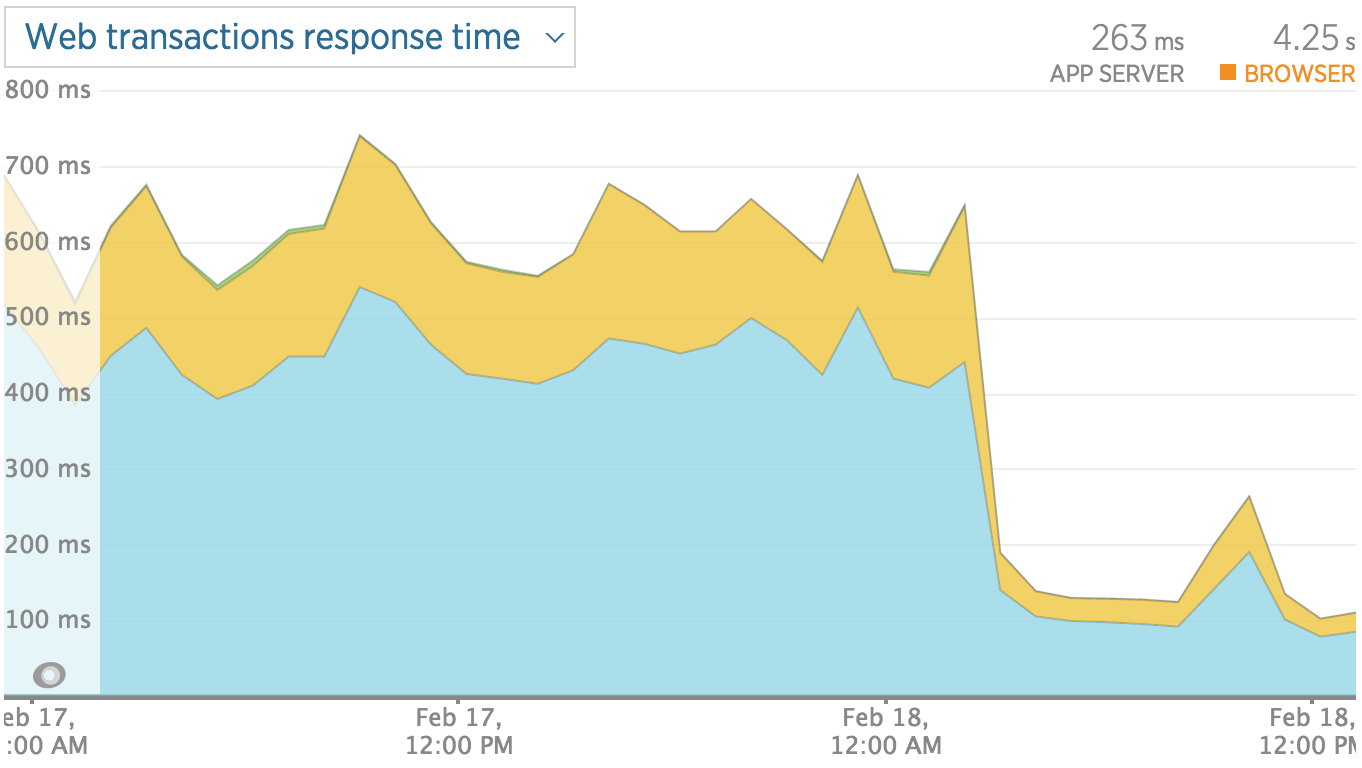
We deactivated the quotes with over 200 products in the basket (ie. not real users), did a few amendments in the code and deployed the changes. Below you can see the result:

Speeding up magento

A massive drop in the average response time, and guess what? the spikes problems disappeared 🙂

Once again, please be aware of the risks of installing third party extensions in your store, as they can really hinder the user experience of your customers and damage your business.

If you are facing similar problems with your store, do not hesitate to get in touch.