Jenkins for PHP from scratch – II

In the previous post, we explained how to set up jenkins for php applications. It was the basic setup, installing Jenkins and creating a test job.

Now we want to go on step further and take advantage of all the previously installed plugins. They require some php extensions and phpunit extensions in order to start working.

Summarizing, I had to run the following command (you might have already installed some of the packages, that’s okey):

sudo apt-get install php5-xsl  #Required by phpdox
sudo pear config-set auto_discover 1
sudo pear install -a pear.phpunit.de/phploc
sudo pear install -a PHP_CodeSniffer
sudo pear install pear.phpunit.de/phpcpd
sudo pear channel-discover pear.pdepend.org
sudo pear install pdepend/PHP_Depend
sudo pear channel-discover pear.phpmd.org
sudo pear install --alldeps phpmd/PHP_PMD
sudo pear install -a channel://nikic.github.com/pear/PHPParser-0.9.3
sudo pear install -a channel://pear.netpirates.net/phpDox-0.5.0
sudo pear channel-discover pear.phpqatools.org
sudo pear install --alldeps phpqatools/PHP_CodeBrowser

Now you should have installed all the tools required by the jenkins plugins.

Then, we just need to create a script to execute all this tools, save the outputs, and configure the jenkins plugins to parse all this data. Yo can do it all manually in a bash script, but I’d suggest you to install ant and create an easy customizable build.

In order to get ant just type:

sudo apt-get install ant1.7

Note: You might need to install java JRE in order to get ant working.

Now, you have to create your own build.xml file on the root directory of your proyect. This is how mine looks like:

<?xml version="1.0" encoding="UTF-8"?>

<project name="The Developer World Is Yours" default="build" basedir="workspace/">
 <target name="build"
   depends="prepare,lint,phploc,pdepend,phpmd-ci,phpcs-ci,phpcpd,phpdox,phpunit,phpcb"/>

 <target name="clean" description="Cleanup build artifacts">
  <delete dir="${basedir}/build/api"/>
  <delete dir="${basedir}/build/code-browser"/>
  <delete dir="${basedir}/build/coverage"/>
  <delete dir="${basedir}/build/logs"/>
  <delete dir="${basedir}/build/pdepend"/>
 </target>

 <target name="prepare" depends="clean" description="Prepare for build">
  <mkdir dir="${basedir}/build/api"/>
  <mkdir dir="${basedir}/build/code-browser"/>
  <mkdir dir="${basedir}/build/coverage"/>
  <mkdir dir="${basedir}/build/logs"/>
  <mkdir dir="${basedir}/build/pdepend"/>
  <mkdir dir="${basedir}/build/phpdox"/>
 </target>

 <target name="lint" description="Perform syntax check of sourcecode files">
  <apply executable="php" failonerror="true">
   <arg value="-l" />

   <fileset dir="${basedir}/">
    <include name="**/*.php" />
    <modified />
   </fileset>

   <fileset dir="${basedir}/tests">
    <include name="**/*.php" />
    <modified />
   </fileset>
  </apply>
 </target>

 <target name="phploc" description="Measure project size using PHPLOC">
  <exec executable="phploc">
   <arg value="--log-csv" />
   <arg value="${basedir}/build/logs/phploc.csv" />
   <arg path="${basedir}/" />
  </exec>
 </target>

 <target name="pdepend" description="Calculate software metrics using PHP_Depend">
  <exec executable="pdepend">
   <arg value="--jdepend-xml=${basedir}/build/logs/jdepend.xml" />
   <arg value="--jdepend-chart=${basedir}/build/pdepend/dependencies.svg" />
   <arg value="--overview-pyramid=${basedir}/build/pdepend/overview-pyramid.svg" />
   <arg path="${basedir}/" />
  </exec>
 </target>

 <target name="phpmd-ci" description="Perform project mess detection using PHPMD creating a log file for the continuous integration server">
  <exec executable="phpmd">
   <arg path="${basedir}/" />
   <arg value="xml" />
   <arg value="${basedir}/../phpmd.xml" />
   <arg value="--reportfile" />
   <arg value="${basedir}/build/logs/pmd.xml" />
  </exec>
 </target>

 <target name="phpcs-ci" description="Find coding standard violations using PHP_CodeSniffer creating a log file for the continuous integration server">
  <exec executable="phpcs" output="/dev/null">
   <arg value="--report=checkstyle" />
   <arg value="--report-file=${basedir}/build/logs/checkstyle.xml" />
   <arg value="--standard=PSR2" />
   <arg path="${basedir}/analyzer/" />
  </exec>
 </target>

 <target name="phpcpd" description="Find duplicate code using PHPCPD">
  <exec executable="phpcpd">
   <arg value="--log-pmd" />
   <arg value="${basedir}/build/logs/pmd-cpd.xml" />
   <arg path="${basedir}/" />
  </exec>
 </target>

 <target name="phpdox" description="Generate API documentation using phpDox">
     <exec executable="phpdox">
         <arg value="-f" />
         <arg value="../phpdox.xml.dist" />
     </exec>
 </target>

 <target name="phpunit" description="Run unit tests with PHPUnit">
     <exec executable="phpunit" failonerror="true">
         <arg value="--log-junit" />
         <arg path="${basedir}/build/logs/junit.xml" />
         <arg value="--coverage-clover" />
         <arg path="${basedir}/build/logs/clover.xml" />
         <arg value="--configuration" />
         <arg path="${basedir}/tests/phpunit.xml" />
         <arg value="${basedir}" />
     </exec>
 </target>

 <target name="phpcb" description="Aggregate tool output with PHP_CodeBrowser">
  <exec executable="phpcb">
   <arg value="--log" />
   <arg path="${basedir}/build/logs" />
   <arg value="--source" />
   <arg path="${basedir}/" />
   <arg value="--output" />
   <arg path="${basedir}/build/code-browser" />
   <arg value="${basedir}" />
  </exec>
 </target>
</project>

You must to keep in mind the output paths that you have set, as you will need to put the same data on jenkins.

In order to ensure that everything is fine, just type ant on the commandline and it will automatically execute all the other targets (dependencies). You shouldn’t see any errors.

This is the process that it should follow:

  • Delete all the build folders (clean up any existing data).
  • Create all the folders where the build results will be stored.
  • Ensure that there aren’t any syntax errors in the code.
  • Generate a full report of the project, including metrics like:
    • Number of lines of code, comments and no-comments
    • Number of directories, files, namespaces, interfaces, classes and so on.
    • Number of testing classes, methods and functions
    • Number of abstract and concrete classes
    • Number of static, non-static, public and private methods
    • Number of global and class constants
    • Average length of the classes and methods
    • Cyclomatic complexity regarding lines of code and number of methods
  • Generate a full report of project dependencies, which includes metrics such as:
    • Complexity
    • Coupling
    • Hierarchy
    • Inheritance
    • and so on.
  • Analyze the source code looking for the following problems:
    • Possible bugs
    • Suboptimal code
    • Overcomplicated expressions
    • Unused parameters, methods, properties
  • Find coding standard violations, note that you can provide a predefined set of rules (such as PSR2) or just create your own custom rules/standard.
  • Perform an analysis of duplicated code (copy paste detector).
  • Generate documentation based on the phpdoc comments found on the source code.
  • Run all PHPUnit tests.
  • Generates a browsable representation of PHP code where sections with violations found by the previous tools are highlighted.
Once you have the ant build working, it’s time to create a new job on Jenkins.
In order to speed up this, you can use  Sebastian Bergmann’s template, whose page has been the inspiration of this guide, by the way. Or you can download my template, which is basically the same but with some customizations.

Either way, all you need is create a new folder under jenkins’ jobs directory, which in Ubuntu is located at /var/lib:

cd /var/lib/jenkins/jobs/
sudo mkdir thedeveloperworldisyours
cd thedeveloperworldisyours
#put here the template (config.xml) file.
cd ..
#change the owner and group of the files, you can get the proper name and group by making an ls -l under jenkins directory (jenkins:nogroup by default)
sudo chown -R jenkins:nogroup thedeveloperworldisyours/

Now, restart Jenkins, go to the web interface, select “New Job” and select the option “copy existing job”:
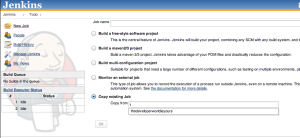
jenkins-new-job-thedeveloperworldisyours

Have a look at the configuration and make the required changes (if you chosen my template you only need to change the source of your git files and the notification email).

Finally, run the job and hopefully you will get the venerated blue ball at the end:
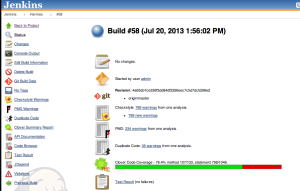
jenkins-blue-ball

And that’s about it. If you have any doubts, questions or problems, feel free to ask.

In my next post I’ll show you how to integrate jenkins with git, authenticating using ssh keys, adding precommit and postcommit hooks, and much more!

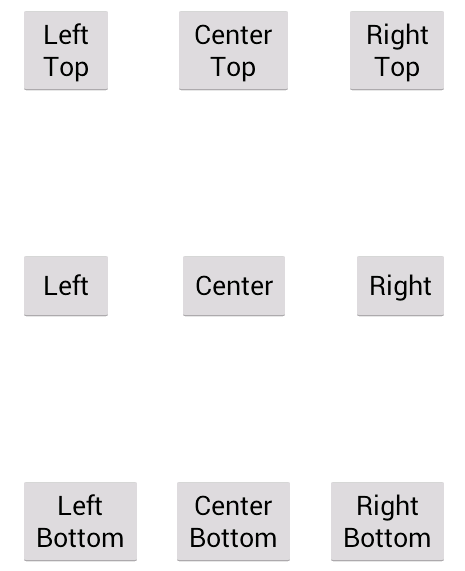
Place in Relative Layout

To place in  a relative layout is very esay. You can place to use two properties

android:layout_alignParent
android:layout_center

placeInRelativeLayout

If you want to do this, just follow this code

<RelativeLayout xmlns:android="http://schemas.android.com/apk/res/android"
    xmlns:tools="http://schemas.android.com/tools"
    android:layout_width="match_parent"
    android:layout_height="match_parent"
    android:paddingBottom="@dimen/activity_vertical_margin"
    android:paddingLeft="@dimen/activity_horizontal_margin"
    android:paddingRight="@dimen/activity_horizontal_margin"
    android:paddingTop="@dimen/activity_vertical_margin"
    tools:context=".TheDeveloperWorldIsYoursActivity" >

    <Button
        android:layout_width="wrap_content"
        android:layout_height="wrap_content"
        android:layout_alignParentLeft="true"
        android:layout_centerVertical="true"
        android:text="@string/left" />

    <Button
        android:layout_width="wrap_content"
        android:layout_height="wrap_content"
        android:layout_alignParentLeft="true"
        android:layout_alignParentTop="true"
        android:text="@string/leftTop" />

    <Button
        android:layout_width="wrap_content"
        android:layout_height="wrap_content"
        android:layout_alignParentBottom="true"
        android:layout_alignParentLeft="true"
        android:text="@string/leftBottom" />

    <Button
        android:layout_width="wrap_content"
        android:layout_height="wrap_content"
        android:layout_alignParentRight="true"
        android:layout_centerVertical="true"
        android:text="@string/right" />

    <Button
        android:layout_width="wrap_content"
        android:layout_height="wrap_content"
        android:layout_alignParentRight="true"
        android:layout_alignParentTop="true"
        android:text="@string/rightTop" />

    <Button
        android:layout_width="wrap_content"
        android:layout_height="wrap_content"
        android:layout_alignParentBottom="true"
        android:layout_alignParentRight="true"
        android:text="@string/rightBottom" />

    <Button
        android:layout_width="wrap_content"
        android:layout_height="wrap_content"
        android:layout_centerHorizontal="true"
        android:layout_centerVertical="true"
        android:text="@string/center" />

    <Button
        android:layout_width="wrap_content"
        android:layout_height="wrap_content"
        android:layout_alignParentTop="true"
        android:layout_centerHorizontal="true"
        android:text="@string/centerTop" />

    <Button
        android:layout_width="wrap_content"
        android:layout_height="wrap_content"
        android:layout_alignParentBottom="true"
        android:layout_centerHorizontal="true"
        android:text="@string/centerBottom" />

</RelativeLayout>

Animation image in Android

Here I will show you how to make an animation image in Android.

It is very easy to make a animation image in background.
The first thing you need is to create a image view in your layout.

<RelativeLayout xmlns:android="http://schemas.android.com/apk/res/android"
    xmlns:tools="http://schemas.android.com/tools"
    android:layout_width="match_parent"
    android:layout_height="match_parent"
    android:paddingBottom="@dimen/activity_vertical_margin"
    android:paddingLeft="@dimen/activity_horizontal_margin"
    android:paddingRight="@dimen/activity_horizontal_margin"
    android:paddingTop="@dimen/activity_vertical_margin"
    tools:context=".TheDeveloperWorldIsYours" >
    <ImageView android:id="@+id/iv"
        android:layout_width="wrap_content"
        android:layout_height="wrap_content"
        android:layout_below="@+id/iv"/>

</RelativeLayout>

The most import line code is

final Handler handler = new Handler();
final Runnable r = new Runnable(){
      public void run(){};
}

a Handler, a Runnable and a run.

package com.thedeveloperworldisyours.animationimagen;

import android.app.Activity;
import android.os.Bundle;
import android.os.Handler;
import android.widget.ImageView;

public class TheDeveloperWorldIsYours extends Activity {

	private static ImageView iv;

	final Handler handler = new Handler();
	Runnable r;

	@Override
	protected void onCreate(Bundle savedInstanceState) {
		super.onCreate(savedInstanceState);
		setContentView(R.layout.activity_the_developer_world_is_yours);

		iv = (ImageView) findViewById(R.id.iv);

		r = new Runnable()
		{
			int x = 1;
		    public void run()
		    {

		        switch(x) {
				 case 1:
					 iv.setImageResource(R.drawable.base1);
				     break;
				 case 2:
					 iv.setImageResource(R.drawable.base2);
				     break;
				 case 3:
					 iv.setImageResource(R.drawable.base3);
				     break;
				 case 4:
					 iv.setImageResource(R.drawable.base4);
				     break;
				 case 5:
					 iv.setImageResource(R.drawable.base5);
				     break;
				 case 6:
					 iv.setImageResource(R.drawable.base6);
				     break;
				 case 7:
					 iv.setImageResource(R.drawable.base7);
				     break;
				 case 8:
					 iv.setImageResource(R.drawable.base8);
				     break;
				 case 9:
					 iv.setImageResource(R.drawable.base9);
				     break;
				 default:
					 iv.setImageResource(R.drawable.base);
				     break;
				 }
		        if(x==9)
		        	x=1;
		        else
		        	x++;
		        handler.postDelayed(this, 1000);

		    }
		};

		handler.postDelayed(r, 1000);
	}

	@Override
	protected void onPause() {
		// TODO Auto-generated method stub
		handler.removeCallbacks(r);
		super.onPause();
	}

}

Popup in Android

In android you can control the view in any away.
A way is with inflater

// Inflate the popup_layout.xml
            LinearLayout viewGroup = (LinearLayout) context
                            .findViewById(R.id.popupLinearLayout);
            LayoutInflater layoutInflater = (LayoutInflater) context
                            .getSystemService(Context.LAYOUT_INFLATER_SERVICE);
            View layout = layoutInflater.inflate(R.layout.activity_popup, viewGroup);

You can download this code: Download code

First step is animation. One for enter and other for exit.

res/anim/enter.xml
<?xml version="1.0" encoding="utf-8"?>
<set xmlns:android="http://schemas.android.com/apk/res/android"
    android:interpolator="@android:anim/decelerate_interpolator" >

    <scale
        android:duration="1000"
        android:pivotX="50%"
        android:pivotY="50%"
        android:toXScale="1.0"
        android:toYScale="1.0" />

    <alpha
        android:duration="2000"
        android:fromAlpha="0.0"
        android:startOffset="500"
        android:toAlpha="1.0" />
</set>
res/anim/exit.xml
<?xml version="1.0" encoding="utf-8"?>
<set xmlns:android="http://schemas.android.com/apk/res/android" >

    <alpha
        xmlns:android="http://schemas.android.com/apk/res/android"
        android:duration="1000"
        android:fillAfter="true"
        android:fromAlpha="1.0"
        android:toAlpha="0" />

</set>

Second step: These animations are item in PopupWindowAnimation style.

res/values/styles.xml
<resources>

    <style name="AppBaseTheme" parent="android:Theme.Light"></style>

    <!-- Application theme. -->
    <style name="AppTheme" parent="AppBaseTheme"></style>

    <style name="PopupWindowAnimation" parent="android:Animation">
        <item name="android:windowEnterAnimation">@anim/enter</item>
        <item name="android:windowExitAnimation">@anim/exit</item>
    </style>

</resources>

you create the layout with button which show the popup.

res/layout/activity_the_developer_world_is_yours.xml
<LinearLayout xmlns:android="http://schemas.android.com/apk/res/android"
    android:layout_width="match_parent"
    android:layout_height="match_parent"
    android:gravity="center"
    android:orientation="vertical" >

    <Button
        android:id="@+id/open"
        android:layout_width="wrap_content"
        android:layout_height="wrap_content"
        android:text="Show popup" />

</LinearLayout>

Now you create the layout of popup.

res/layout/popup_layout.xml
<?xml version="1.0" encoding="utf-8"?>
<LinearLayout xmlns:android="http://schemas.android.com/apk/res/android"
    android:id="@+id/popupLinearLayout"
    android:layout_width="match_parent"
    android:layout_height="match_parent"
    android:background="@color/colorPopUp"
    android:gravity="center"
    android:orientation="vertical" >

    <LinearLayout
        android:layout_width="wrap_content"
        android:layout_height="wrap_content"
        android:background="@color/colorPopUpMarcoWindow"
        android:gravity="center"
        android:orientation="vertical" >

        <Button
            android:id="@+id/close"
            android:layout_width="wrap_content"
            android:layout_height="wrap_content"
            android:layout_gravity="right"
            android:layout_marginRight="5dp"
            android:background="@color/colorPopUpMarcoWindow"
            android:text="@string/closebutton" />

        <LinearLayout
            android:layout_width="wrap_content"
            android:layout_height="wrap_content"
            android:layout_marginBottom="5dp"
            android:layout_marginLeft="5dp"
            android:layout_marginRight="5dp"
            android:background="@color/colorPopUpWindow"
            android:gravity="center"
            android:orientation="vertical" >

            <TextView
                android:id="@+id/textView1"
                android:layout_width="wrap_content"
                android:layout_height="wrap_content"
                android:text="Popup"
                android:textColor="@color/colorPopUpMarcoWindow" />

            <ImageButton
                android:id="@+id/imageButton1"
                android:layout_width="wrap_content"
                android:layout_height="wrap_content"
                android:src="@drawable/octopus_cat" />

            <TextView
                android:id="@+id/textView2"
                android:layout_width="wrap_content"
                android:layout_height="wrap_content"
                android:layout_marginTop="5dp"
                android:text="This is a simple popup"
                android:textColor="@color/colorPopUpMarcoWindow" />
        </LinearLayout>
    </LinearLayout>

</LinearLayout>
res/values/strings.xml
<?xml version="1.0" encoding="utf-8"?>
<resources>

    <string name="app_name">PopUpAndroid</string>
    <string name="title_activity_the_developer_world_is_yours">TheDeveloperWorldIsYours</string>
    <string name="action_settings">Settings</string>
    <string name="closebutton">Close [x]</string>

    <color name="colorPopUp">#BB000000</color>
    <color name="colorPopUpWindow">#000000</color>
    <color name="colorPopUpMarcoWindow">#FFFFFF</color>

</resources>

In conclusion, you create the main class. In this class you create a inflater for show popup.

src/TheDeveloperWorldIsYoursActivity.java
package com.thedeveloperworldisyours.popup;

import android.app.Activity;
import android.content.Context;
import android.graphics.Point;
import android.graphics.Rect;
import android.graphics.drawable.BitmapDrawable;
import android.os.Bundle;
import android.view.Display;
import android.view.Gravity;
import android.view.LayoutInflater;
import android.view.View;
import android.view.View.OnClickListener;
import android.view.Window;
import android.view.WindowManager;
import android.widget.Button;
import android.widget.LinearLayout;
import android.widget.PopupWindow;

public class TheDeveloperWorldIsYours extends Activity {
	private Point p;
    @Override
    protected void onCreate(Bundle savedInstanceState) {
        super.onCreate(savedInstanceState);
        setContentView(R.layout.activity_the_developer_world_is_yours);
        Button popUpButton = (Button) findViewById(R.id.open);
        popUpButton.setOnClickListener(new OnClickListener() {

			@Override
			public void onClick(View arg0) {
				// TODO Auto-generated method stub
				if (p !=null)
				showPopup(TheDeveloperWorldIsYours.this, p);
			}
		});

    }
    @Override
    public void onWindowFocusChanged(boolean hasFocus) {
            int[] location = new int[2];
            Button button = (Button) findViewById(R.id.open);

            button.getLocationOnScreen(location);
            // Initialize the Point with x, and y positions
            p = new Point();
            p.x = location[0];
            p.y = location[1];

    }
 // The method that displays the popup.

    private void showPopup(final Activity context, Point p) {

            Rect rectgle= new Rect();
            Window window= getWindow();
            window.getDecorView().getWindowVisibleDisplayFrame(rectgle);
            int StatusBarHeight= rectgle.top;
            int contentViewTop=
                window.findViewById(Window.ID_ANDROID_CONTENT).getTop();
            int TitleBarHeight= contentViewTop - StatusBarHeight;
            Display display = ((WindowManager) getSystemService(Context.WINDOW_SERVICE)).getDefaultDisplay();
            int popupWidth = display.getWidth();
            int popupHeight = (display.getHeight()-StatusBarHeight);

            // Inflate the popup_layout.xml
            LinearLayout viewGroup = (LinearLayout) context
                            .findViewById(R.id.popupLinearLayout);
            LayoutInflater layoutInflater = (LayoutInflater) context
                            .getSystemService(Context.LAYOUT_INFLATER_SERVICE);
            View layout = layoutInflater.inflate(R.layout.activity_popup, viewGroup);

            // Creating the PopupWindow
            final PopupWindow popup = new PopupWindow(context);
            popup.setContentView(layout);
            popup.setWidth(popupWidth);
            popup.setHeight(popupHeight);
            popup.setFocusable(true);
            popup.setAnimationStyle(R.style.PopupWindowAnimation);

            // Some offset to align the popup a bit to the right, and a bit down,
            // relative to button's position.

            int OFFSET_X = 0;
            int OFFSET_Y = 0;
            // Clear the default translucent background
            popup.setBackgroundDrawable(new BitmapDrawable());
            // Displaying the popup at the specified location, + offsets.
            popup.showAtLocation(layout, Gravity.NO_GRAVITY, p.x + OFFSET_X, p.y
                            + OFFSET_Y);

            // Getting a reference to Close button, and close the popup when
            // clicked.
            Button close = (Button) layout.findViewById(R.id.close);
            close.setOnClickListener(new OnClickListener() {
                    @Override
                    public void onClick(View v) {
                            popup.dismiss();
                    }
            });

    }

}

You can download this code: Download code

Android App Without Layout

It’s very easy. The most important line of code is:

setContentView(myLInearLayout);

You can download this code: Download code

First step, remove layout.xml. Then in your main class you can programmatically add a LinearLayout, RelativeLayout… a example:

package com.thedeveloperworldisyours.withoutlayout;

import android.app.Activity;
import android.os.Bundle;
import android.util.Log;
import android.view.View;
import android.view.View.OnClickListener;
import android.widget.Button;
import android.widget.LinearLayout;
import android.widget.RelativeLayout;
import android.widget.TextView;

public class TheDeveloperWorldIsYours extends Activity {

	private TextView valueTV;
	private Button valueB;
	private TextView valueRelativeLayoutTV;
	private Button valueRelativeLayoutB;

	@Override
	protected void onCreate(Bundle savedInstanceState) {
		super.onCreate(savedInstanceState);

		//create LInearLayout
		LinearLayout myLInearLayout = new LinearLayout(getApplicationContext());

		//add LayoutParams
		LinearLayout.LayoutParams params = new LinearLayout.LayoutParams(LinearLayout.LayoutParams.WRAP_CONTENT, LinearLayout.LayoutParams.WRAP_CONTENT);
		myLInearLayout.setOrientation(LinearLayout.VERTICAL);

		//set Content View
		setContentView(myLInearLayout);

		//add textView
		valueTV = new TextView(this);
		valueTV.setText("LinearLayout");
		valueTV.setId(5);
		valueTV.setLayoutParams(params);

		// add Button
		valueB = new Button(this);
		valueB.setText("RelativeLayout");
		valueB.setId(5);

		//add the textView and the Button to LinearLayout
		myLInearLayout.addView(valueTV);
		myLInearLayout.addView(valueB);

		valueB.setOnClickListener(new OnClickListener() {

			@Override
			public void onClick(View v) {
				// TODO Auto-generated method stub

				// add Button
        		valueRelativeLayoutB = new Button(getApplicationContext());
        		valueRelativeLayoutB.setText("RelativeLayout");
        		valueRelativeLayoutB.setId(5);

        		//add RelativeLayout
				RelativeLayout mainLayout = new RelativeLayout(getApplicationContext());
                RelativeLayout.LayoutParams lyp = new RelativeLayout.LayoutParams(RelativeLayout.LayoutParams.MATCH_PARENT, RelativeLayout.LayoutParams.MATCH_PARENT);
                mainLayout.setLayoutParams(lyp);

                //android:layout_below
        		lyp.addRule(RelativeLayout.BELOW, valueRelativeLayoutB.getId());
        		v.setLayoutParams(lyp);

        		//The most important line
        		setContentView(mainLayout);

              //add textView
                valueRelativeLayoutTV = new TextView(getApplicationContext());
        		valueRelativeLayoutTV.setText("RelativeLayout");
        		valueRelativeLayoutTV.setId(5);
        		valueRelativeLayoutTV.setLayoutParams(lyp);

        		mainLayout.addView(valueRelativeLayoutTV);
        		mainLayout.addView(valueRelativeLayoutB);

        		valueRelativeLayoutB.setOnClickListener(new OnClickListener() {

					@Override
					public void onClick(View v) {
						// TODO Auto-generated method stub
						//Exit app
						System.exit(0);
					}
				});

			}
		});

	}

}

You can download this code: Download code