You can download it from here
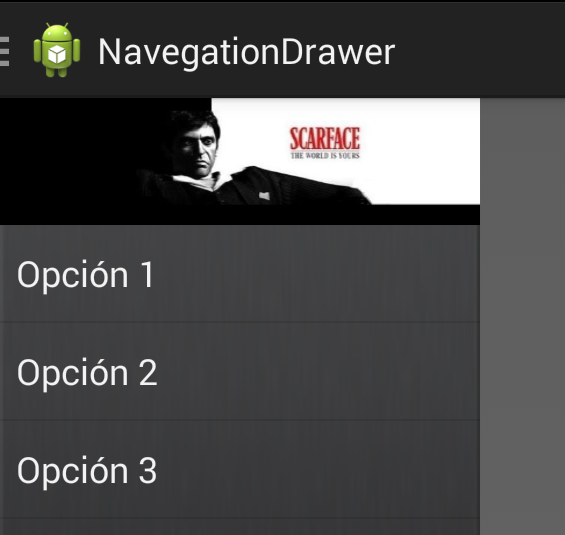
When you put image in your navigation drawer you have to declare a layout, in this case relativeLayout.
In layout xml you declare a layout, now you put image inside layout, then you put listView.
<android.support.v4.widget.DrawerLayout xmlns:android="http://schemas.android.com/apk/res/android"
    android:id="@+id/drawer_layout"
    android:layout_width="match_parent"
    android:layout_height="match_parent" >

    <!-- main content -->

    <FrameLayout
        android:id="@+id/content_frame"
        android:layout_width="match_parent"
        android:layout_height="match_parent" >
    </FrameLayout>

    <!-- Menu -->

    <RelativeLayout
        android:id="@+id/left_drawer"
        android:layout_width="240dp"
        android:layout_height="match_parent"
        android:layout_gravity="start"
        android:background="@drawable/degradee"
        android:orientation="vertical" >

        <ImageView
            android:id="@+id/image_view"
            android:layout_width="match_parent"
            android:layout_height="200dp"
            android:background="@drawable/theworldisyours" />

        <ListView
            android:id="@+id/list_view_drawer"
            android:layout_width="fill_parent"
            android:layout_height="fill_parent"
            android:layout_below="@id/image_view"
            android:choiceMode="singleChoice" />
    </RelativeLayout>

</android.support.v4.widget.DrawerLayout>
In your class you declare
package com.thedeveloperworldisyours.navigationdrawer;

import android.content.res.Configuration;
import android.os.Bundle;
import android.support.v4.app.ActionBarDrawerToggle;
import android.support.v4.app.ActivityCompat;
import android.support.v4.app.Fragment;
import android.support.v4.app.FragmentManager;
import android.support.v4.widget.DrawerLayout;
import android.support.v7.app.ActionBarActivity;
import android.view.Menu;
import android.view.MenuItem;
import android.view.View;
import android.widget.AdapterView;
import android.widget.AdapterView.OnItemClickListener;
import android.widget.ArrayAdapter;
import android.widget.ListView;
import android.widget.RelativeLayout;
import android.widget.Toast;

import com.thedeveloperworldisyours.navigationdrawer.fragment.FirstFragment;
import com.thedeveloperworldisyours.navigationdrawer.fragment.SecondFragment;
import com.thedeveloperworldisyours.navigationdrawer.fragment.ThirdFragment;

public class MainActivity extends ActionBarActivity {

	private String[] mOptionMenu;
	private DrawerLayout mDrawerLayout;
	private RelativeLayout mDrawerRelativeLayout;
	private ListView mDrawerList;
	private ActionBarDrawerToggle mDrawerToggle;

	private CharSequence mTitleSection;
	private CharSequence mTitleApp;
	private Fragment mFragment = null;

	@Override
	protected void onCreate(Bundle savedInstanceState) {
		super.onCreate(savedInstanceState);
		setContentView(R.layout.activity_main);

		mOptionMenu = new String[] { getString(R.string.first_fragment),
				getString(R.string.second_fragment),
				getString(R.string.third_fragment) };
		mDrawerLayout = (DrawerLayout) findViewById(R.id.drawer_layout);
		mDrawerRelativeLayout = (RelativeLayout) findViewById(R.id.left_drawer);
		mDrawerList = (ListView) findViewById(R.id.list_view_drawer);
		mDrawerList.setAdapter(new ArrayAdapter<String>(getSupportActionBar()
				.getThemedContext(), android.R.layout.simple_list_item_1,
				mOptionMenu));
		initContentWithFirstFragment();

		mDrawerList.setOnItemClickListener(new OnItemClickListener() {
			@Override
			public void onItemClick(AdapterView<?> parent, View view,
					int position, long id) {

				switch (position) {
				case 0:
					mFragment = new FirstFragment();
					break;
				case 1:
					mFragment = new SecondFragment();
					break;
				case 2:
					mFragment = new ThirdFragment();
					break;
				}

				FragmentManager fragmentManager = getSupportFragmentManager();

				fragmentManager.beginTransaction()
						.replace(R.id.content_frame, mFragment).commit();

				mDrawerList.setItemChecked(position, true);

				mTitleSection = mOptionMenu[position];
				getSupportActionBar().setTitle(mTitleSection);

				mDrawerLayout.closeDrawer(mDrawerRelativeLayout);
			}
		});
		mDrawerList.setItemChecked(0, true);
		mTitleSection = getString(R.string.first_fragment);
		mTitleApp = getTitle();

		mDrawerToggle = new ActionBarDrawerToggle(this, mDrawerLayout,
				R.drawable.ic_drawer, R.string.drawer_open,
				R.string.drawer_close) {

			public void onDrawerClosed(View view) {
				getSupportActionBar().setTitle(mTitleSection);
				ActivityCompat.invalidateOptionsMenu(MainActivity.this);
			}

			public void onDrawerOpened(View drawerView) {
				getSupportActionBar().setTitle(R.string.app_name);
				ActivityCompat.invalidateOptionsMenu(MainActivity.this);
			}
		};

		mDrawerLayout.setDrawerListener(mDrawerToggle);

		getSupportActionBar().setDisplayHomeAsUpEnabled(true);
		getSupportActionBar().setHomeButtonEnabled(true);
	}

	@Override
	public boolean onCreateOptionsMenu(Menu menu) {

		getMenuInflater().inflate(R.menu.main, menu);
		return true;
	}

	@Override
	public boolean onOptionsItemSelected(MenuItem item) {

		if (mDrawerToggle.onOptionsItemSelected(item)) {
			return true;
		}

		switch (item.getItemId()) {
		case R.id.action_settings:
			Toast.makeText(this, R.string.action_settings, Toast.LENGTH_SHORT)
					.show();
			;
			break;
		default:
			return super.onOptionsItemSelected(item);
		}

		return true;
	}

	@Override
	protected void onPostCreate(Bundle savedInstanceState) {
		super.onPostCreate(savedInstanceState);
		mDrawerToggle.syncState();
	}

	@Override
	public void onConfigurationChanged(Configuration newConfig) {
		super.onConfigurationChanged(newConfig);
		mDrawerToggle.onConfigurationChanged(newConfig);
	}

	public void initContentWithFirstFragment(){

		mTitleSection =getString(R.string.first_fragment);
		getSupportActionBar().setTitle(mTitleSection);
		mFragment = new FirstFragment();
		FragmentManager fragmentManager = getSupportFragmentManager();

		fragmentManager.beginTransaction()
				.replace(R.id.content_frame, mFragment).commit();
	}
}
You can download it from here

Thank you so much for this, it was really helpful!
Best Regards,
Zuhaib.
Thanks Bro,
It was helpful for my project.
Could you please update with the complete source code?
You can download it from here
https://github.com/CabezasGonzalezJavier/NavigationDrawer
Excellent job! Best explainer I’ve found to easily get an image header in your slideout menu. Thanks!!
Linear Layout should be there in place of Relative.
That’s true, it’s better with Linear Layout than Relative Layout. But the result is the same.
Very Helpful to me. Saved my time
Thanks 🙂
It was really very helpful. A perfect example. Thank you.
thanks Bro, i have a question: how can i setImagebyBitmap for this image in java code ?
I think that you want something like this:
AssetManager manager = getAssets(); // read a Bitmap from Assets InputStream open = null; try { open = manager.open("logo.png"); Bitmap bitmap = BitmapFactory.decodeStream(open); // Assign the bitmap to an ImageView in this layout ImageView view = (ImageView) findViewById(R.id.image_view); view.setImageBitmap(bitmap); } catch (IOException e) { e.printStackTrace(); } finally { if (open != null) { try { open.close(); } catch (IOException e) { e.printStackTrace(); } } }Hello admin, i must say you have high quality content here.
Your page can go viral. You need initial traffic only.
How to get it? Search for: Mertiso’s tips go viral