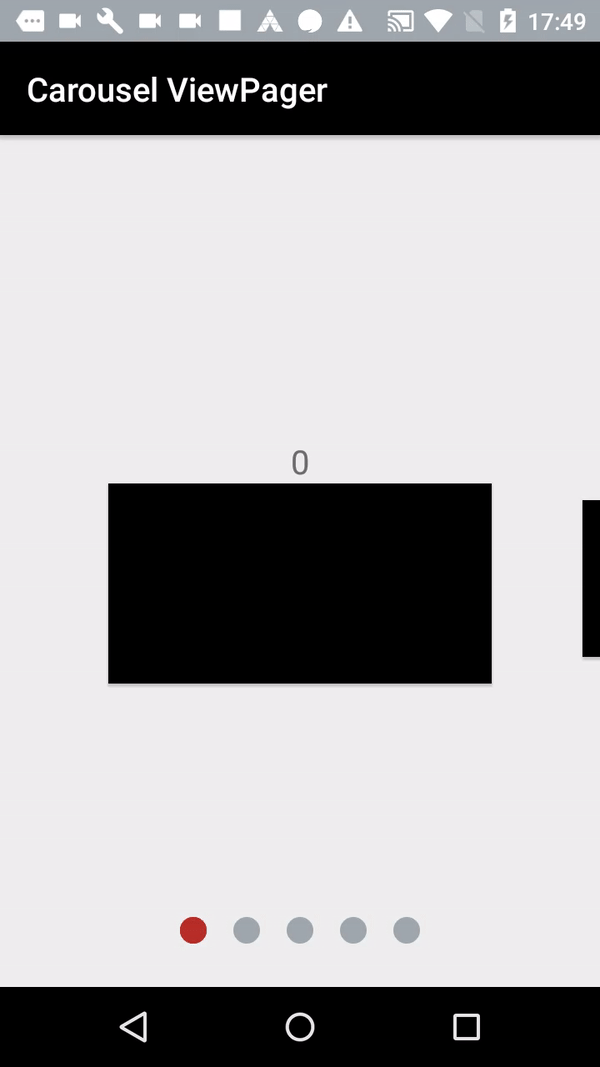
Delete item recyclerView

Remove item recyclerView

Delete item recyclerView

When we delete a item in our recyclerView, first step is in our adapter We must to add this:

void deleteItem(int index) {
        mDataset.remove(index);
        notifyItemRemoved(index);
    }

And now our fragment or activity we call the method like this:

mAdapter.deleteItem(position);

The example is in GitHub

Hopefully this steps will help you removing items from a recycler view, please, drop us a comment if you have any problems with this code.

how to test the server call with Mockito, Retrofit and RxJava

how to test the server call with Mockito, Retrofit and RxJava

In this example you can learn how to test server call with Mockito and RxJava, We need this elements:

1. Service
2. RemoteDataSource
3. RemoteDataSourceTest

how to test the server call with Mockito, Retrofit and RxJava

Simple Service:

public interface Service {
    String URL_BASE = "https://guessthebeach.herokuapp.com/api/";

    @GET("topics/")
    Observable<List<Topics>> getTopicsRx();

}

For RemoteDataSource

public class RemoteDataSource implements Service {

    private Service api;

    public RemoteDataSource(Retrofit retrofit) {


        this.api = retrofit.create(Service.class);
    }


    @Override
    public Observable<List<Topics>> getTopicsRx() {
        return api.getTopicsRx();
    }
}

The key is MockWebServer from okhttp3.

This library makes it easy to test that your app Does The Right Thing when it makes HTTP and HTTPS calls. It lets you specify which responses to return and then verify that requests were made as expected.

Because it exercises your full HTTP stack, you can be confident that you’re testing everything. You can even copy & paste HTTP responses from your real web server to create representative test cases. Or test that your code survives in awkward-to-reproduce situations like 500 errors or slow-loading responses.

Use MockWebServer the same way that you use mocking frameworks like Mockito:

  1. Script the mocks.
  2. Run application code.
  3. Verify that the expected requests were made.

Here’s a complete example in RemoteDataSourceTest:

 
public class RemoteDataSourceTest {

    List<Topics> mResultList;
    MockWebServer mMockWebServer;
    TestSubscriber<List<Topics>> mSubscriber;

    @Before
    public void setUp() {
        Topics topics = new Topics(1, "Discern The Beach");
        Topics topicsTwo = new Topics(2, "Discern The Football Player");
        mResultList = new ArrayList();
        mResultList.add(topics);
        mResultList.add(topicsTwo);

        mMockWebServer = new MockWebServer();
        mSubscriber = new TestSubscriber<>();
    }

    @Test
    public void serverCallWithError() {
        //Given
        String url = "dfdf/";
        mMockWebServer.enqueue(new MockResponse().setBody(new Gson().toJson(mResultList)));
        Retrofit retrofit = new Retrofit.Builder()
                .addCallAdapterFactory(RxJavaCallAdapterFactory.create())
                .addConverterFactory(GsonConverterFactory.create())
                .baseUrl(mMockWebServer.url(url))
                .build();
        RemoteDataSource remoteDataSource = new RemoteDataSource(retrofit);

        //When
        remoteDataSource.getTopicsRx().subscribe(mSubscriber);

        //Then
        mSubscriber.assertNoErrors();
        mSubscriber.assertCompleted();
    }

    @Test
    public void severCallWithSuccessful() {
        //Given
        String url = "https://guessthebeach.herokuapp.com/api/";
        mMockWebServer.enqueue(new MockResponse().setBody(new Gson().toJson(mResultList)));
        Retrofit retrofit = new Retrofit.Builder()
                .addCallAdapterFactory(RxJavaCallAdapterFactory.create())
                .addConverterFactory(GsonConverterFactory.create())
                .baseUrl(mMockWebServer.url(url))
                .build();
        RemoteDataSource remoteDataSource = new RemoteDataSource(retrofit);

        //When
        remoteDataSource.getTopicsRx().subscribe(mSubscriber);

        //Then
        mSubscriber.assertNoErrors();
        mSubscriber.assertCompleted();
    }

}

You can check my example in GitHub

Learn RxJava

Learn RxJava

In this example you can understand different elements of RxJava with Strings.

Simple
This method creates an Observable such that when an Observer subscribes, the onNext() of the Observer is immediately called with the argument provided to Observable.just(). The onCompleted() will then be called since the Observable has no other values to emit.

Observable.create(subcriber ->{
        subcriber.onNext("Hello");
        subcriber.onNext("Javier Gonzalez");
        subcriber.onCompleated();
    });

Now with Exception:

    Observable.create(subcriber ->{
        subcriber.onNext("Hello");
        subcriber.onNext("Javier Gonzalez");
        subcriber.onError(new Exception("iOS user now allowed"));
    });

And there are another different ways to do:

    Observable.just("Hello again...");

    Observable.from(Arrays.asList("Hello", "again..."));

    Observable.from(new String[]{"Hello", "again..."});

    Observable.concat(Observable.just("Hello"), Observable.just("again..."));

    Observable.merge(Observable.just("Hello", "again..."), Observable.never());

Also you can check this example
And this post

Carousel ViewPager

Carousel ViewPager

If you want a good tutorial in your apps, you can make a carousel.

We can use my favorite library for tutorial

    compile "com.romandanylyk:pageindicatorview:0.1.1"

Example in GitHub

In the layout We should add ViewPager and the Indicator.

<?xml version="1.0" encoding="utf-8"?>
<RelativeLayout xmlns:android="http://schemas.android.com/apk/res/android"
    xmlns:attrs="http://schemas.android.com/apk/res-auto"
    xmlns:tools="http://schemas.android.com/tools"
    android:id="@+id/activity_main"
    android:layout_width="match_parent"
    android:layout_height="match_parent"
    android:paddingBottom="@dimen/activity_vertical_margin"
    android:paddingTop="@dimen/activity_vertical_margin"
    tools:context="com.thedeveloperworldisyours.carouselviewpager.MainActivity">


    <android.support.v4.view.ViewPager
        android:id="@+id/activity_main_view_pager"
        android:layout_width="wrap_content"
        android:layout_height="wrap_content" />

    <com.rd.PageIndicatorView
        android:id="@+id/tutorial_activity_page_indicator_view"
        android:layout_width="wrap_content"
        android:layout_height="wrap_content"
        android:layout_alignParentBottom="true"
        android:layout_centerHorizontal="true"
        android:layout_marginBottom="10dp"
        attrs:piv_animationType="drop"
        attrs:piv_dynamicCount="true"
        attrs:piv_interactiveAnimation="true"
        attrs:piv_padding="16dp"
        attrs:piv_radius="8dp"
        attrs:piv_selectedColor="@color/colorAccent"
        attrs:piv_unselectedColor="@color/colorPrimaryDark"
        attrs:piv_viewPager="@id/activity_main_view_pager" />

</RelativeLayout>

We can custom the item

<?xml version="1.0" encoding="utf-8"?>
<LinearLayout xmlns:android="http://schemas.android.com/apk/res/android"
    android:layout_width="match_parent"
    android:layout_height="match_parent"
    android:gravity="center"
    android:orientation="vertical">

    <com.thedeveloperworldisyours.carouselviewpager.CustomLinearLayout
        android:id="@+id/item_root"
        android:layout_width="match_parent"
        android:layout_height="match_parent"
        android:background="@android:color/transparent"
        android:gravity="center"
        android:orientation="vertical">

        <TextView
            android:id="@+id/item_text"
            android:layout_width="wrap_content"
            android:layout_height="wrap_content"
            android:textSize="@dimen/item_size_text" />

        <Button
            android:id="@+id/item_content"
            android:layout_width="230dp"
            android:layout_height="120dp"
            android:background="@android:color/black"/>
    </com.thedeveloperworldisyours.carouselviewpager.CustomLinearLayout>
</LinearLayout>
public class CustomFragment extends Fragment {

    public static Fragment newInstance(Activity context, int position, float scale) {
        Bundle bundle = new Bundle();
        bundle.putInt("position", position);
        bundle.putFloat("scale", scale);
        return Fragment.instantiate(context, CustomFragment.class.getName(), bundle);
    }

    @Override
    public View onCreateView(LayoutInflater inflater, ViewGroup container,
                             Bundle savedInstanceState) {
        if (container == null) {
            return null;
        }

        LinearLayout linearLayout = (LinearLayout)
                inflater.inflate(R.layout.item, container, false);

        int position = this.getArguments().getInt("position");
        TextView textView = (TextView) linearLayout.findViewById(R.id.item_text);
        textView.setText(String.valueOf(position));

        CustomLinearLayout root = (CustomLinearLayout) linearLayout.findViewById(R.id.item_root);
        float scale = this.getArguments().getFloat("scale");
        root.setScaleBoth(scale);

        return linearLayout;
    }
}
public class CustomLinearLayout extends LinearLayout {
    private float mScale = BIG_SCALE;

    public CustomLinearLayout(Context context, AttributeSet attrs) {
        super(context, attrs);
    }

    public CustomLinearLayout(Context context) {
        super(context);
    }

    public void setScaleBoth(float scale) {
        this.mScale = scale;
        this.invalidate();    // If you want to see the mScale every time you set
        // mScale you need to have this line here,
        // invalidate() function will call onDraw(Canvas)
        // to redraw the view for you
    }

    @Override
    protected void onDraw(Canvas canvas) {
        // The main mechanism to display mScale animation, you can customize it
        // as your needs
        int w = this.getWidth();
        int h = this.getHeight();
        canvas.scale(mScale, mScale, w / 2, h / 2);

        super.onDraw(canvas);
    }
}
public class CustomPagerAdapter extends FragmentPagerAdapter implements ViewPager.PageTransformer {
    public final static float BIG_SCALE = 1.0f;
    public final static float SMALL_SCALE = 0.7f;
    public final static float DIFF_SCALE = BIG_SCALE - SMALL_SCALE;

    private Activity mContext;
    private FragmentManager mFragmentManager;
    private float mScale;

    public CustomPagerAdapter(Activity context, FragmentManager fragmentManager) {
        super(fragmentManager);
        this.mFragmentManager = fragmentManager;
        this.mContext = context;
    }

    @Override
    public Fragment getItem(int position) {
        // make the first mViewPager bigger than others
        if (position == FIRST_PAGE)
            mScale = BIG_SCALE;
        else
            mScale = SMALL_SCALE;

        return CustomFragment.newInstance(mContext, position, mScale);
    }

    @Override
    public int getCount() {
        return PAGES;
    }

    @Override
    public void transformPage(View page, float position) {
        CustomLinearLayout myLinearLayout = (CustomLinearLayout) page.findViewById(R.id.item_root);
        float scale = BIG_SCALE;
        if (position > 0) {
            scale = scale - position * DIFF_SCALE;
        } else {
            scale = scale + position * DIFF_SCALE;
        }
        if (scale < 0) scale = 0;
        myLinearLayout.setScaleBoth(scale);
    }
}
public class MainActivity extends AppCompatActivity {

    public final static int PAGES = 5;
    public final static int FIRST_PAGE = 0  ;

    public CustomPagerAdapter mAdapter;
    public ViewPager mViewPager;

    @Override
    protected void onCreate(Bundle savedInstanceState) {
        super.onCreate(savedInstanceState);
        setContentView(R.layout.activity_main);
        mViewPager = (ViewPager) findViewById(R.id.activity_main_view_pager);

        mAdapter = new CustomPagerAdapter(this, this.getSupportFragmentManager());
        mViewPager.setAdapter(mAdapter);
        mViewPager.setPageTransformer(false, mAdapter);

        // Set current item to the middle page so we can fling to both
        // directions left and right
        mViewPager.setCurrentItem(FIRST_PAGE);

        // Necessary or the mViewPager will only have one extra page to show
        // make this at least however many pages you can see
        mViewPager.setOffscreenPageLimit(3);

        // Set margin for pages as a negative number, so a part of next and
        // previous pages will be showed
        mViewPager.setPageMargin(-400);
    }
}

Example in GitHub