MVC on Android

Don’t do MVC on Android

Model-View-Controller is absolutely different from MVP and does not solve any problems which interface developers are facing.

What is MVC?

  • Model stands here for internal application state. It can or can not be connected with a storage.
  • View is the only thing that is partially common with MVP – it is a part of an application that renders Model to the screen.
  • Controller represents an input device, such as keyboard, mouse or joystick.


MVC comes from good (probably) and old days when you had a PC and a simple keyboard-driven application such as a game. No windows, no graphical user interface – the application was something that receives input (Controller), maintains some state (Model) and produces output (View). Both: data and control go like this: controller -> model -> view. This pattern is absolutely useless on Android.

There is a lot of confusion with MVC. People believe that they use MVC, while in fact they use MVP (web developers). Many Android developers think that Controller is something that is controlling View, so they are trying to extract View logic out of View to create a thin View that is controlled by a dedicated Controller. I personally do not see any benefits in such application structure.

How to take a component position

How to take a component position?

If we need to place another element in the same place we need to put use LayoutParams.

<RelativeLayout 
android:id="@+id/activity_main_relative_layout"
android:layout_width="match_parent";
android:layout_height="match_parent";
android:paddingBottom="@dimen/activity_vertical_margin"
android:paddingLeft="@dimen/activity_horizontal_margin"
android:paddingRight="@dimen/activity_horizontal_margin"
android:paddingTop="@dimen/activity_vertical_margin"
<ImageView
 android:id="@+id/activity_main_red_card"
 android:layout_width="match_parent"
 android:layout_height="match_parent"
 android:background="@android:color/holo_red_dark"
 android:layout_marginBottom="@dimen/activity_main_layout_margin_bottom"
 android:layout_marginLeft="@dimen/activity_main_layout_margin_left"
 android:layout_marginRight="@dimen/activity_main_layout_margin_right"
 android:layout_marginTop="@dimen/activity_main_layout_marginB_top"/>
</RelativeLayout>

If we have a ImageView in our layout and we need to replace this Image for other element.
We can take the position with margin.

public class MainActivity extends AppCompatActivity {

 RelativeLayout mRelativeLayout;
 ImageView mRedCard, mNewCard;

 @Override
 protected void onCreate(Bundle savedInstanceState) {
    super.onCreate(savedInstanceState);
    setContentView(R.layout.activity_main);

    mRelativeLayout = (RelativeLayout) findViewById(R.id.activity_main_relative_layout);
    mRedCard = (ImageView) findViewById(R.id.activity_main_red_card);

    mNewCard = new ImageView(this);
    mNewCard.setBackgroundColor(getColor(R.color.colorPrimary));
    takePosition();
 }

 public void takePosition() {

    RelativeLayout.LayoutParams mLayoutParams = (RelativeLayout.LayoutParams) mRedCard.getLayoutParams();
    mNewCard.setLayoutParams(mLayoutParams);
    mRelativeLayout.addView(mNewCard);
 }
}

Also you can check the example in GitHub

How to move a view on touch move?

If you want o move a view on Android, you should implemts OnTouchListener.

In your layout you can define a view, in this case we use ImageView. But You can use any view.

<?xml version="1.0" encoding="utf-8"?>
<RelativeLayout xmlns:android="http://schemas.android.com/apk/res/android"
    xmlns:tools="http://schemas.android.com/tools"
    android:layout_width="match_parent"
    android:layout_height="match_parent"
    android:paddingBottom="@dimen/activity_vertical_margin"
    android:paddingLeft="@dimen/activity_horizontal_margin"
    android:paddingRight="@dimen/activity_horizontal_margin"
    android:paddingTop="@dimen/activity_vertical_margin"
    tools:context=".MainActivity"
    tools:showIn="@layout/activity_main"
    android:id="@+id/content_main_relative_layout"
    android:background="@android:color/holo_blue_light">

    <TextView
        android:layout_width="wrap_content"
        android:layout_height="wrap_content"
        android:layout_centerInParent="true"
        android:text="@string/activity_main_move_the_view" />
    <ImageView
        android:id="@+id/content_main_image_view"
        android:layout_width="wrap_content"
        android:layout_height="wrap_content"
        android:src="@android:drawable/ic_dialog_info"/>
</RelativeLayout>

Now in your activity when you implement View.OnTouchListener, In this listener you have different events, we use two (ACTION_DOWN and ACTION_MOVE) but you can use anyone.

public class MainActivity extends AppCompatActivity implements View.OnTouchListener{

    ImageView mImageView;
    ViewGroup mRoot;
    private int mXDelta;
    private int mYDelta;


    @Override
    protected void onCreate(Bundle savedInstanceState) {
        super.onCreate(savedInstanceState);
        setContentView(R.layout.activity_main);

        mRoot = (RelativeLayout)findViewById(R.id.content_main_relative_layout);
        mImageView = (ImageView) findViewById(R.id.content_main_image_view);
        mImageView.setOnTouchListener(this);
    }

    @Override
    public boolean onTouch(View v, MotionEvent event) {

        final int x = (int) event.getRawX();
        final int y = (int) event.getRawY();
        switch (event.getAction() & MotionEvent.ACTION_MASK) {
            case MotionEvent.ACTION_DOWN:
                RelativeLayout.LayoutParams lParams = (RelativeLayout.LayoutParams) mImageView.getLayoutParams();
                mXDelta = x - lParams.leftMargin;
                mYDelta = y - lParams.topMargin;
                break;
            case MotionEvent.ACTION_UP:
            case MotionEvent.ACTION_POINTER_DOWN:
            case MotionEvent.ACTION_POINTER_UP:
                break;
            case MotionEvent.ACTION_MOVE:
                RelativeLayout.LayoutParams layoutParams = (RelativeLayout.LayoutParams) mImageView.getLayoutParams();
                layoutParams.leftMargin = x - mXDelta;
                layoutParams.topMargin = y - mYDelta;
                layoutParams.rightMargin = -250;
                layoutParams.bottomMargin = -250;
                mImageView.setLayoutParams(layoutParams);
                break;
        }
        mRoot.invalidate();
        return true;
    }
}

Also you can check the complete code in GitHub

7 ways to speed up Magento on micro-instances

Magento Speed upThere are plenty of posts showing ways to speed up Magento, and this is yet another one, but we’ll try to come up with some original techniques that hopefully will help you to improve the performance of your store.

It’s worth mentioning that all the below tips have been tested thoroughly, and we are currently taking advantage of them on many production websites. Today, we’ll focus on how we did it for our motorbikes shop.

The infrastructure where store is currently running is a skinny micro-instance with 0.6GB of RAM, shared CPU, and 10GB of hard disk. We’ve been constantly tunning all the settings trying to get the best performance out of it, and here you have the major changes that made a difference:

  1. Cache:
    1. Start using FPC (Full Page Cache) if you aren’t already, this is definitely the most important thing and should be your priority. We recommend Varnish + Turpentine even though it might not be the easiest to install & configure, depending on the amount of customizations of your store. Having FPC is essential to be able to scale and handle multiple simultaneous requests, specially important in a machine where you’ve a very limited amount of RAM and CPU.
    2. Start using the PHP extension APC (or OPCACHE + APCU) and use APC for the Magento config cache (you can enable it on the local.xml). This will definitely increase the speed of your site for the non-fpc-cached pages.
  2. Memcached for sessions: Many other people use Redis, and that might be even better, but as long as you don’t use files or database, you are doing just fine. You can change this setting in your local.xml. If you don’t use it for anything else, you don’t need more than 16/32MB until you have a serious amount of users.
  3. Robots.txt & Blocking bots: When you start running a new website, (I completely made up that number) probably around 90% of your traffic is just bots, and even when you grow, it will still represent a very high amount of the number of requests of your site. Therefore our advise is to spend some time carefully tunning your robots.txt to prevent bots from crawling pages or images or whatever you don’t want to be crawled. Moreover, there are just too many bots out there and unless you are really interested in them all to crawl your site, my advise is to block them either by the robots.txt or by any other mechanism, such as nginx/apache config by looking at the user agent. Depending on how aggressive you are willing to be against unwanted bots, you can drastically reduce the number of requests of your server and save all those resources to delivery a much better user experience (aka speed) to your actual customers.
  4. Reindex optimizations: This is one of the most painful tasks, and it can only get worse as your catalog of products increase. A good start is usually installing this url reindexer patch extension, which basically skips the disabled or not visible products from the catalog url reindex. This has proven to reduce the reindex time from nearly an hour to just a few minutes, but it will depend a lot on your catalog of products.
  5. MySQL tunning: A proper configuration of your mysql instance can have a huge impact on your site’s performance. Give mysqltunner a go, it will most likely give you useful advise, but once again, it all depends on each custom setup. One setting that works well for one store, might not work for another one. Always monitor your config changes and if something doesn’t work, revert the changes.
  6. Varnish/Turpentine tunning: After installing and configuring varnish+turpentine, we noticed a boost in the capacity and performance of the site, but we noticed as well that, due the CSRF protection (aka formkeys) added in the latest versions of Magento, Turpentine’s FPC stopped working as it used to do. Now, the default config will never serve a cached page to a new user, as it has to be processed by Magento in order to generate a valid session and be able to get a valid formkey through an ESI. This is a very good solution to preserve the FPC functionality and the CSRF protection, but has the downside of always giving a non-cached page to the first time visitors, which if it’s not quick enough, can make de difference between bouncing or not. Therefore, we recommend enabling the setting “Use VCL Fix” in Turpentine, but that would imply disabling the CSRF protection as well, which you should do at your own risk. Be very careful doing this as this can potentially break the add to cart and login in your store. Please, note that after enabling that setting you might still notice that the first time visitor still gets served a non-cached page, if thats the case, check this pull request and make sure you have those changes in your VLC file.
  7. CDN: This one is pretty obvious, but somehow many people have the impression that having a CND is very complex and/or costly. We’ve tried a few of them and the best one we’ve found so far is KeyCDN (register through this link and you’ll get 10$ credit month trial!), mostly because of the price, but also because of the performance and the features.

Conclusion: The above list is a small subset of the many ways to speed up Magento, and it should be just the beginning of all the things that you should do in order to make your store quicker and better. There is an endless list of things that you can try, but this list highlights the changes that had a bigger impact in our micro-instance, and hopefully will be useful for not only low resource machines, but also for the majority of the Magento store setups.

If you have any questions and/or need any help, do not hesitate to get in touch.

How to make Model View Presenter on Android

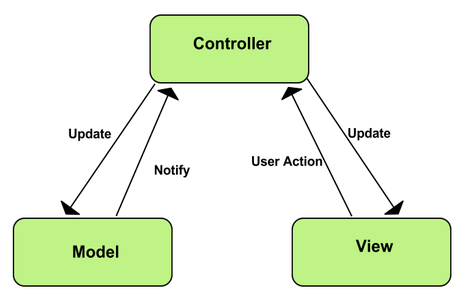
We 4 parts in our android app:

– Model
– View
– Presenter
– Activity

More explanation about this design pattern here.

you can see the complete code here.

In model is the same, nothing new:

public class SignInRequest implements Serializable {
private String username,name, lastname,password,email;

public String getUsername() {
return username;
}

public void setUsername(String username) {
this.username = username;
}

public String getName() {
return name;
}

public void setName(String name) {
this.name = name;
}

public String getLastname() {
return lastname;
}

public void setLastname(String lastname) {
this.lastname = lastname;
}

public String getPassword() {
return password;
}

public void setPassword(String password) {
this.password = password;
}

public String getEmail() {
return email;
}

public void setEmail(String email) {
this.email = email;
}
}

Our view is a interface, and it connects presenter with activity:

public interface LoginView {
void showLoading(boolean state);
void onRequestSuccess(Object object);
void onRequestError(Object object);

Context getContext();

}

In presenter We make call, you can use retrofit or any other way, in this case We choose volley:

public class LoginPresenter {
private static final String TAG ="LoginPresenter" ;
private LoginView loginView;
private RequestQueue queue;
private LoginResponse loginResponse;

public LoginPresenter(LoginView loginView) {
this.loginView = loginView;
}

public void login(String username, String password)
{
queue = Volley.newRequestQueue(loginView.getContext());

final String url = loginView.getContext().getString(R.string.url_login)+"?username="+username+"&amp;password="+password;
final String appID= loginView.getContext().getString(R.string.app_id);
final String key= loginView.getContext().getString(R.string.rest_key);

Log.i(TAG, "url " + url);

JsonObjectRequest jsonObjReq = new JsonObjectRequest(Request.Method.GET,
url, null,
new Response.Listener()
{

@Override
public void onResponse(JSONObject response)
{
Log.i(TAG, "response "+response.toString());
GsonBuilder gsonb = new GsonBuilder();
Gson gson = gsonb.create();

loginResponse=null;
try
{
loginResponse= gson.fromJson(response.toString(),LoginResponse.class);
if(loginResponse!=null)
{
Log.i(TAG, "loginResponse "+loginResponse.toString());
loginView.onRequestSuccess(response);
}

}catch (Exception e)
{
loginView.onRequestError(e);
}

}
}, new Response.ErrorListener() {

@Override
public void onErrorResponse(VolleyError error)
{
Log.i(TAG, "Error: " + error);
loginView.onRequestError(error);
}
})
{
@Override
public Map&lt;String, String&gt; getHeaders() throws AuthFailureError {
Map&lt;String, String&gt; params = new HashMap&lt;String, String&gt;();
params.put("X-Parse-Application-Id", appID);
params.put("X-Parse-REST-API-Key", key);

return params;
}
};
queue.add(jsonObjReq);
}

public void login(Object object)
{

}
}

Finally our activity is few lineas and clear code:

public class LoginActivity extends AppCompatActivity implements LoginView {

private static final String TAG = "HomeActivity";
private EditText eteUsername,etePassword;
private View btnLogin,vLoading,tviSignIn;

private String username, password;
private LoginPresenter loginPresenter;

@Override
protected void onCreate(Bundle savedInstanceState) {
super.onCreate(savedInstanceState);
setContentView(R.layout.activity_login);
loginPresenter= new LoginPresenter(this);
initiateUI();
}

private void initiateUI() {
eteUsername = (EditText)findViewById(R.id.eteUsername);
etePassword = (EditText)findViewById(R.id.etePassword);
btnLogin = findViewById(R.id.btnLogin);
vLoading = findViewById(R.id.vLoading);
tviSignIn = findViewById(R.id.tviSignIn);
vLoading.setVisibility(View.GONE);
events();
}

private void events() {
btnLogin.setOnClickListener(new View.OnClickListener() {
@Override
public void onClick(View view) {

if (validate()) {
login();
}
}
});
tviSignIn.setOnClickListener(new View.OnClickListener() {
@Override
public void onClick(View view) {
gotoSignIn();
}
});
}

private boolean validate() {

username = eteUsername.getText().toString().trim();
password = etePassword.getText().toString().trim();

eteUsername.setError(null);
etePassword.setError(null);
if(username.isEmpty())
{
eteUsername.setError(getString(R.string.msg_ingresar));
return false;
}
if(password.isEmpty())
{
etePassword.setError(getString(R.string.msg_ingresar));
return false;
}
return true;
}

private void gotoSignIn() {

}

private void login()
{
showLoading(true);
loginPresenter.login(username,password);
}

@Override
public void showLoading(boolean state) {
int visibility= (state)?(View.VISIBLE):(View.GONE);
vLoading.setVisibility(visibility);
}

@Override
public void onRequestSuccess(Object object) {
showLoading(false);
gotoHome();
}

@Override
public void onRequestError(Object object) {
showLoading(false);
}

private void gotoHome() {
startActivity(new Intent(this,MainActivity.class));
finish();
}

@Override
public Context getContext() {
return this;
}

@Override
public boolean onCreateOptionsMenu(Menu menu) {
return false;
}

@Override
public boolean onOptionsItemSelected(MenuItem item)
{
return false;
}

}

You can see the complete code here.

Also more explanation about this design pattern here.