Jenkins for PHP from scratch – I

jenkins logoThis is meant to be a full guide of how to set up jenkins for php, starting from the very beginning until the end. As it might become a very long guide, I’ll try to simplify it as much as possible, and I’ll split it in two or three posts.

All the guide was made under Ubuntu 12.10 though it should work fairly well in most of the latest Ubuntu versions, and apart from the apt-get commands the rest should be the almost the same for any unix operating system.

For those who doesn’t know what Jenkins is, here you are a very concise description:

Jenkins is an open source continuous integration tool written in Java.

It’s a very powerful tool and definitely a must have for any development environment that attempts to achieve continuous integration. If you are still not convinced have a look at wikipedia link, and read the fully explanation.

Ok, said that, let’s start, assuming the worst case scenario, where you have your own php application running, but you don’t even have a single automated/unit test.

The first thing you should probably do is install phpunit and start writting some tests. In my case I installed php-test-helpers as well. The installation should be pretty straightforward:

sudo pear config-set auto_discover 1
sudo pear install -a pear.phpunit.de/PHPUnit
sudo pear channel-discover pear.phpunit.de
sudo pecl install phpunit/test_helpers

I’ll skip the part when you learn how to write your own tests :).

Assuming you already have a bunch of tests that cover most of your application code, and you feel like you are ready to install jenkins, let’s do it:

wget -q -O - http://pkg.jenkins-ci.org/debian/jenkins-ci.org.key | sudo apt-key add -
sudo sh -c 'echo deb http://pkg.jenkins-ci.org/debian binary/ > /etc/apt/sources.list.d/jenkins.list'
sudo apt-get update
sudo apt-get install jenkins

Jenkins should be already installed and its service should  have started automatically. It has a web interface at 8080 port by default, so now you should be able to browse it by typing the following url in your browser: http://localhost:8080

Now you should install several plugins that will probably be useful later. You might eventually get rid of some of them, but I advice you to give them a try, as they can provide you with very interesting information about your application. Typically, it’s recommended to install the following plugins:

– Jenkins GIT plugin: As I use git and my application is stored in bitbucket.
– Checkstyle: Useful if you want to apply some codding standard checks over the code.
– Jenkins Clover PHP: For processing PHPUnit code coverage reports.
–  DRY: For checking for duplicated code in the application
– HTML Publisher: For publishing HTML reports, such as the ones generated by PHPUnit.
– JDepend: For analizing the code coupling and dependencies.
– Plot: For being able to draw/display results as graphs
– PMD: For performing further analysis of the code such as locating unused variables, unnecessary objects and many more.
– Violations: For gathering all the isues found by all the plugins listed above.
– xUnit: To collect PHPUnit test results.

Note that here we are just installing the plugins, but in many cases we will need to install some additional software to actually be able to generate the reports. The plugins will take care of reading and displaying in a friendly way the mentioned reports. But don’t worry, we’ll cross that bridge when we get to it, for the moment installing the plugins is enough.

Once you have installed all the plugins that you want, let’s create our first job and test that everything is working as expected.

Open Jenkins and click on New Job.
Type any job name, select “Build a free-style software project” and hit OK.
In the next window, select your Source Code Management (git in my case) and configure its settings.
Assuming you are using GIT, you have to enter the repository URL, and you’ll probably get an authentication error, unless you are using a public repository.
Note that jenkins runs as an isolated service and it even creates its own pseudo-username. The easiest way to authenticate on the git repository from jenkins is either creating a new public key for jenkins username or just using your own keys. This is how I managed to get it working:
sudo cp .ssh/* /var/lib/jenkins/.ssh/
sudo chown jenkins:nogroup /var/lib/jenkins/.ssh/
This should fix the problem.
Now you just need to select your branch and if you want to browse the code from jenkins, just select the repository browser and enter the url.

Then, under the build section, click on Add build step, select “Execute shell” and type in the following:

phpunit --log-junit 'reports/unitreport.xml' --coverage-html 'reports/coverage' --coverage-clover 'reports/coverage/coverage.xml' path_of_your_tests

Finally, under the post-build section, add the following actions:
– Publish JUnit test result report: Enter the previous used file path: tests/reports/unitreport.xml
– Publish Cover PHP Coverage report: Enter the coverage file path: tests/reports/coverage/coverage.xml
Enable the option Publish HTML Report and enter the path tests/reports/coverage/
– Publish xUnit test result report

Once you are finished doing that, save the job, and start a new build.
If everything works as expected, you should see a blue ball at the end, and and something like this:
blue ball build
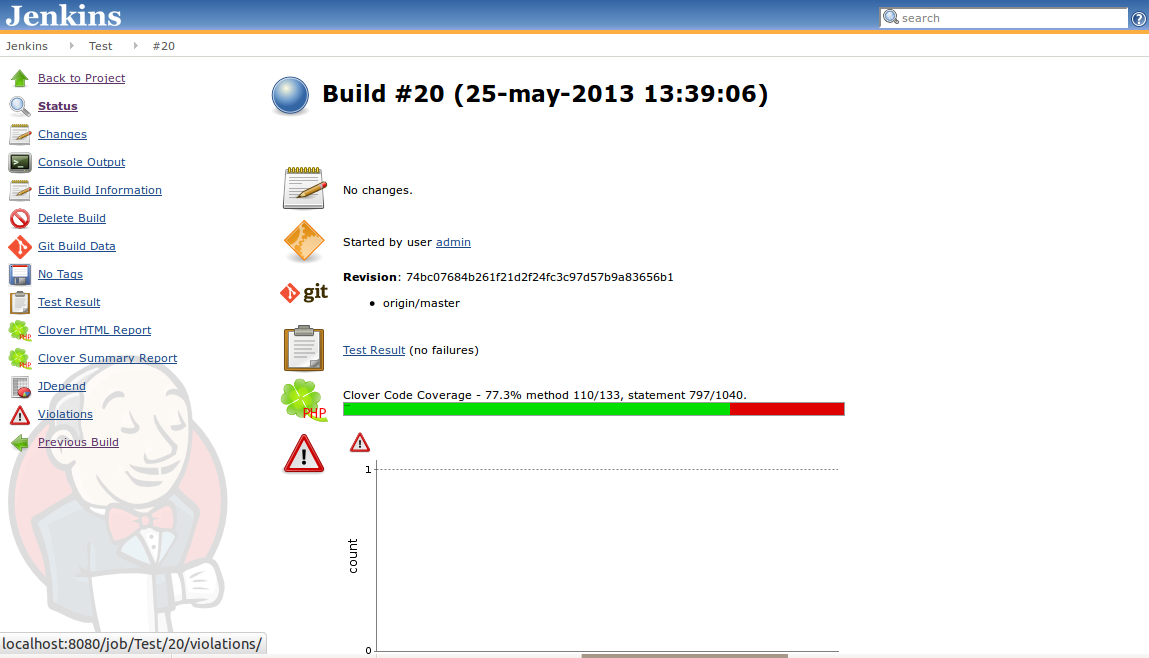
If you have any problems have a look at the Console Output and it should help you to detect the problem. Let me know if you have any other problem and are not able to fix it.

That’s all for now, next time we’ll show how to use all the installed plugins and how to automatically start new builds once new code is pushed to the repository.

JavaScript Validation with JsLint

Here I’ll explain how to integrate javascript validation with JsLint in VIM. If you usually have to write some JavaScript code, either using a framework, or just “pure” js code, you should probably use a JS Validator.
Before I started usin JsLint, I used to write the code, save the file, go to the browser, clean the cache (not always but usually), go to an specific page, and eventually test if my code was working.

Sometimes, if have to write just a few lines, I usually do it directly on the firebug or Chrome console, and once I had verified that it works, I copy the code an put it wherever it’s needed on my app.
However, if it’s something bigger, it becomes unhandleable to work on the console, and I rather type the code on the JS files, for the shake of readability.

When I’m coding in PHP, I have a shortcut to directly check syntax errors, which actually helps me a lot. It doesn’t guarantee that the code would work, but at least I know there aren’t syntax errors. One day I was wondering if there is something similar for JavaScript, and after some research, eventually I found it.

It seems that there are several ways to validate JS code, however after trying some of them, I’ve finally choosen JsLint, a static code analyzer for JavaScript source code.

I usually write code using VIM, and debug in NetBeans, so I was looking for some plugin or script that I can easily integrate with VIM. There are many tutorials on the web, however most of them didn’t work as I expected, so I had to combine some of them until I achieved a satisfactory solution.

Okay, enough speech, let’s do it!
I’m using Ubuntu 12 and theese are the steps I followed in order to get it working:
1. You need a command line JS interpreter, and the easiest to install is rhino:

sudo apt-get install rhino

After the installation, you should be able to enter the interpreter just by typing js on your terminal:

Javascript Interpreter

2. You need JsLint and a plugin to integrate it on your favourite IDE (VIM in my case).
Luckly, there is already a JsLint VIM plugin that includes all together, you just have to download the files and put them under the folder ~/.vim/ftplugin. You can find additional help and installation instructions on the link.
Depending on your .vimrc config, you might need to add the following line to enable filetype plugins: filetype plugin on (only if you don’t have it already).

3. After installing the plugin, the validator should be already working:

Javascript Validator

Note that the “wrong” lines are highlighted, and you will see an error description at the bottom once you put the cursor on the line. Each time you save a file with JS extension, the validation will be performed.

4. Now, you have a JS validator integrated on your editor. However, you’ll probably notice that almos every single line will be highlighted, because depending on the JsLint settings, it can be too strict, but you can customize it. In order to do that, create a new file on your home location: ~/.jslintrc and put your custom config. This is the one I’m using:

/*jslint browser: true, regexp: true, nomen: true, sloppy: true*/
/*global jQuery, $, $$ */
/*global _gaq, FB, twttr */
/* vim: set ft=javascript: */

Taken from the JSLint documentation, here is a little explanation of the customizable settings:

anon       true, if the space may be omitted in anonymous function declarations
bitwise    true, if bitwise operators should be allowed
browser    true, if the standard browser globals should be predefined
cap        true, if upper case HTML should be allowed
'continue' true, if the continuation statement should be tolerated
css        true, if CSS workarounds should be tolerated
debug      true, if debugger statements should be allowed
devel      true, if logging should be allowed (console, alert, etc.)
eqeq       true, if == should be allowed
es5        true, if ES5 syntax should be allowed
evil       true, if eval should be allowed
forin      true, if for in statements need not filter
fragment   true, if HTML fragments should be allowed
indent     the indentation factor
maxerr     the maximum number of errors to allow
maxlen     the maximum length of a source line
newcap     true, if constructor names capitalization is ignored
node       true, if Node.js globals should be predefined
nomen      true, if names may have dangling _
on         true, if HTML event handlers should be allowed
passfail   true, if the scan should stop on first error
plusplus   true, if increment/decrement should be allowed
properties true, if all property names must be declared with /*properties*/
regexp     true, if the . should be allowed in regexp literals
rhino      true, if the Rhino environment globals should be predefined
undef      true, if variables can be declared out of order
unparam    true, if unused parameters should be tolerated
sloppy     true, if the 'use strict'; pragma is optional
sub        true, if all forms of subscript notation are tolerated
vars       true, if multiple var statements per function should be allowed
white      true, if sloppy whitespace is tolerated
widget     true  if the Yahoo Widgets globals should be predefined
windows    true, if MS Windows-specific globals should be predefined

Basically, I’ve enabled browser global variables, set the “use strict” as optional, and I set some additional global variables for the external libs that are usually loaded on the pages.
You might disable several validations such as white spaces, multiple var statements and so on, but I think it’s better to get used to this way of coding, as it makes you improve the readability and the quality of the code that you write.

That’s it, now I’m looking for a way to validate JS code inside HTML files, but I haven’t found a solution yet. Do you have any ideas/suggestions?

Password Avoidance and more

I usually have to do many tasks that require to input a password, for instance, connecting by SSH, connecting to a mysql server, or login to several websites in several environments. This is something that has been bothering me for a long time, so I’ve eventually decided to write this post about password avoidance, to show how I usually deal with it.

SSH

Regarding the SSH access, there is a well-known solution that many people use. You can create a public/private key pair to authenticate, instead of typing the password. There are many manuals explaining how to do that, so summarizing, you have to follow this steps:

Generate the pair of keys on your computer :

ssh-keygen -t rsa

Then, you should have your keys on ~/.ssh/id_rsa (private) and ~/.ssh/id_rsa.pub (public).

Copy the public key to the server(s) (entering your password for last time!) and append it to the authorized_keys file:

scp ~/.ssh/id_rsa.pub your_user@your_server:~
ssh your_user@your_server
cat id_rsa.pub >> ~/.ssh/authorized_keys

Update 04/06/2013: Thanks to Christopher for this tip. You can get rid of all the previous commands, and just type the following:

ssh-copy-id -i .ssh/id_rsa.pub your_user@your_server

That’s it, now you should be able to log in to that server without entering a password.

MYSQL

If you usually have to deal with mysql databases, you’d probably find useful this section. You can easily customize your mysql prompt, just by creating/editing the file ~/.my.cnf. This is how mine looks:

[mysql]
user = root
password = my_password
prompt=\u@\h:[\d]>\_

I have set the default user and password, so I don’t have to enter the password when connecting to my localhost (or any host with this credentials). Note that this credentials will be used not only for the mysql command, but also for the mysqldump and mysqlimport.
On the other hand, I’ve added the last line, which I think is quite useful when you are using mysql client. Basically, it will display the prompt in the following format: user@host:[database]. This way, you will always know where are you connected, which user have you used and what database is being used.

Website Credentials

Speaking about website credentials, I’m currently using a browser extension called LastPass. It allows you to create a database of users and passwords URL-related, allowing ou to auto-fulfill and even auto-submit the login form when you load a known URL. On my experience, it’s very useful, as you can use it in both Chrome and Firefox, and you can share some/all credentials with several people (ie. all the development team).

However, it has some drawbacks/possible improvements from my point of view. First of all, there might be more than one user/password for the same URL (ie. admin and user role), and I’ve been unable to specify the priority of the credentials. Sometimes, the stored credentials aren’t valid anymore, and although there is a credential’s suggestion list on the form page, in my case, the list is useless most of times. It would be very nice if the suggestion list showed the credentials of the same domain in first place.

For instance, imagine I have three environments for my site: dev.mysite.com, preprod.mysite.com and www.mysite.com. Then you can assume that if this three sites are related, and the credentials might be exchanged from time to time.

I guess this extension wasn’t designed for developers, but for all kind of users, but that features would be very useful in my opinion.

Finally, this extension has some other cool features as well, like automatically filling registration forms. This feature has been added to Google Chrome lately, so now it’s not as valuable as before, but it’s worth to mention, as it can save you many time of filling the same registration form over and over.

Unix/Linux 

I wanted to talk as well about the passwords in Linux. Each time you have to edit/create a system file, for instance, add a new host to the /etc/hosts file, add a new virtual host on /etc/nginx/sites-available, set writting permissions to a certain folder, and so on, you have to use a sudo command, and therefore, type your password. I can’t tell how much time I’ve lost typing my password over and over. To avoid this there are many possible solutions.

You could just change the permisions/ownership of the file/folder that is bothering you, with sudo chmod 777 FILE / chown username:yourgroup FILE. This is fast and works fine, however, many people would complain because it’s very unsecure, as this files has restricted permissions for security reasons. In any case, if you are the only person who has access to the computer, you can do it, under your own responsability, and you shouldn’t have any problems.

If you wan’t to do it on a more elegant way, you might achieve the same result by customizing your sudoers file. All you have to do is safely open the file /etc/sudoers with your favourite editor by typing: “visudo /etc/sudoers” and append a new line at the bottom. Remember to put the new content under the line/s:

%sudo ALL=(ALL:ALL) ALL
%admin ALL=(ALL:ALL) ALL

Because this rules would override any line written before.

Imagine you want to be able to restart the nginx server, edit the /etc/hosts, poweroff the computer, and execute the chmod command without being ask for the password. You might do it by adding this line:

awesomeuser ALL=NOPASSWD: /etc/init.d/nginx, /usr/bin/gedit /etc/hosts, /sbin/poweroff, /bin/chmod

Note that the changes will not take effect until you open a new terminal.

This way you would avoid entering your password for all these tasks. However, use it under your responsability, and take into account that a misconfiguration might put your computer in risk. For instance, if you put /usr/bin/vi /etc/hosts, take into account that you can execute shell commands from vim, so anybody might type sudo vi /etc/hosts and execute sudo commands from the editor.

Remember that sometimes is better (safer) having to type the password before executing a command, it’s just up to you.

Customizing bashrc, bash aliases, and more – II

On my the previous post, I explained a few tricks that I use in order to move faster through my project. Básically, you can achieve that by customizing bashrc file on your home directory.

Before moving on to a new topic, I’d like to explain some more tips related to my last post. We created a function called “_sitedirs” that was used just as completion of the input of our function. Well, we can take profit of this function and create many more helpful functions.

For instance, if our application logs all the debug and error messages within a project-relative path, we could easily create a function to display them. In my case, all the projects are running on Magento, so by default the logs are being stored on Project/var/log/*.log. Then It’s fairly easy to display the app logs, but I wanted to display the webserver errors as well. I’m using Nginx, and all the project’s configuration are set to save the logs at /var/log/nginx/Proiect.*.log, where Project is exactly the same name of the proyect’s folder. There are two log files for each nginx’s site: the access and errors. I’m only interested on showing the errors, so this is how my function looks:


#Helper to display project log
function logg() {
 tail -f /var/www/dev.$@*/$@/var/log/* /var/log/nginx/dev.$@.*.error.log
}

And in order to use the tab completion, we just need to add the following line:

complete -F _sitedirs -o dirnames logg  

Now, I can type logg, then type any key and/or press [TAB] to complete the name of the project, and that’s it, you can browse trough your project and check out the console to debug it.

There are many other possible usages, like clearing the cache, enabling/disabling maintenance mode, and many more, your only limit is your imagination!

That’s all from now, on my next post I’ll try to explain my aversion to the passwords and how I try to work without having to type a single one (whenever it’s possible).

Customizing bashrc, bash aliases, and more – I

If you are used to work with the bash console, probably you have noticed that many tasks/commands are repeated very often. In order to improve the speed/productivity, I’m always customizing bashrc files, bash aliases, and creating helper commands whenever it is possible.

For instance, if you work in many different web projects, and you often need to jump between them, it’s very useful to have an alias that takes you to the root of projects. This can be achieved by adding an entry on your ~/.bash_aliases file. Let’s say all your projects are stored on /data/www, then, adding this line should be enough: www=’cd /data/www’. After that, you can directly move to your projects parent directory, just by typing www.

However, if you are as lazy as me, you may want to go beyond that. Probably, you want to jump directly to an specific project, instead of the parent directory. You cannot  pass a variable to an alias, but you can create your custom function on the ~/.bashrc file. In my particular case, all my web projects are stored like this: “/data/www/dev.SITENAME.(com|es|org)/SITENAME”, so that’s what I did:

#Helper to quickly jump to an specific project
function cdd() {
cd /data/www/dev.$@*/$@
}

Now, you can quickly jump to any project just by typing cdd and the project’s name. However, you still need to write the project name properly, which is a bit painful if the names are very long or even not in your language. Wouldn’t it be perfect if you could type cdd and then hit [TAB] for autocompletion with the list of all the available projects? Yes, we can! 🙂
Basically, we need another function that, given any input characters, outputs all the projects that begin with the specified name (or all, if no character was specified). Then, we will use this function as complete of the cdd previously created:

#Autocomplete for tab key displaying all installed sites
function _sitedirs(){
local curw
COMPREPLY=()
curw=${COMP_WORDS[COMP_CWORD]}
COMPREPLY=($(compgen -W '`ls /var/www/ | cut -d"." -f2`' -- $curw))
return 0}

Basically, I make an ls of the projects folder, then I cut the folder with the dot delimiter, and take just the second field, which contains the names of the projects. Then, I filter by the given input and store the result in COMPREPLY.

Finally, to get this working, just add the following line, that will output the available projects once you hit [TAB] key after typing cdd:

#Assigning the complete method to my custom functions
complete -F _sitedirs -o dirnames cdd

If you want to learn more about how bash completion works, I recommend you to read this articles.

Note: Each time you edit your .bash_aliases or .bashrc, the changes will not take effect until you re-login, but you can reload them just by typing:

source ~/.bashrc