notifyDataSetChanged() – Android Example [Updated]

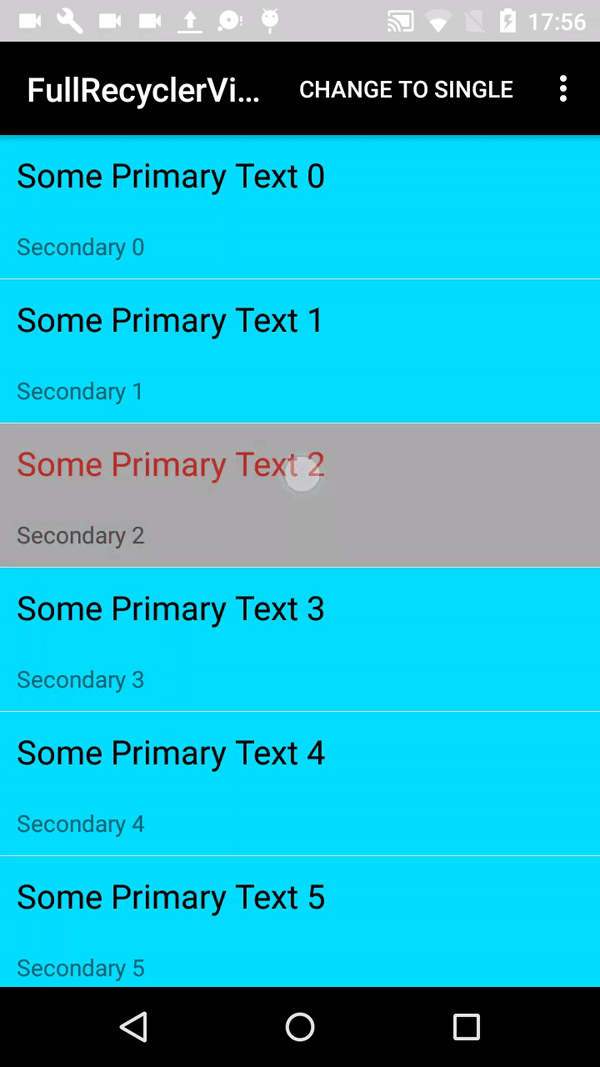
notifyDataSetChanged() example:

This android function notifies the attached observers that the underlying data has been changed and any View reflecting the data set should refresh itself.

You can use notifyDataSetChanged ArrayAdapter, but it only works if you use the add(), insert(), remove(), and clear() on the Adapter.

When an ArrayAdapter or BaseAdapter are constructed, it holds the reference for the List that was passed in. If you were to pass in a List that was a member of an Activity, and change that Activity member later, the ArrayAdapter is still holding a reference to the original List. The Adapter does not know you changed the List in the Activity.

How to implement notifyDataSetChanged

Your choices are:

Use the functions of the ArrayAdapter to modify the underlying List (add(), insert(), remove(), clear(), etc.)
Re-create the ArrayAdapter with the new List data. (Uses a lot of resources and garbage collection.)
Create your own class derived from BaseAdapter and ListAdapter that allows changing of the underlying List data structure.
Use the notifyDataSetChanged() every time the list is updated. To call it on the UI-Thread, use the runOnUiThread() of Activity. Then, notifyDataSetChanged() will work.

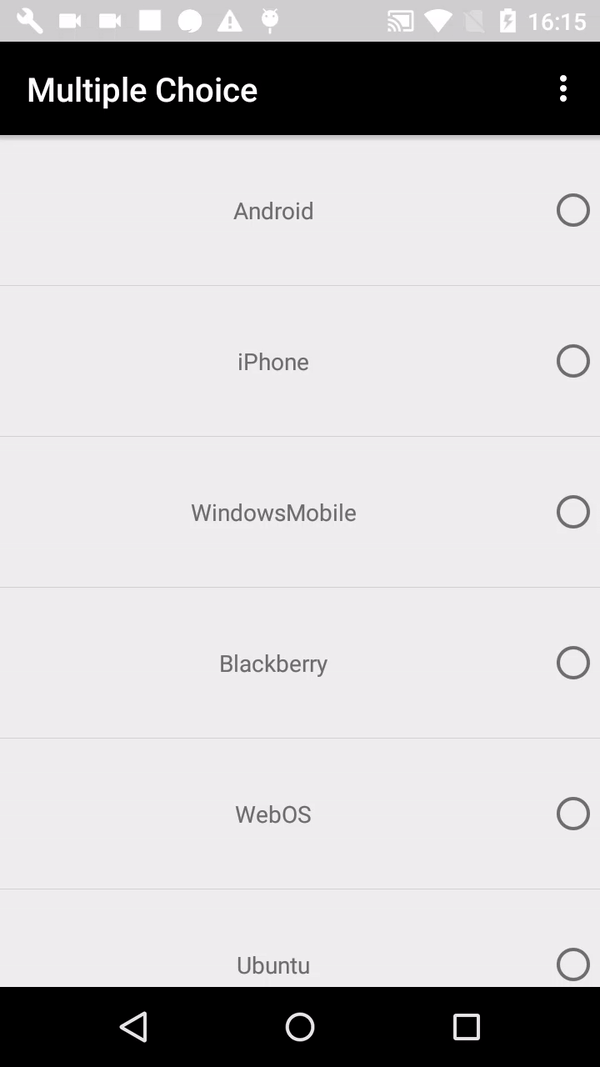
Multiple choice in listView
You need:

Interface
Data (String text, boolean selected)
Adapter
Fragment or Activity (calling notifyDataSetChanged custom adapter)
list_item.xml

You can start with data:

public class MultipleData {
    private String text;
    private boolean selected;

    public MultipleData(String text, boolean selected) {
        this.text = text;
        this.selected = selected;
    }

    public String getText() {
        return text;
    }

    public void setText(String text) {
        this.text = text;
    }

    public boolean isSelected() {
        return selected;
    }

    public void setSelected(boolean selected) {
        this.selected = selected;
    }
}

list_item.xml

<RelativeLayout xmlns:android="http://schemas.android.com/apk/res/android"
    android:layout_width="match_parent"
    android:layout_height="match_parent">

    <TextView
        android:id="@+id/list_item_text"
        android:layout_width="match_parent"
        android:layout_height="90dp"
        android:text="@string/app_name"
        android:layout_toLeftOf="@+id/list_item_check_button"
        android:gravity="center"/>

    <RadioButton
        android:id="@+id/list_item_check_button"
        android:layout_width="wrap_content"
        android:layout_height="90dp"
        android:layout_alignParentRight="true"
        android:checked="false"
        android:clickable="false"
        android:focusable="false" />

</RelativeLayout>

activity_mail.xml

<RelativeLayout xmlns:android="http://schemas.android.com/apk/res/android"
        xmlns:tools="http://schemas.android.com/tools"
        android:layout_width="match_parent"
        android:layout_height="match_parent"
        tools:context=".MainActivity">

        <ListView
            android:id="@+id/fragment_multiple_list_view"
            android:layout_width="wrap_content"
            android:layout_height="wrap_content" />

</RelativeLayout>

Adapter

public class MultipleAdapter extends BaseAdapter implements SelectedIndex {

    private final Context mContext;
    List&amp;lt;MultipleData&amp;gt; mList;

    @Override
    public void setSelectedIndex(int position) {

        if (mList.get(position).isSelected()) {
            mList.get(position).setSelected(false);
        } else {
            mList.get(position).setSelected(true);
        }
    }

    static class ViewHolder {
        TextView mTextView;
        RadioButton mRadioButton;
    }

    public MultipleAdapter(Context context, List&amp;lt;MultipleData&amp;gt; list) {
        this.mContext = context;
        this.mList = list;
    }

    @Override
    public int getCount() {
        return mList.size();
    }

    @Override
    public Object getItem(int position) {
        return null;
    }

    @Override
    public long getItemId(int position) {
        return 0;
    }

    @Override
    public View getView(int position, View convertView, ViewGroup parent) {
        View rowView = convertView;

        if (rowView == null) {
            LayoutInflater inflater = (LayoutInflater) mContext.getSystemService(Context.LAYOUT_INFLATER_SERVICE);
            rowView = inflater.inflate(R.layout.list_item, null);

            ViewHolder viewHolder = new ViewHolder();
            viewHolder.mTextView = (TextView) rowView.findViewById(R.id.list_item_text);
            viewHolder.mRadioButton = (RadioButton) rowView.findViewById(R.id.list_item_check_button);

            rowView.setTag(viewHolder);
        }

        // fill data
        ViewHolder holder = (ViewHolder) rowView.getTag();
        holder.mTextView.setText(mList.get(position).getText());
        holder.mRadioButton.setChecked(mList.get(position).isSelected());

        return rowView;
    }

} 

Interface

public interface SelectedIndex {
    void setSelectedIndex(int position);
}

In your fragment or activity:

public class MultipleFragment extends Fragment implements AdapterView.OnItemClickListener {

    MultipleAdapter mAdapter;

    public MultipleFragment() {
        // Required empty public constructor
    }

    public static MultipleFragment newInstance() {
        return new MultipleFragment();
    }

    @Override
    public void onCreate(Bundle savedInstanceState) {
        super.onCreate(savedInstanceState);
    }

    @Override
    public View onCreateView(LayoutInflater inflater, ViewGroup container,
                             Bundle savedInstanceState) {
        // Inflate the layout for this fragment
        View view = inflater.inflate(R.layout.fragment_multiple, container, false);
        ListView listView = (ListView) view.findViewById(R.id.fragment_multiple_list_view);

        MultipleData android = new MultipleData("Android", false);
        MultipleData iPhone = new MultipleData("iPhone", false);
        MultipleData windowsMobile = new MultipleData("WindowsMobile", false);

        MultipleData blackberry = new MultipleData("Blackberry", false);
        MultipleData webOS = new MultipleData("WebOS", false);
        MultipleData ubuntu = new MultipleData("Ubuntu", false);

        MultipleData windows7 = new MultipleData("Windows7", false);
        MultipleData max = new MultipleData("Max OS X", false);
        MultipleData linux = new MultipleData("Linux", false);

        MultipleData os = new MultipleData("OS/2", false);
        MultipleData symbian = new MultipleData("Symbian", false);

        List&amp;lt;MultipleData&amp;gt; list = new ArrayList&amp;lt;&amp;gt;();
        list.add(0, android);
        list.add(1, iPhone);
        list.add(2, windowsMobile);

        list.add(3, blackberry);
        list.add(4, webOS);
        list.add(5, ubuntu);

        list.add(6, windows7);
        list.add(7, max);
        list.add(8, linux);

        list.add(9, os);
        list.add(10, symbian);

        mAdapter = new MultipleAdapter(getActivity(),list);
        listView.setAdapter(mAdapter);
        listView.setOnItemClickListener(this);
        return view;
    }

    @Override
    public void onItemClick(AdapterView&amp;lt;?&amp;gt; adapterView, View view, int position, long l) {
        mAdapter.setSelectedIndex(position);
        mAdapter.notifyDataSetChanged();
    }
}

You can download the source code of this example in github.

If you have any questions about the usage of notifyDataSetChanged leave a comment below and we’ll try to help you.

Happy coding!

Unit testing retrofit RxJava

Unit testing retrofit RxJava

ReactiveX is a combination of the best ideas from the Observer pattern, the Iterator pattern, and functional programming.

RxAndroid is an extension to RxJava. It providers a scheduler to run code in the main thread of Android. It also provides the ability to create a scheduler that runs on a Android handler class. With this schedulers, you can define an observable which does its work in a background thread, and post our results to the main thread. This allows for example to replace a AsyncTask implementations which RxJava.

The subscriber observes in the main thread
Observable is called outside the main thread

To manage RxJava is not so difficult, When we have to use RxJava in Unit test, We need to create these element:

1. BaseSchedulerProvider (Father)
2. ImmediateSchedulerProvider (Testing)
3. SchedulerProvider (Application)

Android Test, Unit testing retrofit RxJava
You can check my complete example in GitHub

BaseSchedulerProvider :

public interface BaseSchedulerProvider {

    @NonNull
    Scheduler computation();

    @NonNull
    Scheduler io();

    @NonNull
    Scheduler ui();
}

ImmediateSchedulerProvider I use for a test:

public class ImmediateSchedulerProvider implements BaseSchedulerProvider {

    @NonNull
    @Override
    public Scheduler computation() {
        return Schedulers.immediate();
    }

    @NonNull
    @Override
    public Scheduler io() {
        return Schedulers.immediate();
    }

    @NonNull
    @Override
    public Scheduler ui() {
        return Schedulers.immediate();
    }
}

And SchedulerProvider I use in my Presenter

public class SchedulerProvider implements BaseSchedulerProvider {

    // Prevent direct instantiation.
    public SchedulerProvider() {
    }

    @Override
    @NonNull
    public Scheduler computation() {
        return Schedulers.computation();
    }

    @Override
    @NonNull
    public Scheduler io() {
        return Schedulers.io();
    }

    @Override
    @NonNull
    public Scheduler ui() {
        return AndroidSchedulers.mainThread();
    }
}

In my PresenterTest I setUp like this:

public class TopicPresenterTest {

            @Mock
            private RemoteDataSource mRemoteDataSource;

            @Mock
            private TopicContract.View mView;

            private BaseSchedulerProvider mSchedulerProvider;

            TopicPresenter mPresenter;

            List<Topics> mList;

            @Before
            public void setup() {
            MockitoAnnotations.initMocks(this);

                    Topics topics = new Topics(1, "Discern The Beach");
                    Topics topicsTwo = new Topics(2, "Discern The Football Player");
                    mList = new ArrayList<>();
                    mList.add(topics);
                    mList.add(topicsTwo);
//ADD IMMEDIATESCHEDULERPROVIDER !!!!!!!!!!!!!!!
                    mSchedulerProvider = new 
                    ImmediateSchedulerProvider();

                    mPresenter = new TopicPresenter(mRemoteDataSource, mView, mSchedulerProvider);

            }

            @Test
            public void fetchData() {

                when(mRemoteDataSource.getTopicsRx())
                        .thenReturn(rx.Observable.just(mList));

                mThemePresenter.fetch();

                InOrder inOrder = Mockito.inOrder(mView);
                inOrder.verify(mView).setLoadingIndicator(false);
                inOrder.verify(mView).showTopics(mList);

            }

}

And In my Presenter I call to my server with retrofit:

public class TopicPresenter {

    @NonNull
    private BaseSchedulerProvider mSchedulerProvider;

    public TopicPresenter(@NonNull RemoteDataSource remoteDataSource, @NonNull TopicContract.View view) {
                    this.mRemoteDataSource = checkNotNull(remoteDataSource, "remoteDataSource");
                    this.mView = checkNotNull(view, "view cannot be null!");
                    this.mSchedulerProvider = new SchedulerProvider();
 //ADD COMPOSITESUBSCRITPTION !!!!!!     
                    mSubscriptions = new CompositeSubscription();

                    mView.setPresenter(this);
    }

    @Override
    public void fetch() {

        Subscription subscription = mRemoteDataSource.getTopicsRx()
                .subscribeOn(mSchedulerProvider.computation())
                .observeOn(mSchedulerProvider.ui())
                .subscribe((List<Topics> listTopics) -> {
                            mView.setLoadingIndicator(false);
                            mView.showTopics(listTopics);
                        },
                        (Throwable error) -> {
                            try {
                                mView.showError();
                            } catch (Throwable t) {
                                throw new IllegalThreadStateException();
                            }

                        },
                        () -> {
                        });

        mSubscriptions.add(subscription);
    }

    @Override
    public void subscribe() {
        fetch();
    }

    @Override
    public void unSubscribe() {
        mSubscriptions.clear();
    }


}

You can check my complete example in GitHub

how to highlight the selected Item of Recycler View?

how to highlight the selected Item of Recycler View?

We can find several ways to highlight the selected Item of Recycler View.
In this case We can use SparseBooleanArray, SparseBooleanArrays map integers to booleans. Unlike a normal array of booleans there can be gaps in the indices. It is intended to be more memory efficient than using a HashMap to map Integers to Booleans, both because it avoids auto-boxing keys and values and its data structure doesn’t rely on an extra entry object for each mapping.

Complete Code in GitHub
Now in our Adapter We can see how to use SparseBooleanArray.
First step We create a selected background

Create a new Drawable resource file in your drawable directory with the following content:

selector_row.xml

<?xml version="1.0" encoding="utf-8"?>
<selector xmlns:android="http://schemas.android.com/apk/res/android">
    <!-- Color when the row is selected -->
    <item android:drawable="@android:color/darker_gray" android:state_pressed="false" android:state_selected="true" />
    <!-- Standard background color -->
    <item android:drawable="@android:color/white" android:state_selected="false" />
</selector>

Now simply use this StateListDrawable as the background in the row-layout of your RecyclerView

<RelativeLayout xmlns:android="http://schemas.android.com/apk/res/android"
    android:layout_width="match_parent"
    android:layout_height="wrap_content"
    android:background="@drawable/selector_row">

    <!-- row content -->
</RelativeLayout>

Now as soon as the onClick() method in your adapter is called you simply need to do the following:

// myBackground is the RelativeLayout root of your row
myBackground.setSelected(true);
The rows’ background will have the color (in this case darker_gray) as long as you call myBackground.setSelected(false). Of course you should create a SparseBooleanArray for example in order to know which row is selected and which isn’t since the rows will be reused when scrolling.

Edit: Remember selected items
The idea behind the SparseBooleanArray is to remember the items which are selected. Following a sample on how to use it:


public class UpdateDataAdapter extends RecyclerView
        .Adapter<UpdateDataAdapter
        .DataObjectHolder> {

    private ArrayList<UpdateData> mDataset;
    private static Context mContext;
    private static int mPosition;
    private static SparseBooleanArray sSelectedItems;
    private static UpdateDataClickListener sClickListener;

    static class DataObjectHolder extends RecyclerView.ViewHolder
            implements View
            .OnClickListener {
        TextView mLabel;
        TextView mDateTime;
        LinearLayout mBackground;


        DataObjectHolder(View itemView) {
            super(itemView);
            mLabel = (TextView) itemView.findViewById(R.id.vertical_list_item_title);
            mDateTime = (TextView) itemView.findViewById(R.id.vertical_list_item_subtitle);
            mBackground = (LinearLayout) itemView.findViewById(R.id.vertical_list_item_background);
            itemView.setOnClickListener(this);

        }

        @Override
        public void onClick(View v) {
            if (sSelectedItems.get(getAdapterPosition(), false)) {
                sSelectedItems.delete(getAdapterPosition());
                mBackground.setSelected(false);
                mLabel.setTextColor(ContextCompat.getColor(mContext, android.R.color.black));
            } else {    
            
                mLabel.setTextColor(ContextCompat.getColor(mContext, R.color.colorAccent));
                sSelectedItems.put(getAdapterPosition(), true);
                mBackground.setSelected(true);
            }
            sClickListener.onItemClick(getAdapterPosition());
        }
    }

    void setOnItemClickListener(UpdateDataClickListener clickListener) {
        sClickListener = clickListener;
    }

    UpdateDataAdapter(ArrayList<UpdateData> myDataset, Context context, int modo) {
        mDataset = myDataset;
        mContext = context;
        sSelectedItems = new SparseBooleanArray();
     }

    @Override
    public UpdateDataAdapter.DataObjectHolder onCreateViewHolder(ViewGroup parent,
                                                                 int viewType) {
        View view = LayoutInflater.from(parent.getContext())
                .inflate(R.layout.vertical_list_item, parent, false);

        UpdateDataAdapter.DataObjectHolder dataObjectHolder = new UpdateDataAdapter.DataObjectHolder(view);
        return dataObjectHolder;
    }

    @Override
    public void onBindViewHolder(UpdateDataAdapter.DataObjectHolder holder, int position) {
        holder.mLabel.setText(mDataset.get(position).getmTitle());
        if (sSelectedItems.get(position)) {
            holder.mLabel.setTextColor(ContextCompat.getColor(mContext, R.color.colorAccent));
        } else {
            holder.mLabel.setTextColor(ContextCompat.getColor(mContext, android.R.color.black));
        }
        holder.mDateTime.setText(mDataset.get(position).getmSubTitle());
        holder.mBackground.setSelected(sSelectedItems.get(position, false));
    }

    @Override
    public int getItemCount() {
        return mDataset.size();
    }

    public void selected(int position) {
       
    }

    public void changeMode(int modo) {
      
    }

    interface UpdateDataClickListener {
        void onItemClick(int position);
    }

}

This is one way how to highlight the selected Item of Recycler View.

Complete Code in GitHub

View over keyboard

View over keyboard

Sometimes We need more space when the keyboard it’s open, the solution can be to put a view over keyboard.

Complete Code in GitHub

We try this way, we have to create a popup in our activity


public void showPopUpKeyboard() {
        mIsPopupVisible = true;
        // Initialize a new instance of LayoutInflater service
        LayoutInflater inflater = (LayoutInflater) getSystemService(LAYOUT_INFLATER_SERVICE);

        // Inflate the custom layout/view
        View customView = inflater.inflate(R.layout.popup_in_keyboard, null);


        mScrollView = (ScrollView) customView.findViewById(R.id.keyboard_layout_view);
        // Initialize a new instance of popup window
        mPopupWindow = new PopupWindow(
                customView,
                RelativeLayout.LayoutParams.MATCH_PARENT,
                RelativeLayout.LayoutParams.MATCH_PARENT
        );


        setSizeForSoftKeyboard();

        // Get a reference for the custom view close button
        Button closeButton = (Button) customView.findViewById(R.id.ib_close);

        // Set a click listener for the popup window close button
        closeButton.setOnClickListener((View view) -> {
                // Dismiss the popup window
                mIsPopupVisible = false;
                mPopupWindow.dismiss();
        });
        mPopupWindow.showAtLocation(mParentLayout, Gravity.CENTER, 0, 0);

    }

And to know our height of keyboard with getViewTreeObserver, you can put this code in our onCreate in Activity

mParentLayout.getViewTreeObserver().addOnGlobalLayoutListener(() -> {
                Rect r = new Rect();

                mParentLayout.getWindowVisibleDisplayFrame(r);

                int heightDiff = mParentLayout.getRootView().getHeight() - (r.bottom - r.top);
                if (heightDiff > 100) {
                    //enter your code here
                    if (mIsPopupVisible) {
                        keepKeyboard();
                        mIsPopupVisible = false;
                        mPopupWindow.dismiss();
                    }
                } else {
                    //enter code for hid
                }
        });

This is my screen in my popup screen, but you can changes whatever you want.

<?xml version="1.0" encoding="utf-8"?>
<RelativeLayout xmlns:android="http://schemas.android.com/apk/res/android"
    android:id="@+id/keyboard_rootView"
    android:layout_width="match_parent"
    android:layout_height="match_parent">

    <Button
        android:id="@+id/ib_close"
        android:layout_width="match_parent"
        android:layout_height="match_parent"
        android:layout_above="@+id/keyboard_layout_view"
        android:background="@android:color/transparent" />

    <ScrollView
        android:id="@+id/keyboard_layout_view"
        android:layout_width="match_parent"
        android:layout_height="wrap_content"
        android:layout_alignParentBottom="true">

        <RelativeLayout
            android:layout_width="match_parent"
            android:layout_height="match_parent"
            android:background="@android:color/white">

            <RelativeLayout

                android:id="@+id/keyboard_video"
                android:layout_width="wrap_content"
                android:layout_height="wrap_content"
                android:layout_centerHorizontal="true"
                android:layout_toLeftOf="@+id/keyboard_image_photo_image">

                <ImageButton
                    android:id="@+id/keyboard_video_button"
                    android:layout_width="wrap_content"
                    android:layout_height="wrap_content"
                    android:layout_margin="@dimen/activity_messenger_margin_elements"
                    android:background="@drawable/attach_circle"
                    android:src="@drawable/ic_message_videocam" />

                <TextView
                    android:layout_width="wrap_content"
                    android:layout_height="wrap_content"
                    android:layout_below="@+id/keyboard_video_button"
                    android:layout_centerHorizontal="true"
                    android:paddingBottom="@dimen/activity_messenger_margin_elements"
                    android:text="@string/activity_messenger_video" />

            </RelativeLayout>

            <ImageButton
                android:id="@+id/keyboard_image_photo_image"
                android:layout_width="wrap_content"
                android:layout_height="wrap_content"
                android:layout_centerHorizontal="true"
                android:layout_margin="@dimen/activity_messenger_margin_elements"
                android:background="@drawable/attach_circle"
                android:src="@drawable/ic_message_camera" />

            <TextView
                android:id="@+id/keyboard_image_photo_text"
                android:layout_width="wrap_content"
                android:layout_height="wrap_content"
                android:layout_below="@+id/keyboard_image_photo_image"
                android:layout_centerHorizontal="true"
                android:paddingBottom="@dimen/activity_messenger_margin_elements"
                android:text="@string/activity_messenger_photo" />


            <RelativeLayout
                android:layout_width="wrap_content"
                android:layout_height="wrap_content"
                android:layout_toRightOf="@+id/keyboard_image_photo_image">

                <ImageButton
                    android:id="@+id/keyboard_album_image"
                    android:layout_width="wrap_content"
                    android:layout_height="wrap_content"
                    android:layout_margin="@dimen/activity_messenger_margin_elements"
                    android:background="@drawable/attach_circle"
                    android:src="@drawable/ic_message_album" />

                <TextView
                    android:layout_width="wrap_content"
                    android:layout_height="wrap_content"
                    android:layout_below="@+id/keyboard_album_image"
                    android:layout_centerHorizontal="true"
                    android:paddingBottom="@dimen/activity_messenger_margin_elements"
                    android:text="@string/activity_messenger_album" />

            </RelativeLayout>

            <RelativeLayout
                android:id="@+id/keyboard_audio_relative_layout"
                android:layout_width="wrap_content"
                android:layout_height="wrap_content"
                android:layout_below="@+id/keyboard_image_photo_text"
                android:layout_toLeftOf="@+id/keyboard_location_button">

                <ImageButton
                    android:id="@+id/keyboard_audio_button"
                    android:layout_width="wrap_content"
                    android:layout_height="wrap_content"
                    android:layout_alignParentLeft="true"
                    android:layout_alignParentStart="true"
                    android:layout_alignParentTop="true"
                    android:layout_margin="@dimen/activity_messenger_margin_elements"
                    android:background="@drawable/attach_circle"
                    android:src="@drawable/ic_message_voice" />

                <TextView
                    android:layout_width="wrap_content"
                    android:layout_height="wrap_content"
                    android:layout_below="@+id/keyboard_audio_button"
                    android:layout_centerHorizontal="true"
                    android:paddingBottom="@dimen/activity_messenger_margin_elements"
                    android:text="@string/activity_messenger_audio" />
            </RelativeLayout>

            <ImageButton
                android:id="@+id/keyboard_location_button"
                android:layout_width="wrap_content"
                android:layout_height="wrap_content"
                android:layout_below="@+id/keyboard_image_photo_text"
                android:layout_centerHorizontal="true"
                android:layout_margin="@dimen/activity_messenger_margin_elements"
                android:background="@drawable/attach_circle"
                android:src="@drawable/ic_message_location" />

            <TextView
                android:id="@+id/keyboard_location_text"
                android:layout_width="wrap_content"
                android:layout_height="wrap_content"
                android:layout_below="@+id/keyboard_location_button"
                android:layout_centerHorizontal="true"
                android:paddingBottom="@dimen/activity_messenger_margin_elements"
                android:text="@string/activity_messenger_location" />

            <RelativeLayout
                android:id="@+id/keyboard_contact_relative_layout"
                android:layout_width="wrap_content"
                android:layout_height="wrap_content"
                android:layout_below="@+id/keyboard_image_photo_text"
                android:layout_toRightOf="@+id/keyboard_location_button">

                <ImageButton
                    android:id="@+id/keyboard_contact_button"
                    android:layout_width="wrap_content"
                    android:layout_height="wrap_content"
                    android:layout_margin="@dimen/activity_messenger_margin_elements"
                    android:background="@drawable/attach_circle"
                    android:src="@drawable/ic_contacts_white" />

                <TextView
                    android:id="@+id/keyboard_contact_text"
                    android:layout_width="wrap_content"
                    android:layout_height="wrap_content"
                    android:layout_below="@+id/keyboard_contact_button"
                    android:layout_centerHorizontal="true"
                    android:paddingBottom="@dimen/activity_messenger_margin_elements"
                    android:text="@string/activity_messenger_contact" />
            </RelativeLayout>

            <RelativeLayout
                android:id="@+id/keyboard_document_relative_layout"
                android:layout_width="wrap_content"
                android:layout_height="wrap_content"
                android:layout_below="@+id/keyboard_location_text"
                android:layout_toLeftOf="@+id/keyboard_link_button">

                <ImageButton
                    android:id="@+id/keyboard_document_relative_button"
                    android:layout_width="wrap_content"
                    android:layout_height="wrap_content"
                    android:layout_margin="@dimen/activity_messenger_margin_elements"
                    android:background="@drawable/attach_circle"
                    android:src="@drawable/ic_message_file" />

                <TextView
                    android:layout_width="wrap_content"
                    android:layout_height="wrap_content"
                    android:layout_below="@+id/keyboard_document_relative_button"
                    android:layout_centerHorizontal="true"
                    android:paddingBottom="@dimen/activity_messenger_margin_elements"
                    android:text="@string/activity_messenger_document" />
            </RelativeLayout>

            <ImageButton
                android:id="@+id/keyboard_link_button"
                android:layout_width="wrap_content"
                android:layout_height="wrap_content"
                android:layout_below="@+id/keyboard_location_text"
                android:layout_centerHorizontal="true"
                android:layout_margin="@dimen/activity_messenger_margin_elements"
                android:background="@drawable/attach_circle"
                android:src="@drawable/ic_message_link" />

            <TextView
                android:layout_width="wrap_content"
                android:layout_height="wrap_content"
                android:layout_below="@+id/keyboard_link_button"
                android:layout_centerHorizontal="true"
                android:paddingBottom="@dimen/activity_messenger_margin_elements"
                android:text="@string/activity_messenger_link" />

            <RelativeLayout
                android:id="@+id/keyboard_save_relative_layout"
                android:layout_width="wrap_content"
                android:layout_height="wrap_content"
                android:layout_below="@+id/keyboard_location_text"
                android:layout_toRightOf="@+id/keyboard_link_button">

                <ImageButton
                    android:id="@+id/keyboard_save_button"
                    android:layout_width="wrap_content"
                    android:layout_height="wrap_content"
                    android:layout_margin="@dimen/activity_messenger_margin_elements"
                    android:background="@drawable/attach_circle"
                    android:src="@drawable/ic_message_save" />

                <TextView
                    android:layout_width="wrap_content"
                    android:layout_height="wrap_content"
                    android:layout_below="@+id/keyboard_save_button"
                    android:layout_centerHorizontal="true"
                    android:paddingBottom="@dimen/activity_messenger_margin_elements"
                    android:text="@string/activity_messenger_save" />
            </RelativeLayout>

        </RelativeLayout>
    </ScrollView>

</RelativeLayout>

Complete Code in GitHub

Best Way To Compare Dates

<h1>Best Way To Compare Dates in Android</h1>

Sometimes we need to do a list with dates, like

today with hour

yesterday with yesterday

other days with 23/06/2017

To make this we need to compare current time with our data.

Example in GitHub

Public class DateUtil {

    Public static int getDateDayOfMonth (Date date) {
        Calendar calendar = Calendar.getInstance ();
        Calendar.setTime (date);
        Return calendar.get (Calendar.DAY_OF_MONTH);
    }

    Public static int getCurrentDayOfMonth () {
        Calendar calendar = Calendar.getInstance ();
        Return calendar.get (Calendar.DAY_OF_MONTH);
    }

    Public static String convertMillisSecondsToHourString (long millisSecond) {
        Date date = new Date (millisSecond);
        Format formatter = new SimpleDateFormat ("HH: mm");
        Return formatter.format (date);
    }

    Public static String convertMillisSecondsToDateString (long millisSecond) {
        Date date = new Date (millisSecond);
        Format formatter = new SimpleDateFormat ("dd / MM / yyyy");
        Return formatter.format (date);
    }

    Public static long convertToMillisSecond (Date date) {
        Return date.getTime ();
    }

    Public static String compare (String stringData, String yesterday) {

        String result = "";

        SimpleDateFormat simpleDateFormat = new SimpleDateFormat ("yyyy-MM-dd HH: mm: ss");
        Date date = null;

        Try {
            Date = simpleDateFormat.parse (stringData);
        } Catch (ParseException e) {
            E.printStackTrace ();
        }

        Long millisSecond = convertToMillisSecond (date);
        Long currencyMillisSecond = System.currentTimeMillis ();

        If (currencyMillisSecond> millisSecond) {
            Long diff = currencyMillisSecond - millisSecond;
            Long day = 86400000L;

            If (diff <day && getCurrentDayOfMonth () == getDateDayOfMonth (date)) {
                Result = convertMillisSecondsToHourString (millisSecond);

            } Else if (diff <(day * 2) && getCurrentDayOfMonth () -1 == getDateDayOfMonth (date)) {
                Result = yesterday;
            } Else {
                Result = convertMillisSecondsToDateString (millisSecond);
            }
        }

        Return result;
    }
}